fbpx
Your first step to recovery

Ankle injuries – Your first step to recovery

Common? Oh Yes!

The ankle is the most commonly injured joint in sport. This does not exclude other people such as active hikers, beach goers and even your average Sunday stroller. Good news though – your ankle injury is highly likely to be uncomplicated.

It is still vital that your ankle is examined, evaluated and treated early. This will ensure a swift return to activity and prevent further complications.


The road to recovery

Planning for Resiliency and the Road to Recovery

Your clinician will ask you some questions related to how you injured your ankle, pain, instability and any past episodes of injury. The earlier you get your ankle checked, the sooner your recovery will begin.

Keeping a mental note of things like initial pain, swelling, ability to walk and balance will go a long way in assisting your clinician to making an accurate diagnosis.


Investigations

Ankle x-rays

In most cases, initial X – rays are done to rule out broken bones.

Ultrasounds can be used to diagnose some ligament and tendon damage.

MRI is the best form of imaging but this does come at a higher cost and higher exposure to radiation. These are usually done after failed conservative treatment or in instances where pain remains high for longer periods.

A CT scan is helpful with complicated foot and ankle fractures. It will normally be ordered by a specialist surgeon who is planning for an operation.


What to look out for
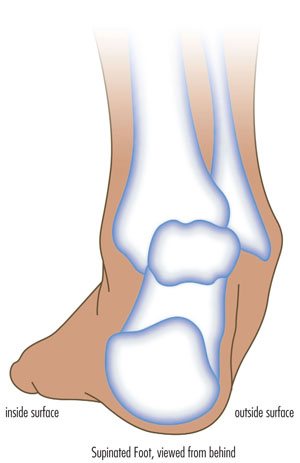
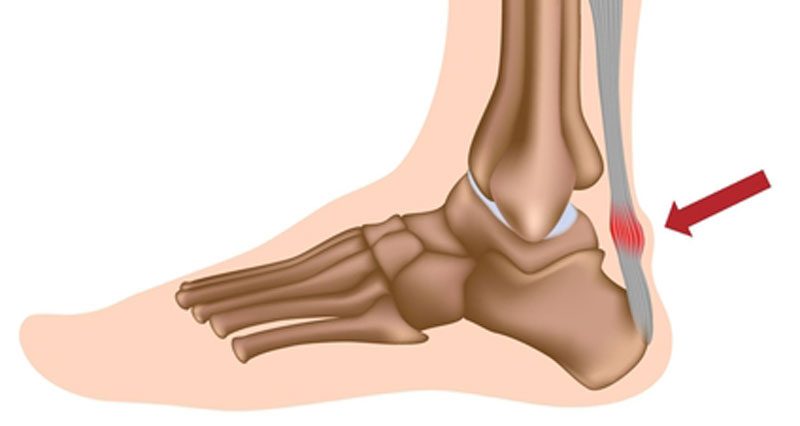
Ankle sprains:

This is normally a twisting injury that causes a stretch or tear of ligaments surrounding the ankle. Your health care professional will provide you with all the information and tools you need for recovery.

These heal relatively quickly when the outside border of the foot is affected and a little slower when the inside border of the ankle is affected.

You will normally feel pain on certain ankle movements, stiffness in the ankle and experience some swelling and bruising.

Ankle - Wikipedia


Ankle Fractures:

These normally present with swelling, bruising and pain initially – although not always. In some cases, it is too painful to put weight on the ankle.

They are usually best confirmed with X – ray and specialist referral.

Management may be surgical or non-surgical depending on the severity and site of the fracture.

Fractures generally take longer to recover compared to sprains.


What treatment to expect

Foot and Ankle Doctor | EmergeOrtho—Triangle Region

Acute phase:

Your healthcare professional will normally initiate techniques to minimise your pain and swelling with rest, ice, compression and elevation.

Analgesia and anti – inflammatory medication may also be used.

Strapping may be used for stability at this stage and can be done by your physiotherapist.

You will also be encouraged to increase movement and begin strengthening.


Rehabilitation phase:

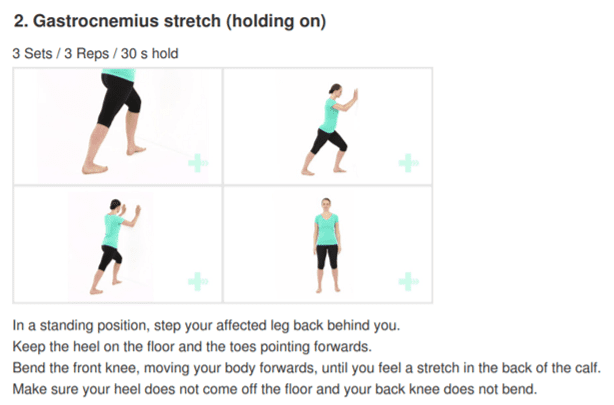
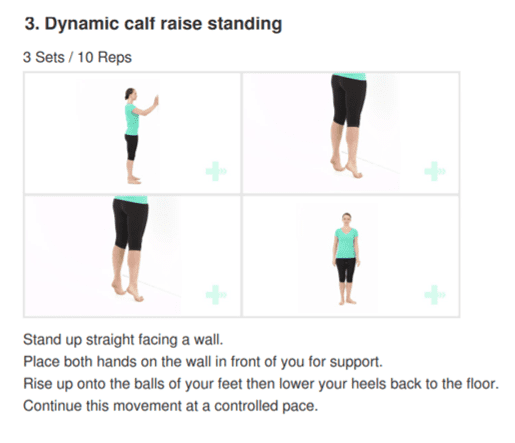
Balance and proprioceptive exercises will be given to you by your physiotherapist.

Strengthening will continue and running will start soon.

Once running in a linear motion pain free, you will progress to sport specific exercises.

Finally, you will return to sport or previous function such as trekking with a graded program.

Strapping may continue for up to 12 months after your injury in order to prevent re–injury.


What can you do on the day of the injury?

Rest by reducing time spent walking or standing. This will help the ankle to heal.

Ice the ankle for up to 20 minutes every couple of hours.

Compress the ankle with a firm bandage during the day and remove the bandage at night.

Elevate the leg.

Attempt circulatory exercises such as ankle circles and foot pumps (About 10 – 30 repetitions every couple of hours).

Contact your health professional or physiotherapist in order to make appointment for assessment.

If you are unable to stand on your leg or have excruciating pain in the ankle, head on to the local emergency department for immediate investigation.


Remember, your injury will heal and you will recover!


To find your nearest Physio Fusion clinic and book an appointment call 09 6266186 or visit our website https://physiofusion.co.nz

The myth about foot pronation (flat foot)

Myth: Foot pronation(flat foot) is the enemy.

Quest - Article - Surgery Sometimes, Bracing Often, Caution Always |  Muscular Dystrophy Association

In the foot, pronation should occur naturally when the foot comes into contact with the ground. Pronation will appear as the foot rolling inward and the arch flattening.

What are the benefits?

  • Dissipates the force that the foot receives from the ground

  • Allows the foot to become a stable and mobile adaptor to enhance movement opportunity

  • Loads the muscles of the extensor chain (calf, quads, glutes) to convert ground reaction forces into forward momentum so we can propel efficiently.

So why have I been told this is bad?

So as you are now aware, pronation is very normal and a critical movement to ensure we move and propel ourselves forward efficiently.

What you may have heard someone say to you is that you ‘overpronate’?

Firstly, overpronation is subjective and not as black and white as it is sometimes made out to be. Overpronation has be defined as: ‘a foot that rolls inward toward the arch excessively’.

Foot Pronation: Underpronation & overpronation explained- The Foot Clinic

What we must understand is that a pronation can only happen when the foot has a stable tripod on the ground. This means that the calcaneus (heel bone), 1st metatarsal (big toe knuckle), 5th metatarsal (little toe knuckle) must all remain in contact when the foot rolls inwards and the arch flattens.

The Foot Tripod - Fix Flat Feet

So, If you have been told you are ‘overpronated’ , it is most likely that your whole foot is ‘everting’ NOT ‘overpronating’.

What is Eversion?

Eversion can be defined as: ‘the process of turning inside-out’.

In pronation your heel must naturally ‘evert’ (sole of the heel will move away from the midline of the body) NOT your whole foot.

If your ‘whole foot’ everts (turns out) you will no longer have a stable foot tripod as the 5th metatarsal (little toe) will lose contact with the ground.

The key to ensuring this does not happen is to provide an environment for the bones of the midfoot (middle of the foot) and forefoot (toes) to experience the opposite motion to that of the heel. This will mean that the foot has an opportunity to truly pronate with a tripod on the ground.


So how can you help me do that?

  • At Physio fusion we can help you to bring your own body into alignment and create an environment in which the healing can begin

  • Foot strengthening exercises

  • Footwear advice

  • Referral to other healthcare specialists for further assistance (e.g. podiatrists)

To find your nearest Physio Fusion clinic and book an appointment call 09 6266186 or visit our website https://physiofusion.co.nz

Do You Have a Healthy Work Station Set Up?

An ergonomically correct workstation has all the best practices to help maintain a healthy posture and improve your health and productivity.

Here are a few helpful tips;

1. Set up your screen

Adjust the monitor height so that the top of the screen is at—or slightly below—eye level. Your eyes should look slightly downward when viewing the middle of the screen. Position the monitor at least 20 inches (51 cm) from your eyes—about an arm’s length distance. If you have a larger screen, add more viewing distance.


2. Set up your chair

  • Height – You should be able to sit with your feet flat on the floor and your thighs roughly parallel to the floor. If you require a taller chair in order to reach the floor you can use a foot rest to ensure you achieve the right angle.

  • Backrest Recline and Tilt – Research has shown that a reclined seat (at least 135 degrees back)  significantly reduces the pressure on your back, and is particularity beneficial for people with back

  • Lumbar support – the shape of the backrest should have a natural curve to support your lower back.

  • Arm rests – Look for armrests that are not just height adjustable and support the entire length of the forearms.


3. Adjust your Desk Height

  • Your legs should fit comfortably under the desk if you are sitting with your feet flat on the floor: you should have enough space to cross your legs.

  • The angle between your forearm and upper arm should be between 90 degrees and 110 degrees while your arms are at rest on the desk.

  • Make your desk organized using storage accessories i.e. Document holders

  • Use an ergonomic mouse pad; to keep your wrists supported.


4. Organizing your Desk space

Organize all the items on the workstation according to their priorities and assign them to the proper ergonomic reach zones.

  • Primary Zone: High use items, easiest access

  • Secondary Zone :Medium use items, comfortable reach

  • Third Zone: Low use items, reduction in efficiency

:sparkles: MOVEMENT IS KEY :sparkles:

Its a simple action step, but mighty! Get up out of your chair and take frequent posture breaks!

When we sit in one position for hours without moving, our performance slowly starts to deteriorate, our body slows down, static loading takes over our muscles and we actually get fatigued even when we aren’t putting in any physical effort. However, when you consciously integrate these microbreaks into your day, you’re giving your body a much-needed refresher and an opportunity to wake up your muscles and replenish blood flow. Research has shown that movement can also help with creativity, or get you ‘unstuck’ so you can approach your work with a different or fresh perspective and energy.

If you think your desk set up could be better, or want us to have a quick look we can do this via a video call. Book in for an appointment www.physiofusion.co.nz or give us a call on (09) 626 6186

Do you experience Cervicogenic Headaches?

What on Earth is a cervicogenic headache??

Headaches happen for lots of reason and can be cause by several sources- both primary and secondary. Once major “red flags” are ruled out, understanding the type of headache is important in order to have it properly addressed.

A cervicogenic headache is a secondary headache arising from a musculoskeletal dysfunction within the cervical spine, and is a disorder that many physiotherapists treat. The main players that are typically involved in generating the pain are the joints, discs, ligaments, nerves and/or muscles found in the upper portion of the neck.

Characteristics of a Cervicogenic Headache:

:sparkles: Pain usually one sided or one side dominant

:sparkles: Pain originates from the back of the neck and radiates along the forehead, orbits around the eye, temple area and ear.

:sparkles: Steady ache or dull, diffuse pain that travels into shoulder region

:sparkles: Limited neck movement especially when turning head

:sparkles: Tenderness to touch at the muscles at the base of the head.

Here are some exercises that would help alleviate your pain:

  1. Cervical side flexion with chin tuck

  • Sit upright in a chair.
    With your shoulders relaxed, relax one arm to your side.
    Drop your opposite ear to your shoulder until a stretch is felt.
    Using your fingers, tuck your chin in, as to resemble a double chin.
    Gently release pressure with your fingers and hold this position.
    Relax and repeat

2. Levator stretch Neck stretch – levator scapula

  • Start in a seated position.
    Place the hand of the side you want to stretch down by your side.
    Tilt your head forwards and to the opposite side at an angle, as if you are trying to
    look at your armpit.
    Keeping your back straight and upright, continue to tilt your head down until you
    feel a stretch from the base of your skull down into your shoulder blade.

3. Neck stretching (Upper trapezius)


  • Stand up straight.
    Take the hand on the symptomatic side and place it behind your back.
    Take your other hand and place it on your head.
    Tilt your ear directly down towards your shoulder and hold this position.
    You should feel a stretch down the side of your neck.

If you believe you experience Cervicogenic Headaches get in touch with us https://physiofusion.co.nz/ for an in-depth assessment and lets knock out those headaches and decrease you dependence on pain meds

Exercises you can do during lockdown

I know how hard it can be when it comes to working out and its really easy to find an excuse to avoid lockdown workouts but it’s not just about staying in shape its also about keeping active to feel mentally strong. We know that exercise does wonders for mental health and at a time where its all uncertainty, anxiety, and a daily dose of doom and gloom, we all need to work out that frustration somewhere!

If you’re struggling with a lack of motivation or negative mindsets there’s only one way to turn it all around: Take :boom: ACTION :boom:


How much exercise is enough?

You’ve heard the saying something is always better than nothing and that’s the case when it comes to exercise. The current recommendation for adults according to Best Exercises for Health and Weight Loss.org is to aim for 150 minutes of moderate intensity activity every week (or 75 minutes of vigorous intensity) with two sessions of strength building activities per week. That’s about 30 minutes of movement, five times per week.

This is a quick full body routine:

Bodyweight Squats

Stand with your feet shoulder-width apart. Engage your core muscles and gently squat down. As you squat, bend from your hips. Keep your back straight as you push your hips back and counterbalance by leaning your torso forwards. Keep your knees aligned with your toes. Your weight should be evenly on your heels and the balls of your feet, not your toes. It might help to image your are trying to sit down in a chair that is too far away from you. Tense your bottom muscles at the bottom of the squat and keep them tense as you straighten back up to the start position.

Arm dips

Start in a seated position. Place your hands on the seat of the chair and use your arms to move yourself forwards towards the front of the chair. You will need to move your feet further forwards to help your stability. From this position, use the strength of your arms to slowly lower your body directly down towards the floor and then raise yourself back up. Do not actually sit on the floor and keep your hands close in beside you. Relax and repeat.


Lunges

Stand straight with your arms to the side or on your hips. Take a large step forwards on your affected leg, then drop your hips directly down between both feet, bending your hips and knees to a 90 degrees. Push back up to the starting position, and repeat. Make sure you take a large enough step that your front knee does not travel over your foot, and ensure your knee travels directly forwards. Keep your body up straight throughout the movement.


Mountain Climbers

Adopt a plank position insuring your hands are directly beneath your shoulders.
Fully flex one hip and hold.
Extend the bent leg to the rear and repeat the movement pattern on the opposite side


How to stay Healthy and Sane during Lockdown


The restrictions and change brought by the outbreak of COVID-19 has resulted in a great deal of control being taken from our hands; this has been anxiety provoking for many of us. Nevertheless, it’s important to re-evaluate, acknowledge and place focus upon the matters that we DO have control over so that we can gain our personal power back!


Lockdown Productivity Tips


Check in with yourself: how is your body and mind feeling. Embrace your emotions and give yourself permission to feel the way toy do.

:large_blue_diamond: Stay connected: Social connection is inevitably limited at the moment but catching up with people via text or facetime will help prevent feelings of isolation.

:large_blue_diamond: Maintain some form of routine: Maintaining a routine helps provide some structure do days which often all seem to merge into one.

:large_blue_diamond: Get fresh air where possible: Daily fresh air can provide an easy change of scenery when we are stuck at home most of the day.

:large_blue_diamond: Gentle exercise is a MUST!

:large_blue_diamond: Stay Hydrated: Drinking enough water is important to keep your body hydrated and makes sure your body functions properly.

:large_blue_diamond: Eat well- You’d be surprised how your diet can affect how you feel. Gut health in particular is linked to mental health.

:large_blue_diamond: Get to that “thing” you’ve been delaying for months

:large_blue_diamond: Pick up a good book

:large_blue_diamond: Learn new habits or rediscover old ones

:sparkles: These may seem like simple strategies but sometimes it’s the simple things that are most effective :sparkles:

“One day this will all be over and we will be grateful for life in ways we never felt possible”

The gratitude we will have for the things we once took for granted will be unmeasurable- getting on a plane, an impromptu visit to the cinema, a shopping spree, going to the gym, even meeting a friend for lunch at a café. Keep going, nothing lasts forever and we have so much to look forward to. In the mean time take each day as it comes, be kind, support those who are struggling and keep going! You are stronger and more resilient than you know!

Lifting Mechanics

IS IT DANGEROUS TO LIFT WITH A BENT BACK?

One common belief about lifting is that rounding your back when lifting an object is considered dangerous while lifting with a straight back is considered safe…


However, there is a lot of misinformation circulating around lifting mechanics and what is deemed “good technique” versus “bad technique.”

Here are some key myths and misinformation that you may have heard:


A ROUNDED BACK WHILE LIFTING OVER STRESSES THE BACK MUSCLES AND LIGAMENTS

  • Research has shown that regardless of lifting position, whether you’re stooped, squatting or weightlifting, your back has to produce the same amount of force. Statistically speaking, it’s not significantly different.


FLEXING THE SPINE WHILE LIFTING INCREASES THE LOAD ON THE LUMBAR DISCS

  • Under heavy loads, discs are unlikely to fail unless >95% flexion is achieved (which is near impossible)

  • With low loads, the disc is unlikely to fail unless you do thousands of repetitions continuously

  • Your body is an amazing adapter, this includes discs! Your discs can adapt and become more and more able to handle loads when stressed appropriately


THESE COMPOUND TO CAUSE INJURIES AND PAIN TO THE BACK MUSCLES AND DISCS

  • Resistance training has demonstrated through countless studies the ability to increase bone mineral density (BMD) of the lumbar spine. BMD is actually positively associated with the strength of the spinal discs and ligaments at that level. With appropriate loading and training, disc, ligament, bone and muscles are going to adapt favourably


A NEUTRAL SPINE IS SAFER, STRONGER, MORE EFFICIENT AND BETTER TO LIFT WITH

  • There is no significant difference between activities that encourage more spinal flexion and one’s that do not in the long term

  • Lifting with lumbar flexion is not a risk factor for low back pain

  • Research has shown lifting with a bent back is more metabolically and neuromuscularly efficient

  • When the spine is in extension during bent over activities, the hip is actually flexed to a greater degree – decreasing the ability for the glutes and hamstrings to create as much internal torque. Flexing the spine reduces this effect and reduces the moment arm for the hip extensors


STOP BACK PAIN & INJURIES BY LIFTING WITH A NEUTRAL SPINE

  • Your lumbar spine flexes every time your hip flexes! It is impossible to isolate one versus the other. It is also impossible to not flex while doing common movements

  • Extreme flexion however (>/=100%), may pose an increased risk under heavy loads, but not at light loads


You may still be wondering why you have back pain (stay tuned for our next blog!). Your pain may not be directly related to your lifting strategy.


Could you have pain with forward bending? Absolutely.

Is bending at the lumbar spine an increased risk for pain or injury? In the vast majority of situations, no.

If I have pain with forward bending, is it bad to temporarily limit doing so? Not at all.

Should I fear bending at the spine with or without pain or injury? No. Being fearful of flexing/moving your spine is actually a stronger predictor of disability and back pain.


Work on moving through your spine, after all it’s what it is designed to do! Choose comfortable movements and gain confidence over time, then build up your strength gradually with resistance training – try and not to push too fast, we want nice, healthy adaptation! Give your body time to adapt, back pain is not quick fix sometimes but you are resilient and with healthy, normal movements and some patience, you will be okay.

Disorders of the Achilles Tendon

Basic Anatomy

The Achilles tendon is the largest tendon in the human-body. It is a band of tissue that connects your calf muscles to your heel bone (calcaneus). This tendon primarily facilitates general mobility such as walking, running, climbing stairs, jumping, and standing on your tip toes, by helping to raise the heel off the ground.


Common Achilles Pathology

Achilles tendinitis and tendinosis are two common disorders and are typically classified as overuse injuries.

Achilles tendonitis involves inflammation of the Achilles tendon. Inflammation is the body’s natural response to injury or disease, and often causes swelling, pain, or irritation. This inflammation is typically short-lived. Over time, if this is left resolved, the condition may progress to degeneration of the tendon- Achilles tendinosis, in which case, the tendon loses its organized structure and is likely to develop microscopic tears.

There are two types of Achilles tendonitis and it is based on which part of the tendon is inflamed:

  • Insertional Achilles tendonitis affects the lower portion of your tendon where it attaches to your heel bone.
  • Non-insertional Achilles tendonitis involves fibres in the middle portion of the tendon and tends to affect younger people who are active.

In both non-insertional and insertional Achilles tendinitis, damaged tendon fibres may also calcify (harden) and often bone spurs (extra bone growth) develop with insertional Achilles tendinitis. Achilles tendonitis may also increase your risk of sustaining an Achilles tendon rupture (tear).

Causes

Typically referred to as “overuse” conditions, Achilles tendonitis and tendinosis are often caused by the sudden increase in repetitive activity involving the Achilles tendon. This can put too much stress on the tendon too quickly, that can then lead to micro-injury of the tendon fibres. Because of this ongoing stress on the Achilles, the body is not able to repair the injured tissue. The structure of this tendon is then modified, resulting in continued pain and other symptoms. The Achilles tendon also has poor blood supply that makes it more susceptible to injury and may make recovery from injury slow.

Common factors that may lead to the development of disorders of the Achilles tendon include:

  • Weak and/or tight calf muscles
  • Rapidly increasing the amount or intensity of exercise within a short span of time
  • Hill climbing or stair climbing exercises
  • Presence of bony spurs in the back of your heel
  • Changes in footwear – especially changing from wearing high-heeled shoes to flat shoes
  • Wearing poor fitting, inappropriate, or worn out shoes during sporting activities
  • Exercising without adequate warm-ups and stretching
  • A sudden sharp movement which causes the calf muscles to contract and the stress on the Achilles tendon to be increased. This can cause the tendon fibres to tear.
  • Excessive mobility
  • Poor feet positioning and biomechanics (excessive pronation and flattening of the arches of the foot)


Symptoms

Achilles tendon pain: Causes. when to see a doctor, and treatment


Common symptoms include:

  • Pain and stiffness along the Achilles tendon especially first thing in the morning
  • Pain along the tendon or back of the heel that worsens with activity
  • Severe pain the day after exercising
  • Visible thickening of the tendon
  • Tenderness to touch
  • Bone spur
  • Swelling that is present all the time and gets worse throughout the day with activity

If you have experienced a sudden “pop” in the back of your calf or heel, you may have torn your Achilles tendon. Please seek urgent medical attention if you think you may have torn your tendon.

Diagnosis

If Achilles tendonitis or tendinosis is suspected, please deter from any activity or exercise which causes the pain. It is advisable to see your doctor or physiotherapist as soon as possible so that an accurate diagnosis may be made and appropriate treatment recommended.

You will be asked about the nature and duration of your symptoms and the medical professional assessing you will have a look at your foot and ankle. Ultrasound scanning may be used to evaluate the damage to the tendon and/or surrounding structures.

An MRI may be recommended if symptoms persist. X-rays may also be taken to rule out other disorders which may cause symptoms like Achilles tendonitis and tendinosis.

Achilles Tendonitis - Ankle - Conditions - Musculoskeletal - What We Treat  - Physio.co.ukHow to Treat Achilles Tendinopathy with Physical Therapy -  prohealthcareproducts.com

Treatment

Treatment will depend on the nature, severity, and length of the injury. Generally speaking, the longer the symptoms are present before treatment commences, the longer the timeframe until full recovery is attained.  Full recovery may take between three and nine months.

Initial treatment options in the early stages may include:

  • Rest – to avoid further injury to the area
  • Ice – to reduce inflammation
  • Elevation – to reduce swelling
  • Non-steroidal anti-inflammatory drugs to reduce pain and inflammation.

 How physiotherapy can help:

Physiotherapy typically focuses on two main areas: treatment and rehabilitation. Treatment may entail massage, shockwave therapy, acupuncture, gait re-education, and gentle stretching, whereas, rehabilitation predominantly entails strengthening of the Achilles and surrounding musculature.

Strengthening of the muscles surrounding the Achilles tendon facilitates healing in the tendon itself. Strengthening is attained through the utilization of specific exercises, that will be taught by your physiotherapist. It is common for the rehabilitation programme to take up to three months.


Exercises