Piriformis Syndrome
Piriformis syndrome refers to the dysfunction of the piriformis muscle which irritates the sciatic nerve. It is characterized by deep buttock region pain that radiates down leg and foot often accompanied by pins and needles and numbness traveling along the path of the sciatic nerve.
The simplistic reason for this widely distributed pain comes down to the piriformis muscle itself – Their close proximity means that direct trauma to the buttock region or the supporting structures can result in inflammation and muscle dysfunction which can compress and irritate the sciatic resulting in referred symptoms.
Piriformis syndrome symptoms may include:
- Localised deep buttock region pain
- Pain with continuous sitting or standing for 15 mins or over
- Pins and needles along the leg down to the outer foot
- Numbness in outer leg or foot (often resolves on movements)
- Deep squatting or bending
- Pain on direct palpation
Anatomy

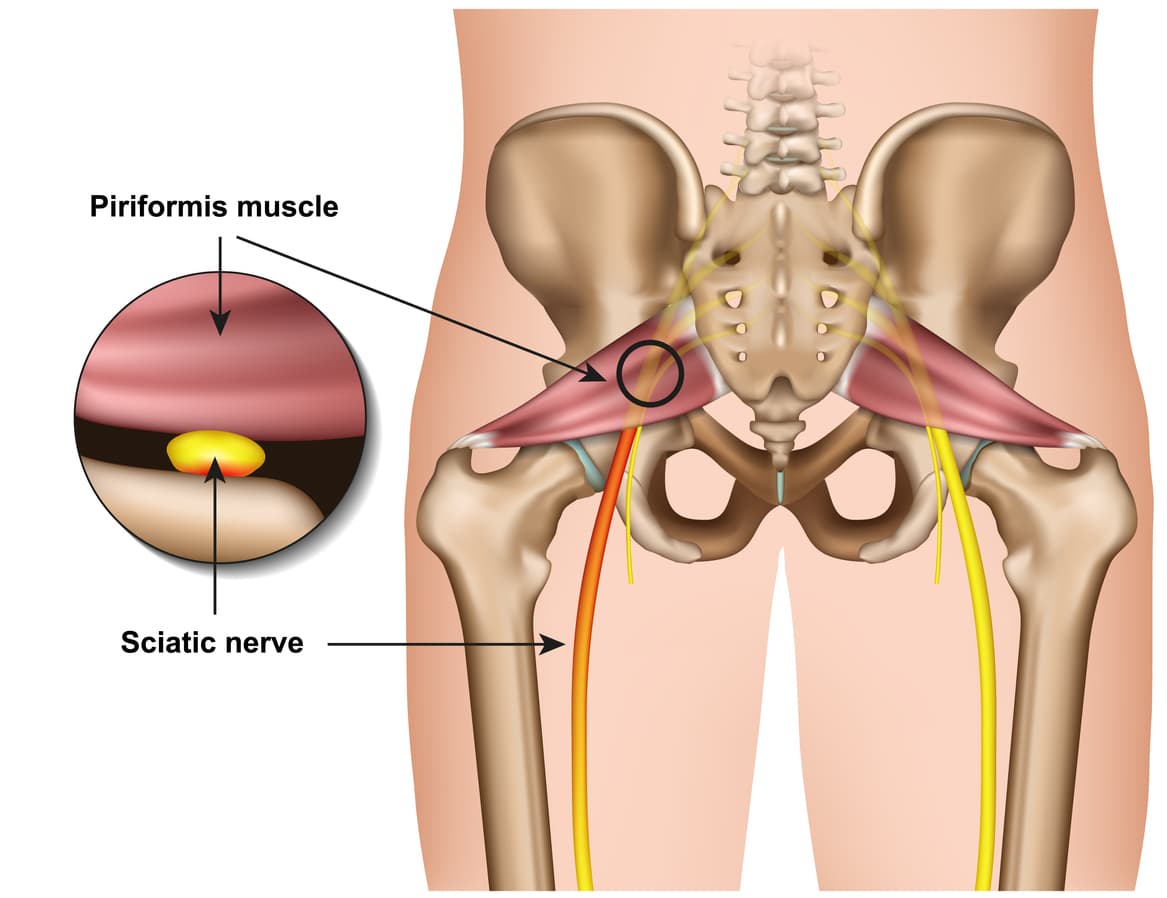
The piriformis muscle originates from the outer surface of a large fused bone of our pelvis called the sacrum. It travels adjacently and inserts into the top of the hip joint. The piriformis muscle is a very active muscle involved in stabilizing the hip and pelvis during majority of our activities (walking, running, standing, sitting or standing, turning in bed). When the piriformis muscle contracts it helps the hip rotate outwards (external rotation) and lift thigh out and up (abduct).
The sciatic nerve originates from where the very base of the spine and the sacrum join known as the lumbosacral region (lower back and saddle region). In this region five separate branches of nerves travel outside of the bony openings of the spine called the nerve roots and connect into a single large nerve – the sciatic nerve. It then travels through the pelvis deep into the buttock region close proximity the piriformis and gluteal muscles. In some individuals the piriformis muscles can travel through the piriformis muscle subjecting them to piriformis syndrome.
Diagnosis
There are no specific tests to diagnose piriformis syndrome. Diagnosis of piriformis syndrome is made by the report of symptoms and by physical exam using a variety of movements to elicit pain to the piriformis muscle. In some cases, a contracted or tender piriformis muscle can be found on physical exam.
In cases where there is underlying pathology (such as disc injury, arthritis, sacroiliac dysfunction or hip injury) resulting in true sciatica – piriformis syndrome may develop to become an additional muscular dysfunction that is required to be addressed. Because symptoms can be similar in other conditions, radiologic tests such as MRIs may be required to rule out other causes of sciatic nerve compression, such as a herniated disc.
Consultation with a physiotherapist in this case is highly recommended as they will perform a comprehensive clinical examination to identify the root cause of your symptoms.
Exercises for piriformis syndrome
Corrective exercises with a combination of strength and flexibility regimen is an essential way to treat true piriformis syndrome (without involvement of other underlying pathologies).
The exercises outlined below follow a phase-by-phase progressive regimen to strength key muscles of the hip, buttock and legs.
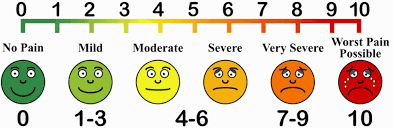
As you work through these exercises expect to feel some pain during and after your exercise. Pain you may feel during the exercise is an expected sign of muscle activity. Pain you may feel after the exercises is an expected sign of muscle healing and recovery. However, if you are unable to participate in the exercises due to symptom deterioration – it is highly recommended you consult your physiotherapist to rule out other potential causes.
Otherwise, to help you gauge the correct amount of pain you should expect during exercise – use this scale. The ideal range should be 2 to 5. If your baseline pain is over 6 or 7 – it is recommended that you consult your doctor for pain relief appropriate to manage your pain, followed by a consult with a physiotherapist. Your physiotherapist will be able to modify the following exercises or prescribe alternative exercises best suited based on your current level of function and symptoms.
Symptom noting – is a great way to keep track of your progress and symptom behaviour.
- Take a diary
- Note down pain before you begin the exercise.
- Note down the pain rating after each exercise.
- Note down pain at the end of the day
- Repeat the pain recording process for the next 4-5 days
- Examine the trend in your symptoms.
Interference with everyday tasks – Your participation or level of exertion with everyday activities may interfere with your symptoms impacting your exercise tolerance. It is therefore important to note any of these interferences’ contributory to your pain.
Phase 1 – is a beginner stage.
This phase is intended for gently priming muscle activation. It will demand your concentration on technique and compliance to change the possible compensation your body has been used to as a result of pain. This phase can last between 1-2 weeks.
Instructions:
3 sets of 10 repetitions. Hold each repetition for 8-10 seconds. Rest 10-15 seconds between sets, 30 seconds between exercises. Do this exercise 1-2 times per day.
Bridges
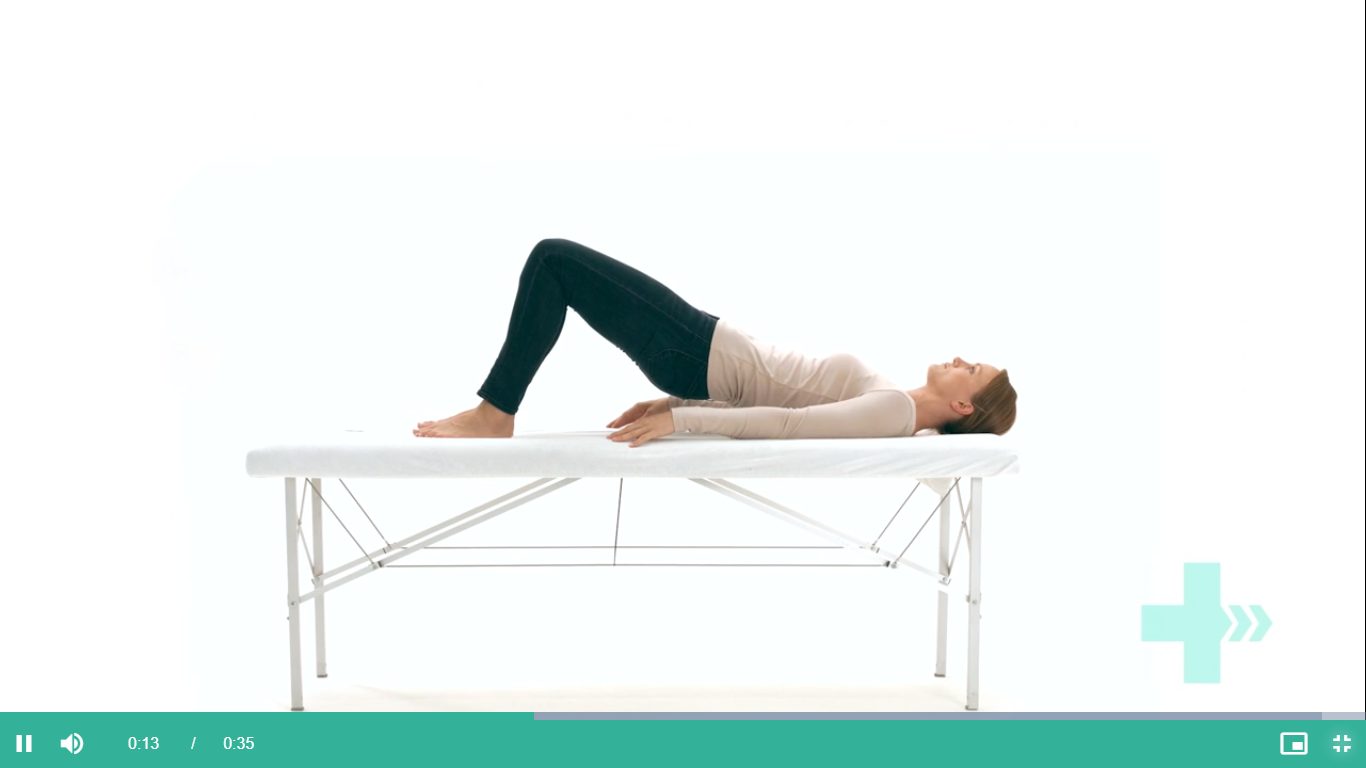
Lie on your back.
Bend both knees and place your feet flat on the bed.
Lift your buttocks from the bed.
Place your buttocks back on the bed.
Repeat this exercise and remember to continue to breathe properly.
Clam shells
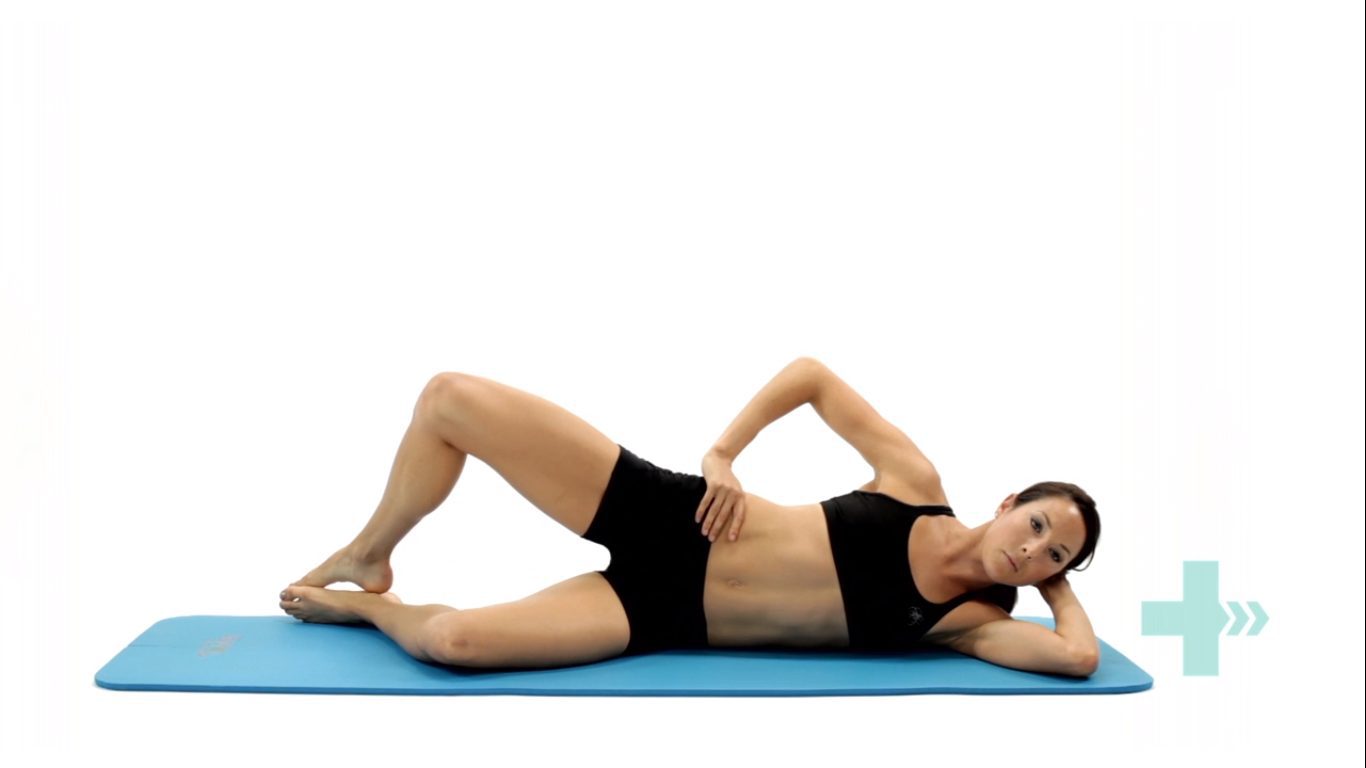
Lie on your side with your feet, ankles and knees together.
Bend the legs a little and tighten your core stability muscles.
Keeping the feet together, lift the top knee up.
Make sure you don’t roll your body back with the movement.
Control the movement as you bring the knee back down to the starting position.
Phase 2 – intermediate stage
The intermediate phase is similar to the beginner stage with the difference of using changing elements of progression to challenge the muscles capacity further. In this stage you may choose to progress the exercises by choosing to change ONE factor:
- Increase repetitions
- Increase hold time
- Increase sets
- Add appropriate resistance
Instructions:
- 3 sets of 10-15 repetitions. Hold each repetition for 10-15 seconds.
- Rest 10-15 seconds between sets, 30 seconds between exercises.
- Do this exercise 1-2 times per day.
Bridges with resistance

Tie a resistance band around both thighs, just above your knees.
Lie on your back with your knees bent and legs hips width apart.
There should be tension in the band.
Raise your hips up into a bridge, keeping the knees hips width apart.
Control the movement back down to the start position, maintaining constant tension on the band.
Clams with resistance
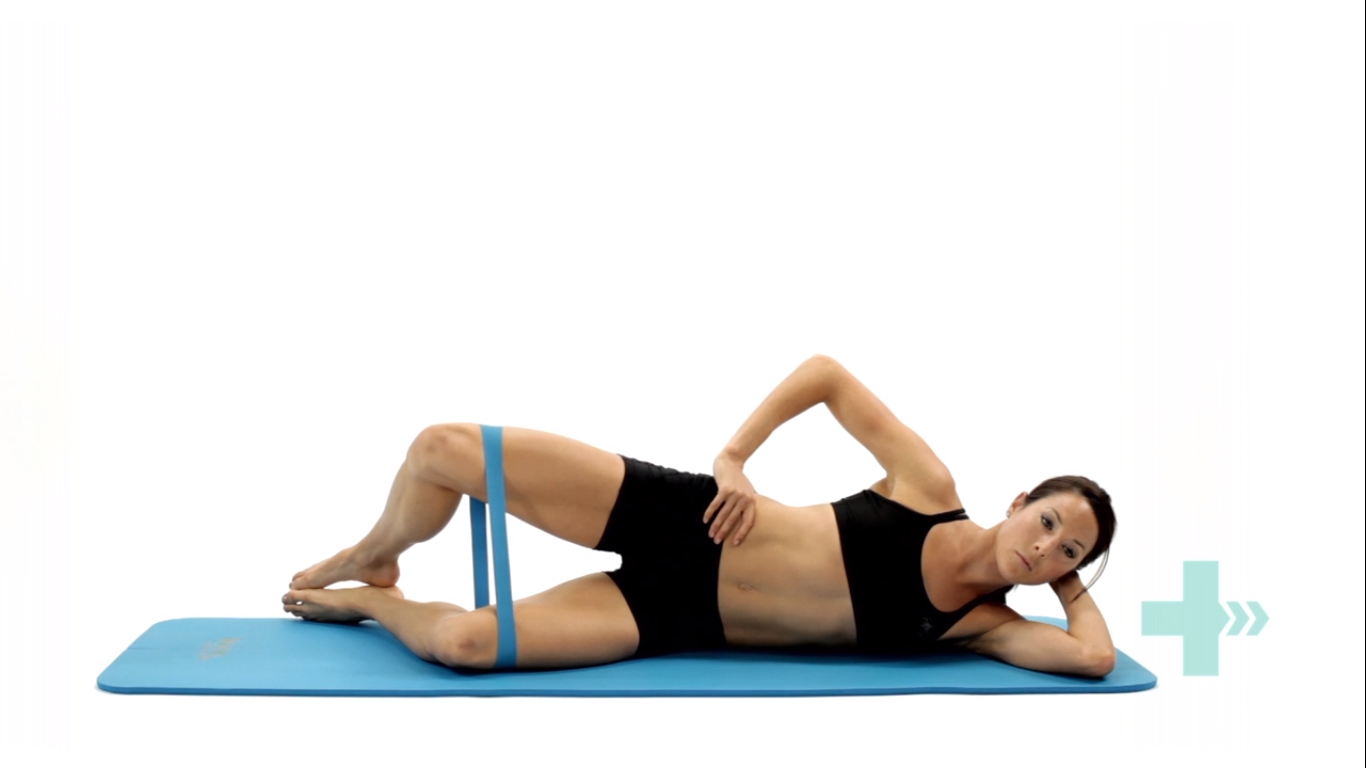
Lie on your side and place a band above your knees, approximately an inch or two above the knee joint.
Bend your legs a little, keeping the feet in line with your back.
Use your core stability muscles to keep the body stable.
Keeping your feet together, lift the top knee up against the resistance of the band.
Ensure you stay on your side and do not roll your hips and your body back with the movement.
Lower the knee back down, controlling the resistance.
Phase 3 – advance stage
Body weight squats
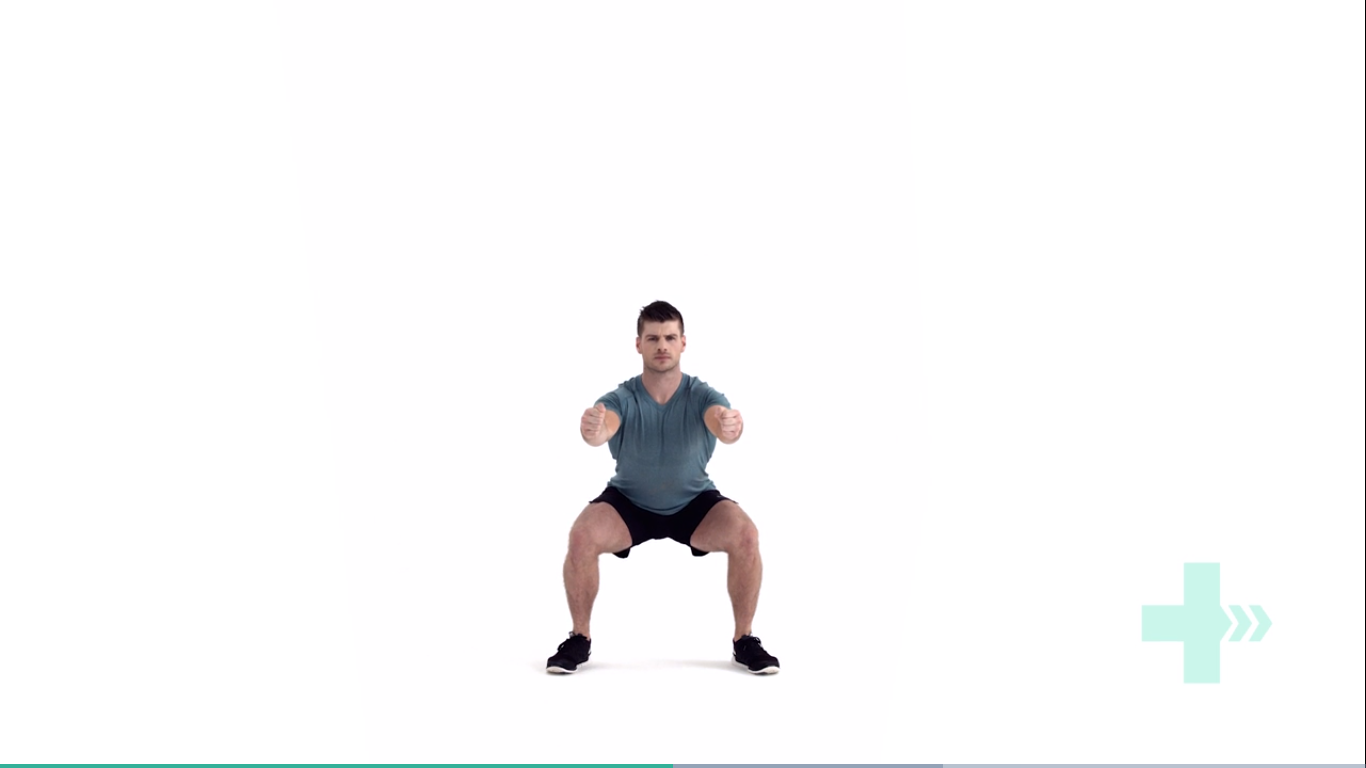
Start position is standing straight with the arms out in front and bent at the elbows, the fists should be clenched and the palms facing inwards.
Move downwards into a squat position so that the knees are aligned over the toes and the heels are in contact with the floor, make sure the back is straight.
Keep the head and chest upright and the gaze horizontal.
Hold for 2 seconds and return to the start position.
Lunges
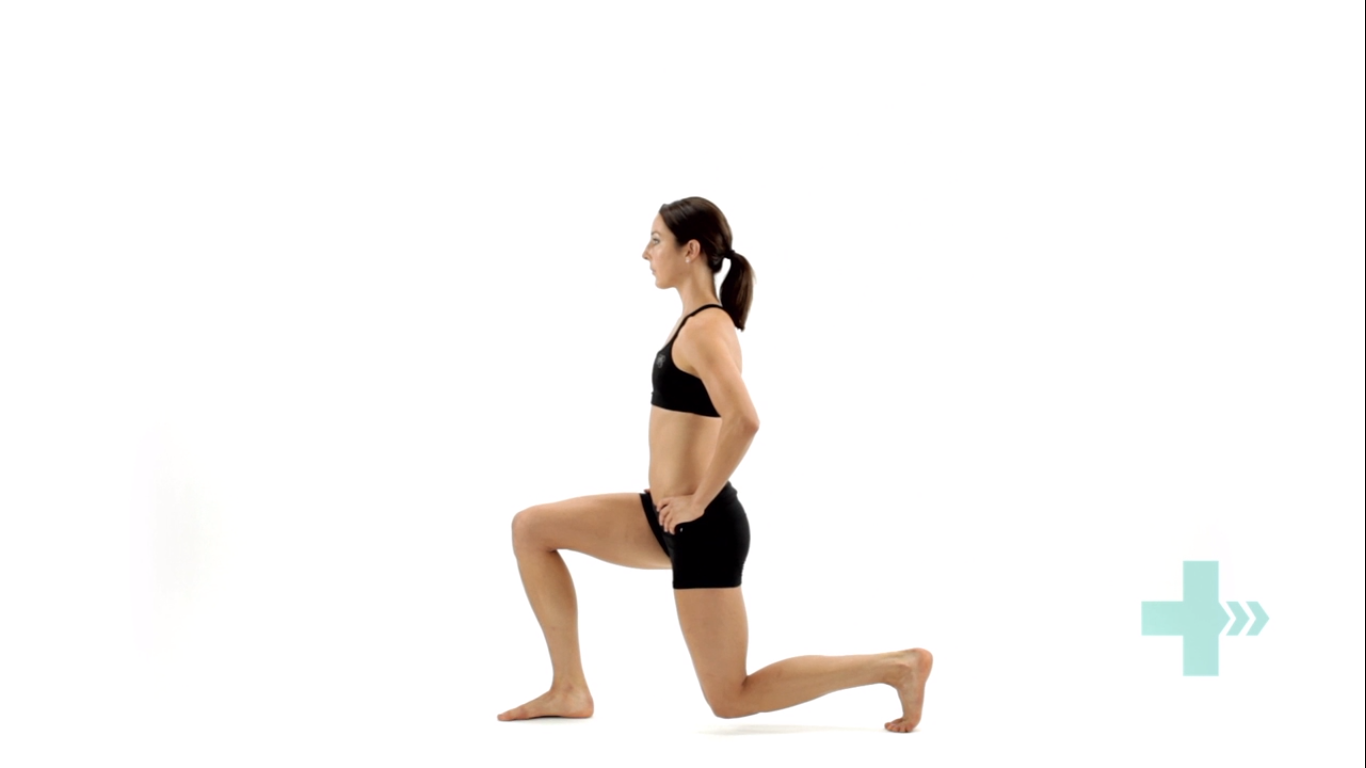
Stand straight with your arms to the side or on your hips.
Take a large step forwards on your affected leg, then drop your hips directly down between both feet, bending your hips and knees to a 90 degrees.
Push back up to the starting position, and repeat.
Make sure you take a large enough step that your front knee does not travel over your foot, and ensure your knee travels directly forwards.
Keep your body up straight throughout the movement.
Crab walks
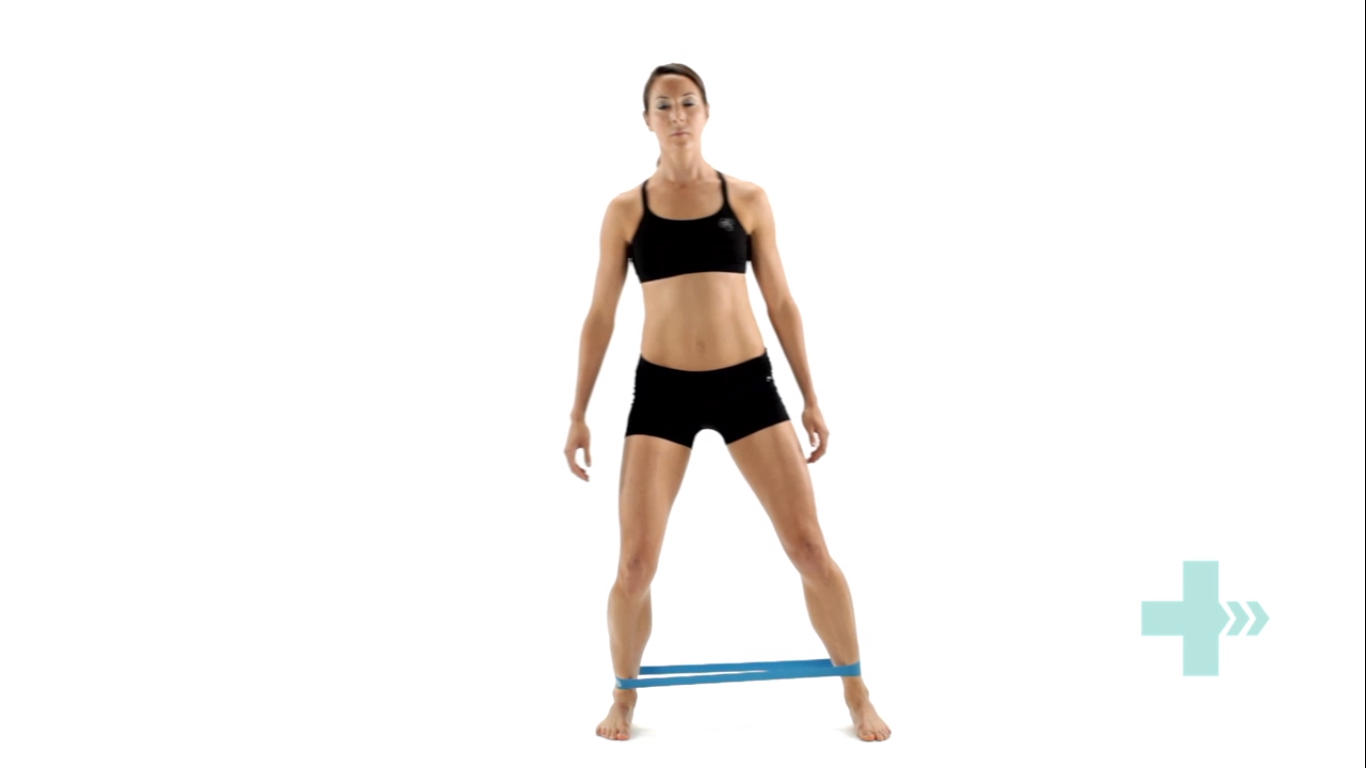
Place a band around your ankles and gather some tension.
Side-step keeping constant tension on the band.
Make sure you do not bring your feet too close together and keep your toes and knees pointing forwards.
Phase 4 – return to activities

Stretching
Do you always need to stretch the muscle? The answer is NO. While stretching is an important tool to improve muscle elasticity. You may not always need to stretch a muscle if it is NOT tight. Thus, stretching is recommended to be limited to areas you feel are TIGHT when you perform a given movement. Check the affected side and unaffected side – don’t need to stretch a muscle that doesn’t need to be stretched.
Seated piriformis stretch

Start in a seated position.
Cross the symptomatic leg your ankle is resting on, to the opposite knee.
Apply gentle pressure to the knee as you lean forward, increasing the depth of the stretch.
Hold this position, you should feel a comfortable tension with no pain.
Pigeon stretch
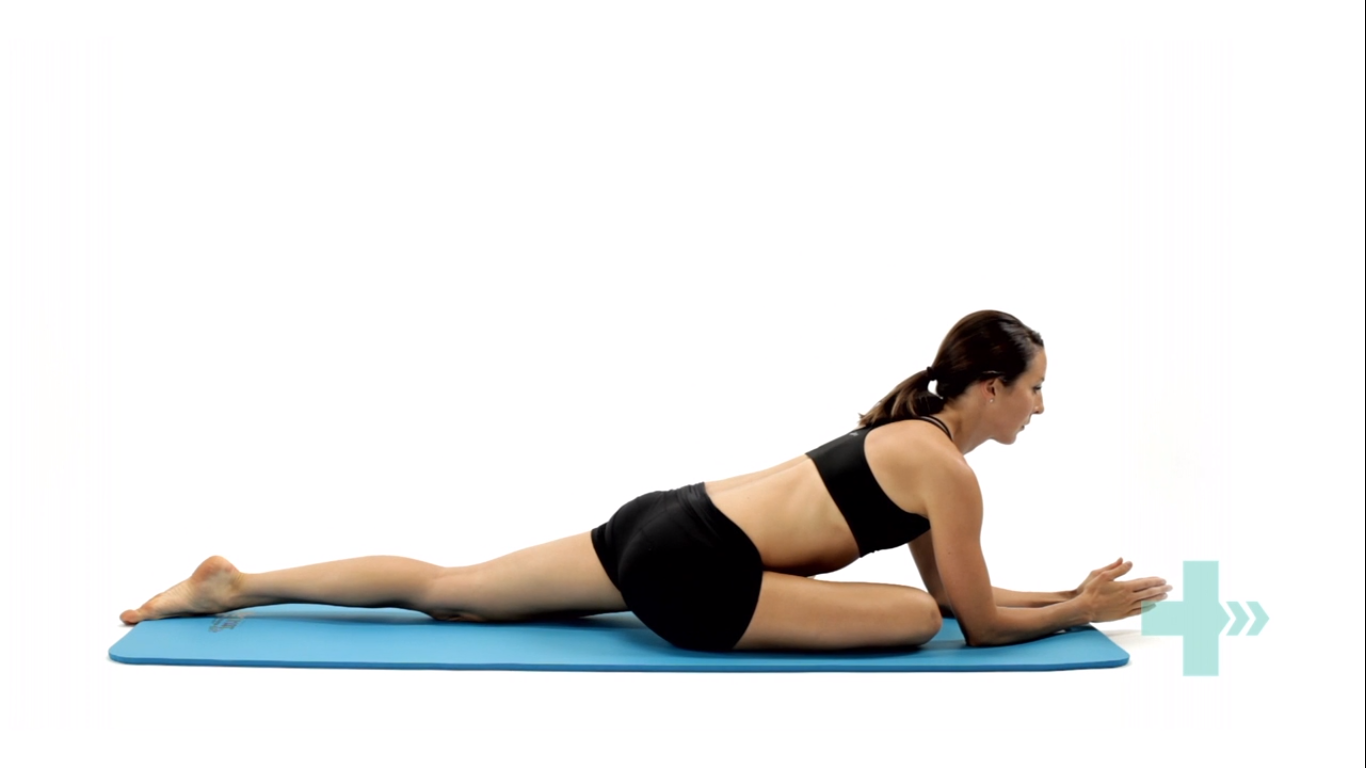
Start on your hands and knees.
Cross the symptomatic leg underneath you, then lower your hips down to the ground.
Rest your body forwards on your arms.
You should feel a stretch across the buttock.