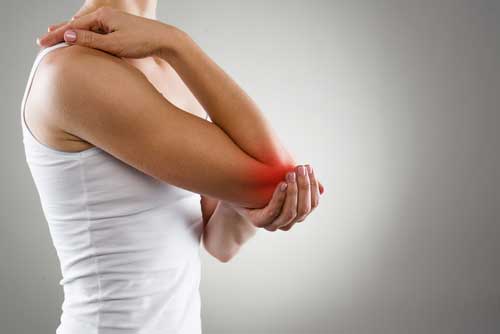
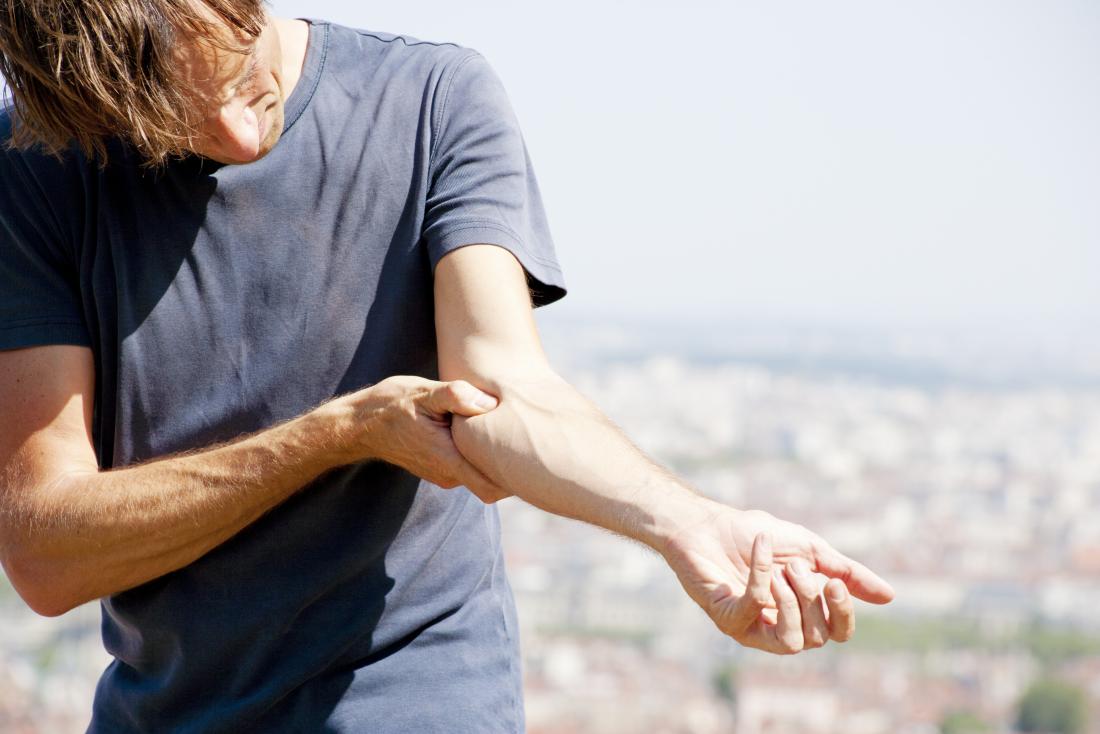
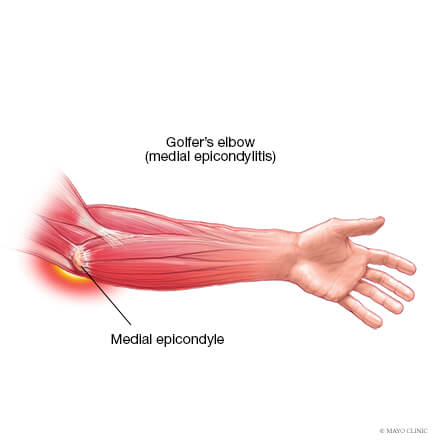
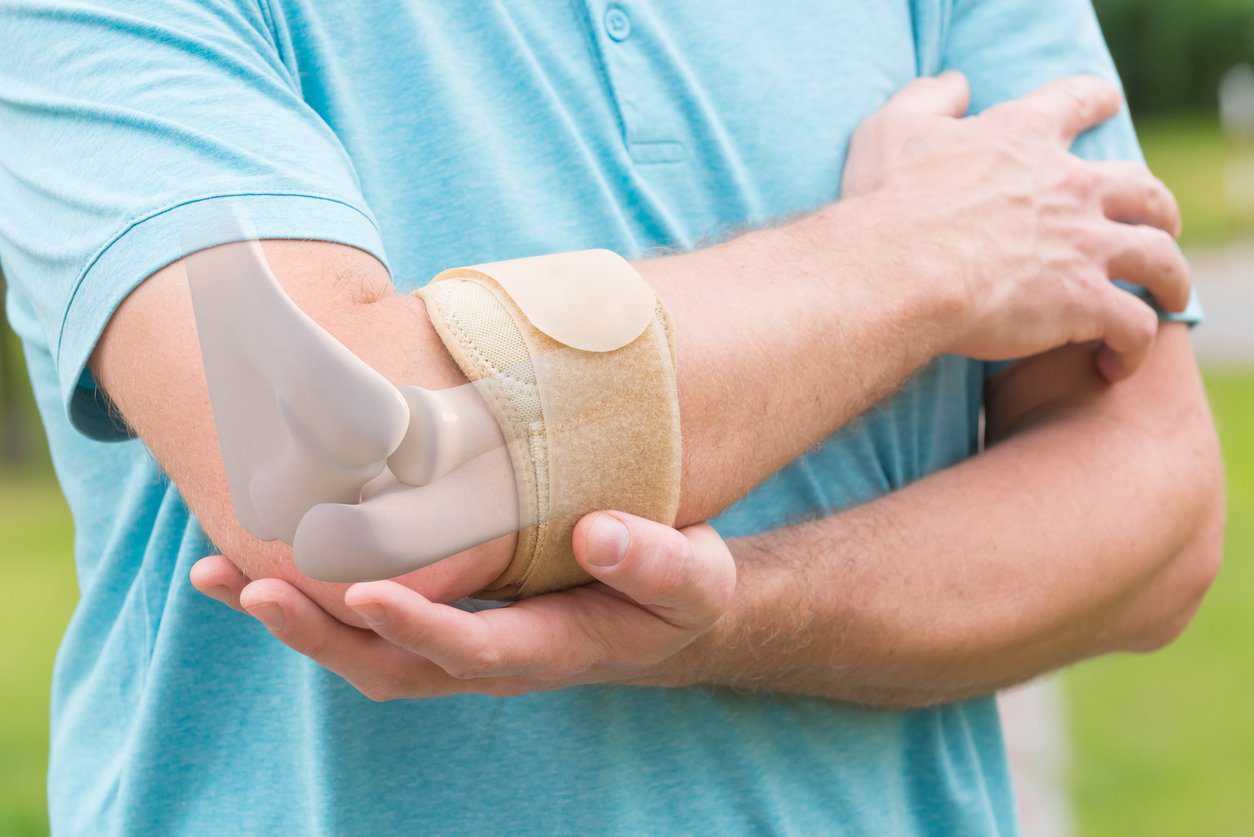
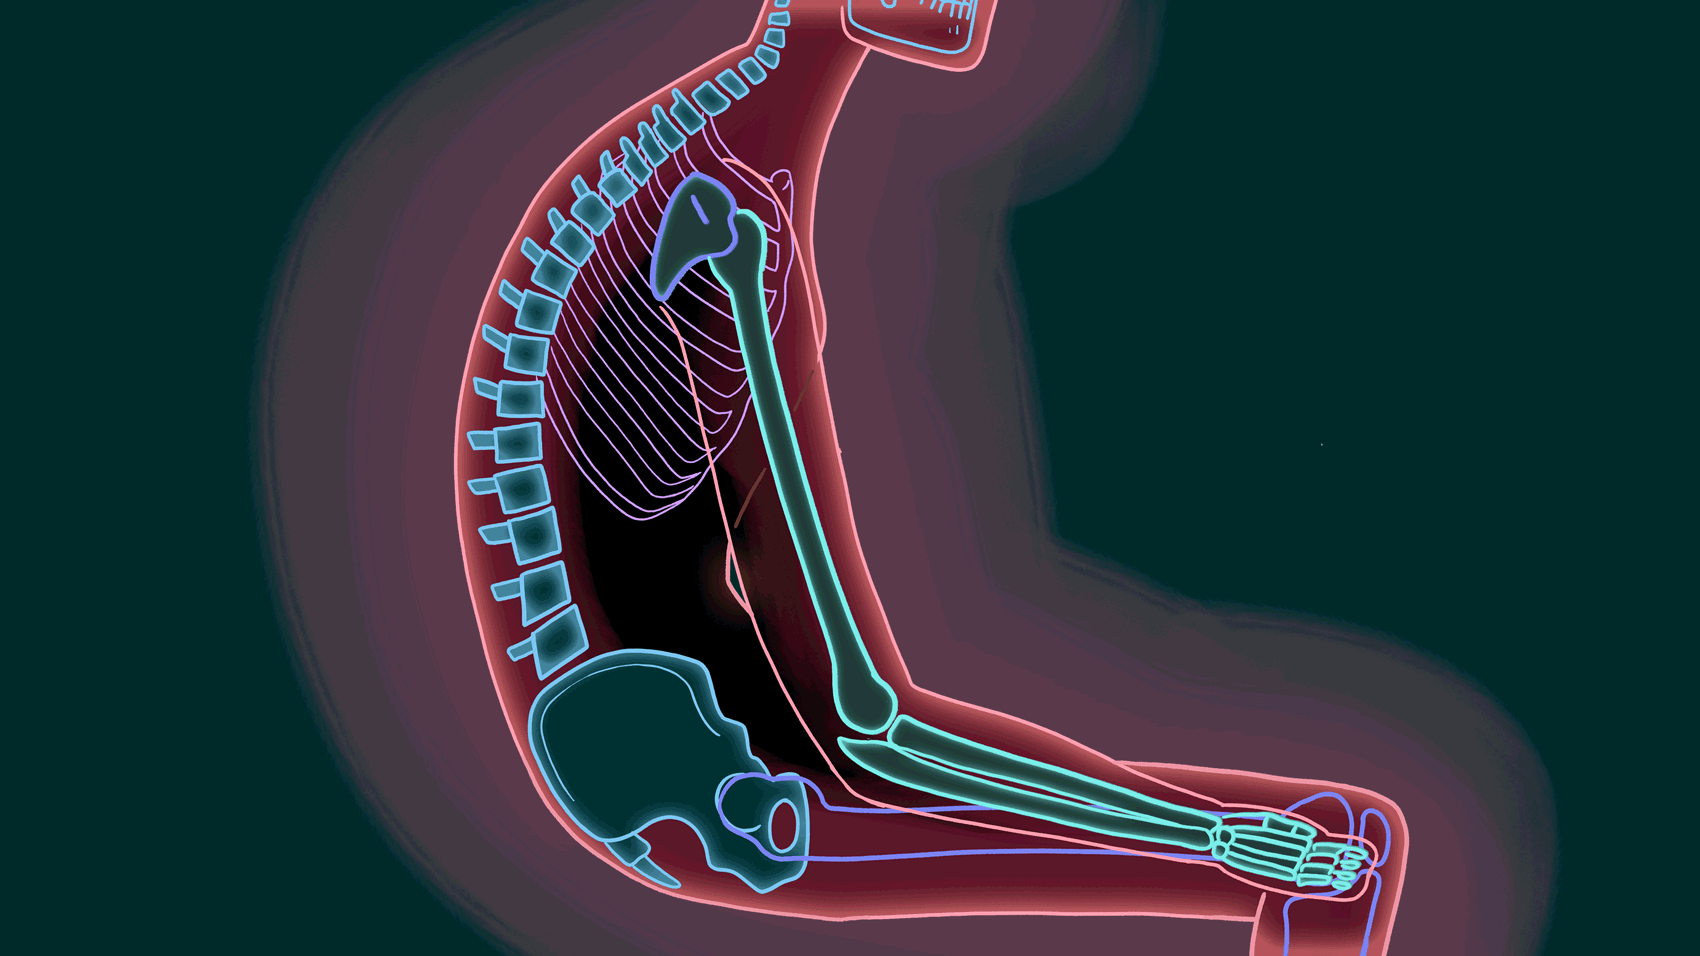
Medial elbow pain is also known as medial epicondylitis or golfer’s elbow. It is typically associated with pain on the inside (medial side) of your elbow and can spread into your forearm and wrist. This pain is the result of overloading and damage to the tendons that flex your wrist towards your palm.
Causes
This condition is triggered by damage to tendons and muscles which control your fingers and wrist. This damage is associated with excessive or repeated stresses- particularly repetitive and forceful finger and wrist movements, incorrect lifting, hitting and throwing techniques, lack of warmups and/or poor muscle conditioning.
Key risk factors for developing medial elbow pain may include smoking, obesity, being of in age bracket of 40 years old and over and undertaking repetitive activity with your arms for at least two hours daily. High risk occupations may include chefs, office desk workers, plumbers, construction workers, painters, butchers and assembly line workers. Those who partake in sports such as golf, racket sports, rowing, weight lifting and baseball are also at a higher risk.
Symptoms
Symptoms may be triggered suddenly due to a traumatic incident or may gradually develop over time and include but are not limited to:
Tenderness and pain is typically felt on the inner side of your elbow (particularly on the bony knob), and may refer along the inner side of your forearm and down to your wrist and fingers. It often worsens with certain movements. For example, bending your wrist towards your palm against resistance, or when squeezing a rubber ball.
You may feel stiffness in your elbow, and making a fist may hurt
You may experience weakness in your forearm, wrist and hand
You may experience tingling and numbness that can radiate into one or more fingers — typically to your ring and little fingers.
Diagnosis
This condition is typically diagnosed based on your medical and occupation history and a physical exam by your doctor or physiotherapist. To evaluate stiffness, strength and pain, your clinician may apply pressure to the impacted region and get you to move your elbow, wrist and fingers in various ways. You may also be referred on for imaging such as X-rays and Ultrasounds to aid diagnosis.
Management
A mix of non-surgical treatment options are effective for the majority of medial elbow pain cases, and self-resolves over time. You should rest your elbow and painful activities should be avoided. But it is very vital to maintain gentle movements of the forearm, elbow, and wrist through its range of motion.
Potential treatment options include:
Ice
Rest
Physiotherapy and acupuncture
Anti-inflammatory medications as recommended by your doctor or pharmacist
The use of a wrist and forearm brace or splint to support and rest your forearm
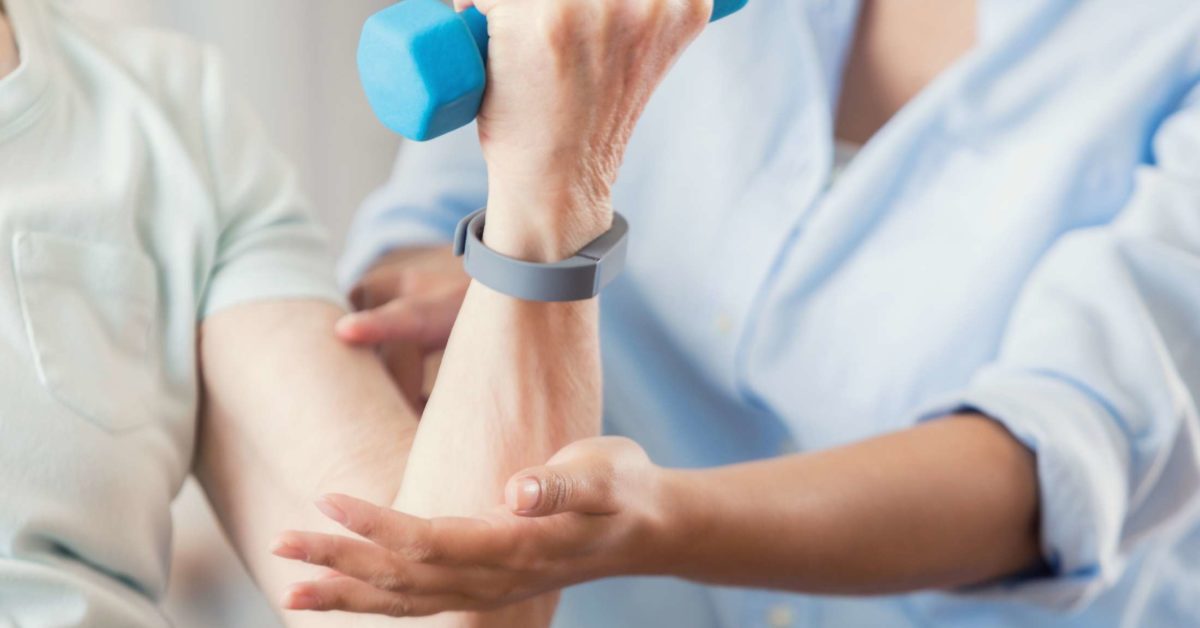
As your initial elbow pain lessens, your muscles around the elbow, forearm and wrist should be safely strengthened and stretched under guidance of a physiotherapist. Your physiotherapist will advise you on particular exercises, give you appropriate symptom management advice and take you through a personalised graduated rehabilitation program. If you continue to experience pain after 6-8 weeks of treatment, your physiotherapist can refer you back to your doctors, to consider administration of a cortisone injection into the elbow to help reduce pain and inflammation, and further referral onto see a specialist to seek guidance on other treatment options.
Prevention
Having a good comprehension of risk of injury and being conscious of your everyday activities may aid in the prevention of medial elbow pain. You should:
Adopt appropriate technique and form when undertaking repetitive activities or sporting motions
Keep up with adequate wrist, forearm, and shoulder muscle strength
Undertake gentle wrist and forearm stretches pre and post activities
Adopt appropriate posture and body mechanics when lifting heavy objects to reduce joint strain- especially if doing so repetitively
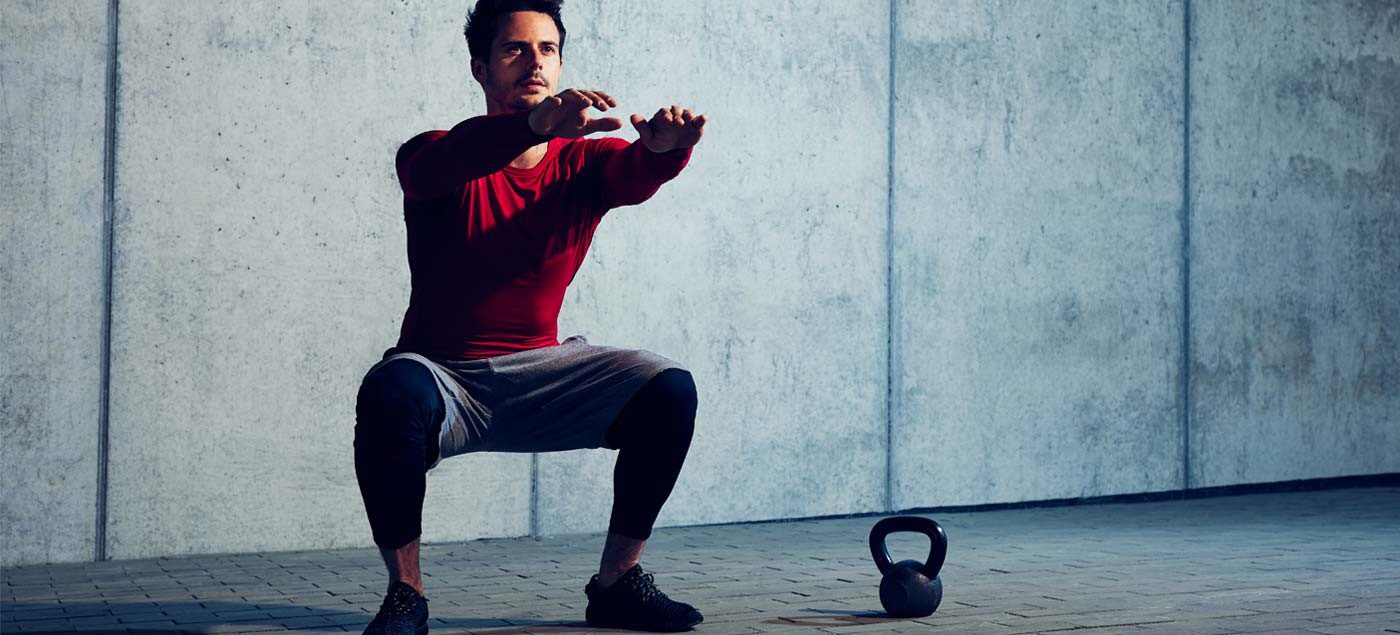
Whether you are squatting racks of weights in the gym or squatting down to the floor to play with your children or simply squatting to sit in a chair – you are still squatting.
Truth of the matter is, squatting is more than just an exercise. If you think about it, it is a functional movement we all do many times in the day.
Knee pain from squatting is a common compliant. Although it is common, it doesn’t mean it is normal.
More often than not, the problem doesn’t only lie at the knee joint. We have to understand the complexity of our body in how our knees are directly linked with how your hips and ankles are moving. So, the purpose of this blog is not only to help you understand the basic mechanics involved in the legs when you squat, but also to help you perfect your lifting craft in the gym.
A bit on what is a squat?
Squatting is characterized as a ‘compound movement’ – fancy fitness lingo that simply means, multiple joints and muscles are moving and working in harmony to contribute to the very movement of squatting.
So here is a checklist to help you find the missing links.
Squatting check list
1. Foot arches
Feet are the foundation to our body. From a balance perspective we can go as far to say that steady the feet, steady the rest of the body. So, what happens at our feet is extremely important to consider when we talking about knee pain in general, let alone, knee pain when squatting.
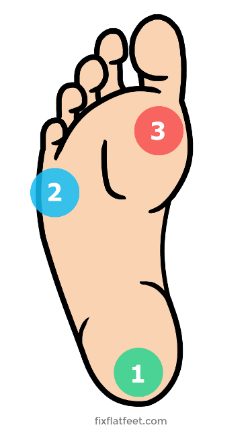
Foot stability can be best explained using the analogy of a ‘tripod’. As tripod has 3 points of contact with the ground, so should our feet ideally.
The three points of a contact, as in a tripod looks like this in our feet.
Ball of the big toe
Ball of the 5th toe
Heel
Keeping this in mind, lets assess the foundation of your body – Your feet with this small exercise.
Take your shoes and socks off. Stand up tall, plant both your feet flat on the ground. Take a look at both sides individually. What do you see?
Either of your feet collapse in?
Are either of your arches diminished?
Take note of it. Next, remain standing and focus on what you feel at sole of your feet.
Think about the 3 points of contact – the tripod.
Do you feel you have evenly distributed pressure?
Take note.
Now stand on one leg – think about the same TWO things the arch and the pressures.
Which way did your foot go?
Which points of contact in the foot had more pressure?
Did your toes 3-5th lose contact from ground?
If your foot caved in and the last 3-5th toes lost ground contact, then your foot pressure is likely to sit between big toe, the base of 2-3rd toes and heel, suggesting you have a narrowed base of support. This will force the knee, hip and the rest of your body to follow in the direction, creating risk of building up unwanted pressures in others areas of your body. Before you know it, unwanted pressure results in inflammation and pain.
It is important that you consider this of high value and practice on pressure control and arch control before your look at the overall picture of squatting.
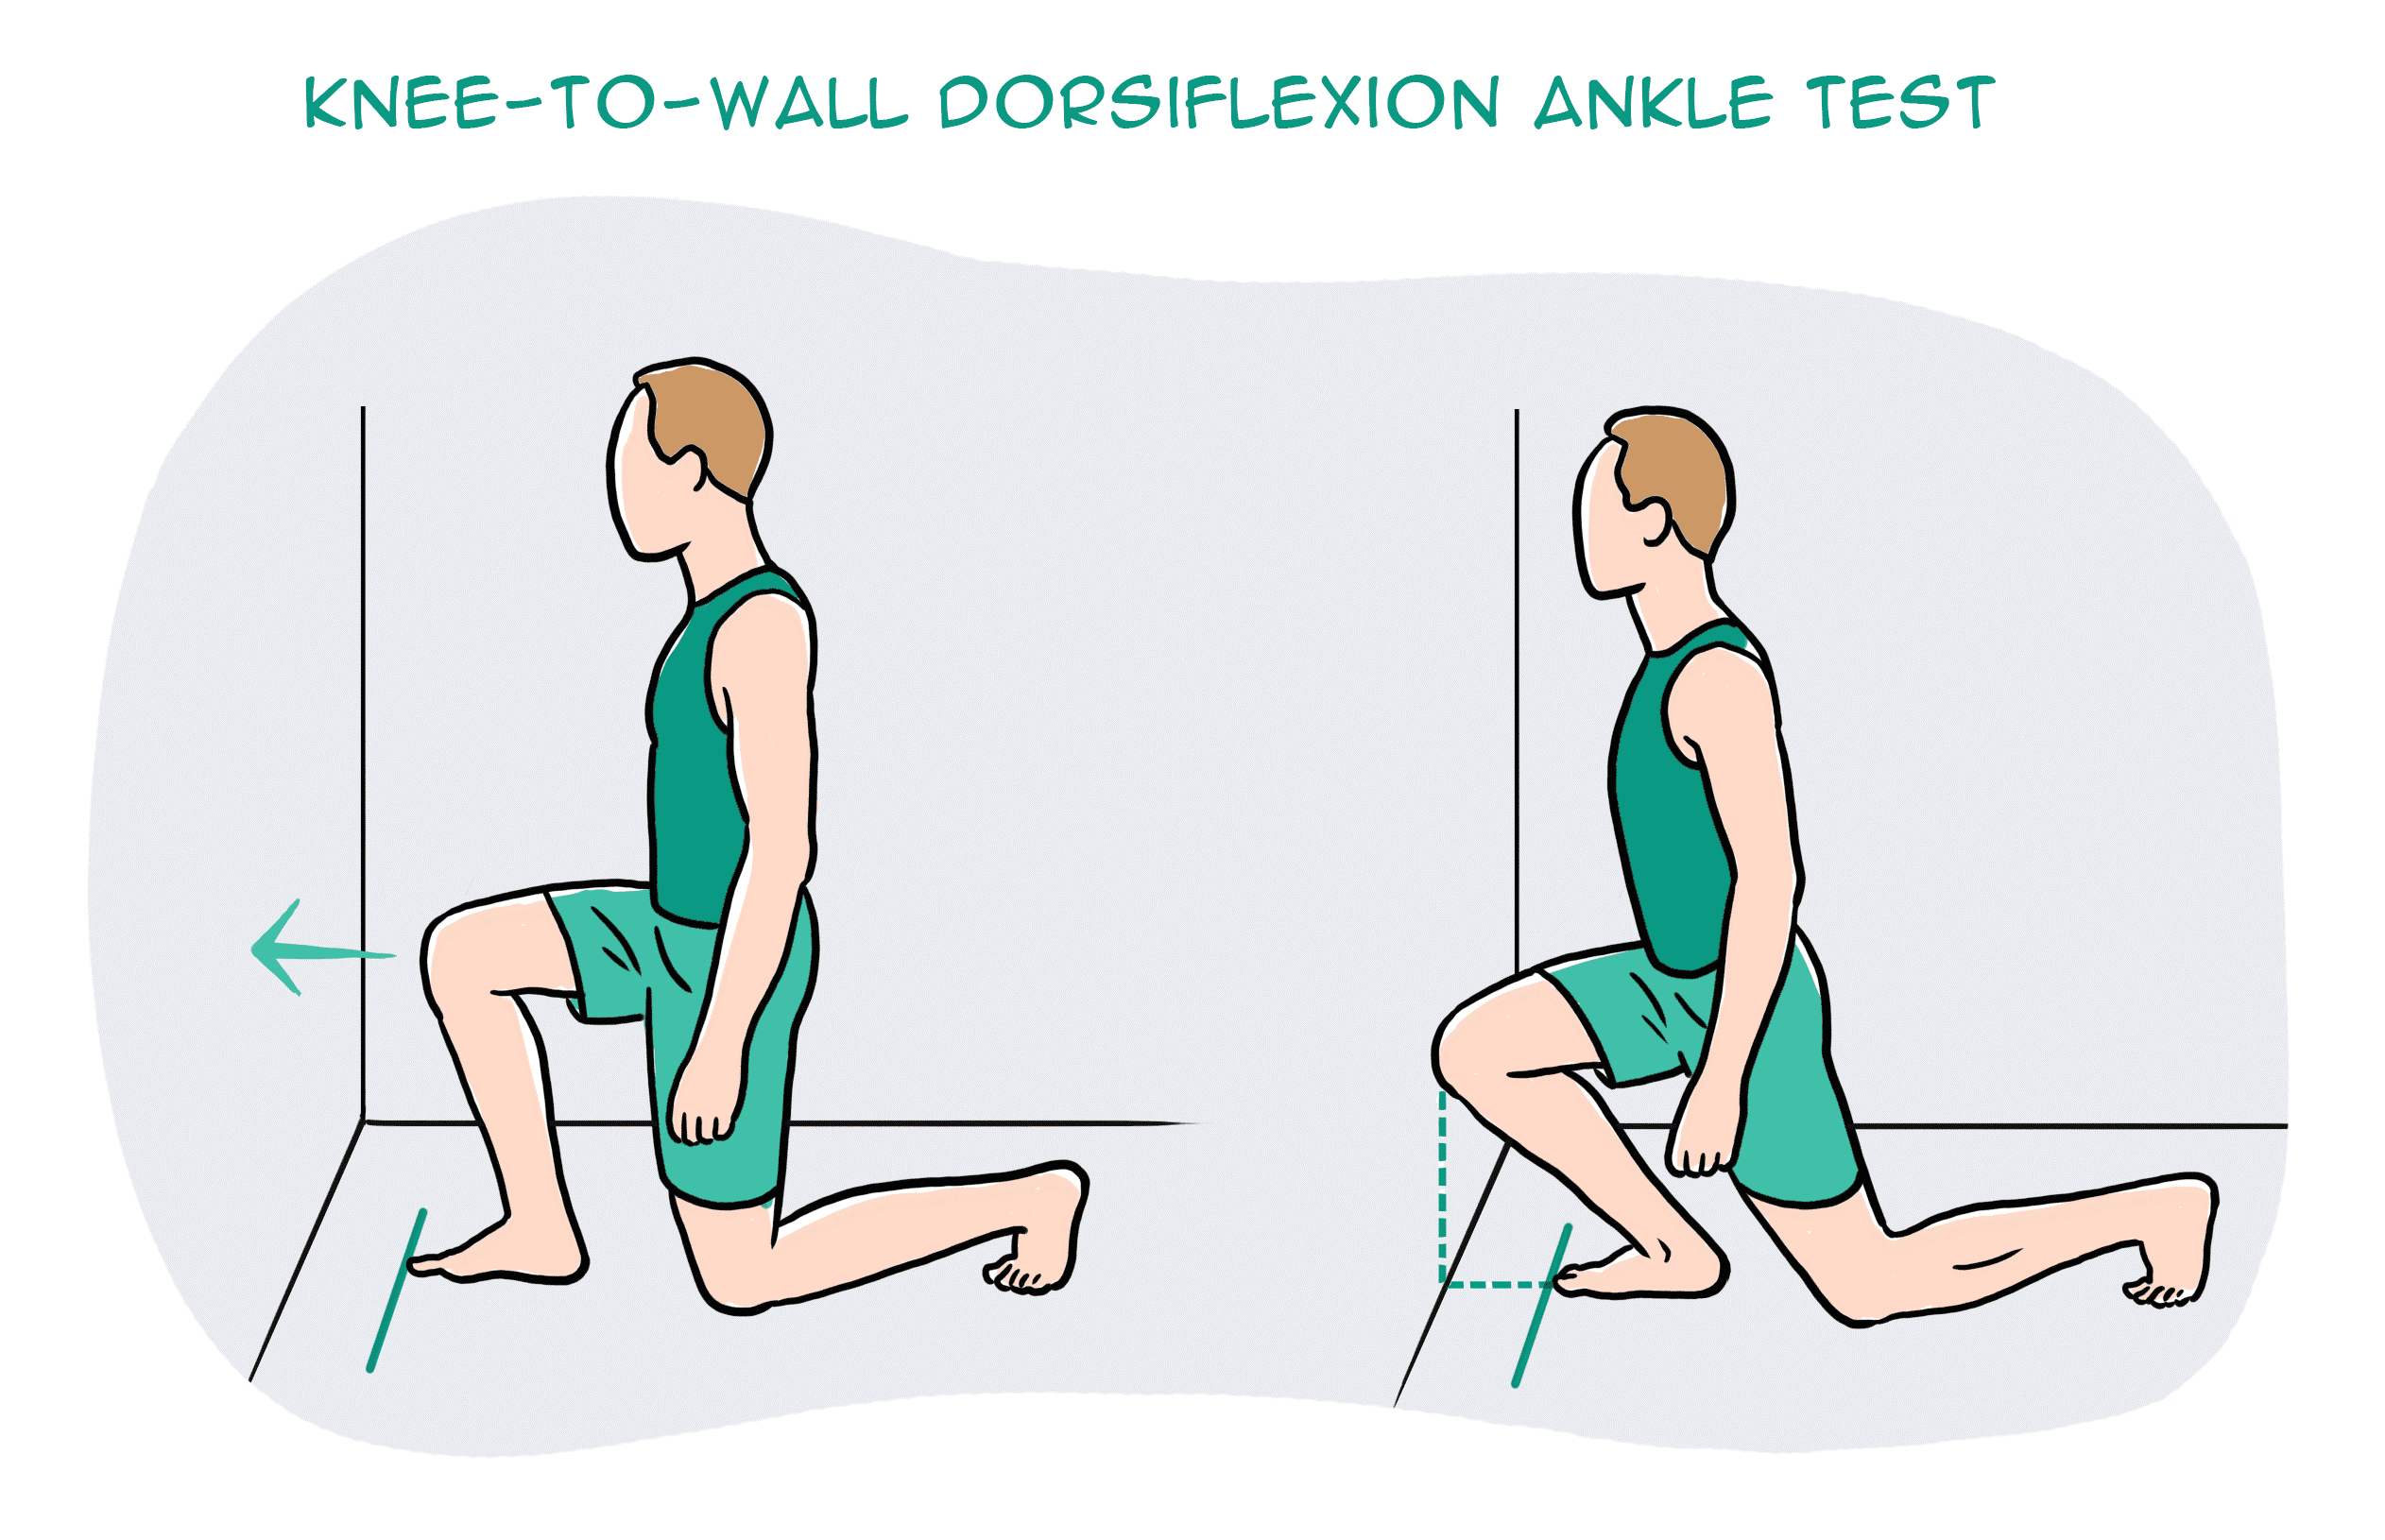
2. Ankle mobility
Your foot and ankle are closely linked – between them there are 28 bones, many muscles, ligaments and connective tissue. These anatomical structures work together to provide stability and mobility of the joints – considered KEY essentials to squatting.
Too much or too little flexibility in the ankle can be a problem. In most cases, ankle injuries result in stiffness, a hinderance to simple functional movements.
So, let’s take a closer look at your ankle with a simple mobility test.
Kneel down in front of a wall. Signal a thumbs up and measure the width of it from the wall and mark it. Place your foot on the line and drive your knee forward to the wall. Make sure you drive your knee straight forward without caving in or twisting in with your hips.
What do you see?
Can you touch your knee to the wall?
What about the other side?
Consider what you feel.
One side feels almost effortless, the other side doesn’t?
It is not uncommon to notice that the unaffected side may not be as flexible as you thought.
This is point to note – you have just discovered a link and a potential cause of your knee pain.
You need focus on stretching the muscles of your leg in a way that similar to ‘squatting’ – here is a good one!
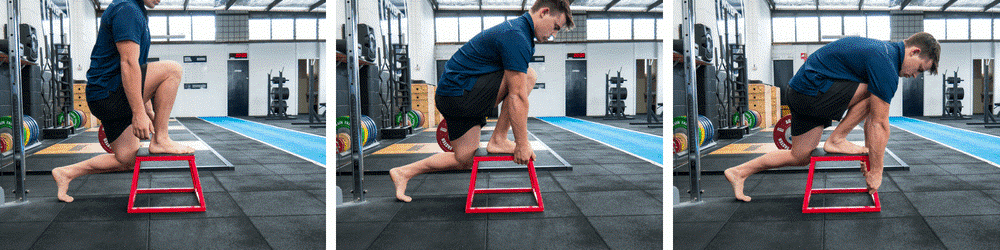
Box ankle stretch
Use a box or a chair, plant your foot flat and rock forwards until you feel a stretch in the calf and ankle. Remember to make sure your knee doesn’t cave in or your body doesn’t twist. Do this for 20-25 repetitions, 2-3 sets. Re-test yourself.
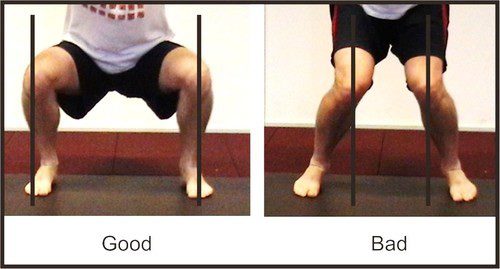
3. Hips
Your feet are directly tied to your hips. So, the action of your hip and feet should be working together for good purposeful movement.
Here is a quick way to check this yourself:
Stand tall, with your feet planted shoulder width apart. Drive your knees out to the side. You will notice your foot arch lifts.
It might be a very small amount, but worth taking note. Because, this is no different when you are squatting. If your knees collapse in, it may mean that you are not recruiting the key muscles of your hips that prevent the knees collapsing.
So, driving your knees out to match the alignment of your hip-ankle not only lifts the arches but begins the process of recruitment patterns of hip muscles to engage.
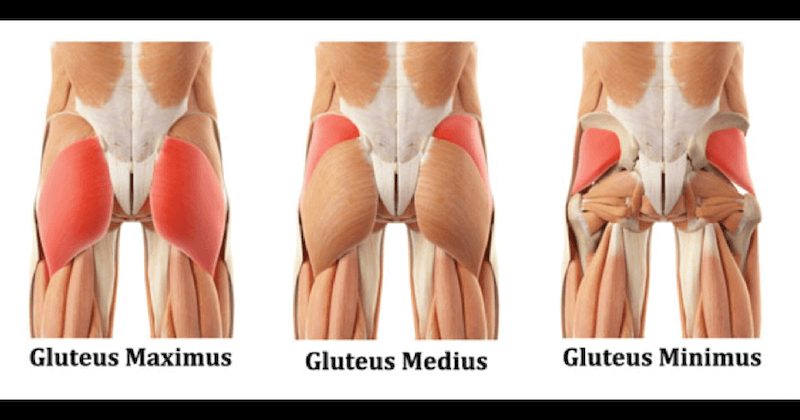
The common deficit contributing to your knee pain may be weak gluteal muscles.
Gluteal muscles are powerful muscles of the lower limb. They are a group of three muscles, each with slight different function
Gluteal maximus – hip external rotation, hip extension
Gluteal medius – hip abduction, internal and external rotation, extension
Gluteal minimus – hip abduction and internal rotation
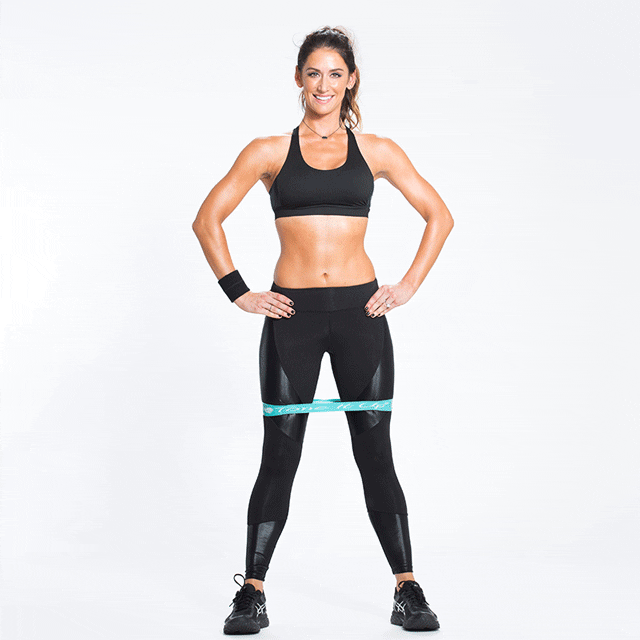
Banded squat
Banded squats are a great way to activate your gluteus. The band not only provide resistance but provides sensory information to help you learn to push into it, therefore avoid knees from collapsing in.
If you have a lighter level resistance band, place this at knee height.
Descend in to a squat position with emphasis on pushing you knee out into the resistance band, until you reach the hip-knee-ankle alignment.
Do this 15 times, 3 sets.
For starters, work at a level that is easy for you.
Build the reps ups as you gain confidence
Weak or inadequately recruited muscles could be a result of stiffness hips.
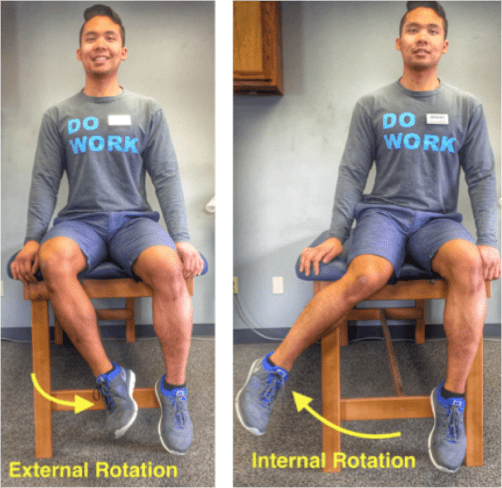
To check your flexibility, try this next test:
Sit on tall on a chair. Feet planted flat on ground at shoulder width apart. Test one leg at a time. Keeping your thigh in contact with the chair, drive your knee out to the side (internal rotation). Now try going inwards (external rotation).
What do you see?
Can internally rotate higher? External rotation is difficult? Or vice versa?
What do you feel?
Takes more effort going one way than the other?
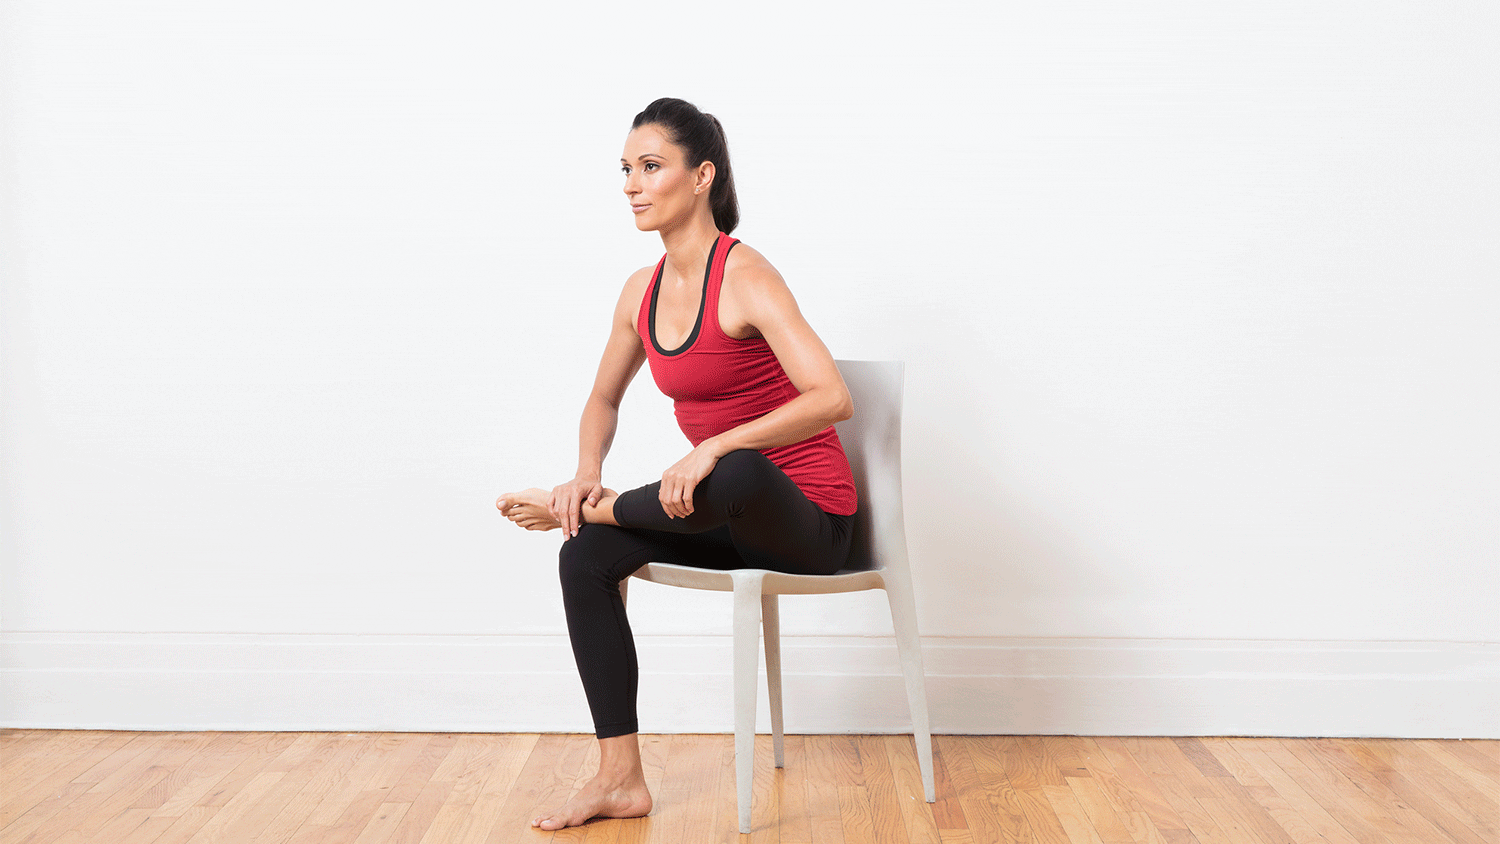
Unlock the hips with this beginner hip stretch.
Sit upright on a chair. Cross one leg over on the other. You should feel a stretch in the buttock region. If not, progress by leaning forward with an upright posture. Hold for 15-20 seconds. Repeat 3-5 times.
Perfecting your squat
Perfect practice makes perfect. Now bearing the rules of movement in mind, practice your squats.
Some tips to help you better practice:
Do not worry about the depth of your squat
It’s the quality not the quantity. So as you begin to learn and adapt these principles, only squat down to a level where you feel in control of your foot, ankle, knee and hip.
Use a mirror
Visual learning is a great tool! It provides for a greater ability to correct your mistakes and perfect that ‘quality over quantity’ rule.
Start with barefoot
This allows you to connect the sensory receptors in the soles of your feet to the ground, making it much easier to learn the tripod grip.
Still having pain?
Remember, the complexity of our body and the complexity in how we move as whole can be the result of your knee pain. So, if you are still having pain – its time you get it checked.
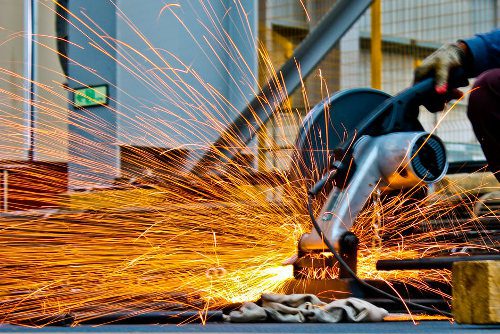
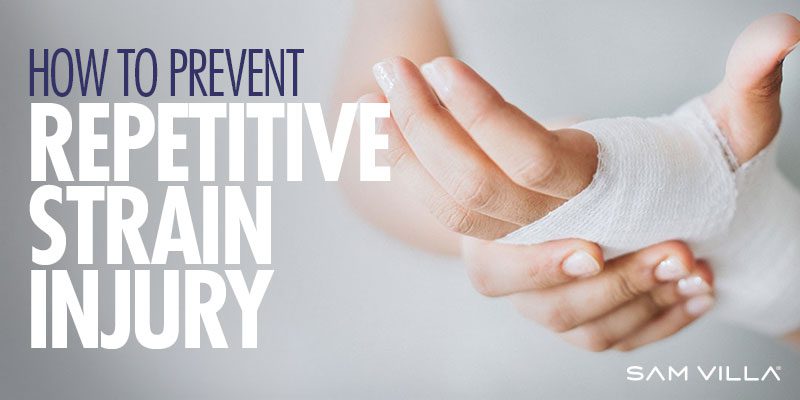
RSI is typically defined as an overuse disorder- a gradual build-up of overload to nerves, tendons, and muscles arising from repetitive movements or activities. Repetitive use of the same motions leads to inflammation and damage to these soft tissues. This disorder mostly affects the upper limb- particularly the elbows, hands and wrists.
Causes
Possible causes of RSI include but are not limited to:
Undertaking the same and repetitive movements and stressing the same muscle groups
Working in cold environments
Assuming a sustained and/or awkward posture for prolonged periods of time
Undertaking a particular activity for prolonged periods of time with no rest-breaks
Frequent and prolonged use of vibrating equipment
Adopting poor postures from working at inappropriately designed workstations
Undertaking a motion which involves carrying and/or lifting heavy items
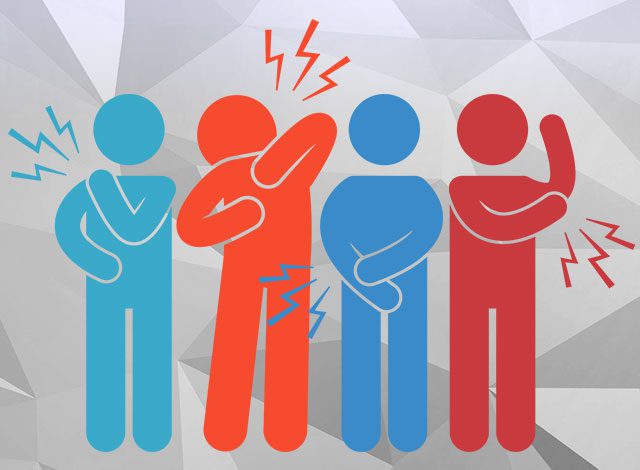
Symptoms
RSI leads to a gradual development of a broad variety of symptoms, which range from mild to severe in severity. RSI particularly affects the muscles and joints of your wrists, hands, elbows, forearms, shoulders, neck. Having said this, RSI can affect other areas of the body as well.
Common symptoms may include:
Pain
Tingling
Cramping
Increased sensitivity to heat and cold
Tenderness
Fatigue
Loss of strength
Throbbing
Soreness
Achiness
Stiffness
Struggling with typical activities of daily living, such as gripping and twisting motions, carrying light weights, writing, kitchen prepping, dressing, personal cares etc
You may develop these symptoms when you undertake a task repetitively for a period of time, and can settle when you stop. Symptoms may settle over a few hours or over the course of a few days. However, if left untreated or is poorly managed, a minor RSI may gradually progress to a nasty chronic injury.
Diagnosis
If you experience mild discomfort whilst completing particular activities at home or at your job, it is a good idea to see your GP or physiotherapist to talk about RSI. But an RSI is not always simple to diagnose as there is no particular clinical test for it. Your GP will enquire about your medical history, occupation and work environment, and other activities to attempt to identify any repetitive motions you undertake that may be the cause of your symptoms. A physical examination will be undertaken, where they will assess your movement, check for pain, inflammation, sensation, tenderness, strength and reflexes in the impacted body part. RSI may be triggered by specific health disorders like bursitis, carpal tunnel, tigger finger, ganglion cyst, or tendonitis (inflammation in your tendons). Your GP can refer you on further diagnostic tests such as X-rays, Ultrasounds, blood tests, MRIs, nerve conduction tests etc, to determine if these underlying disorders may be the cause of your symptoms. You may be also be referred onto a physiotherapist and acupuncturist for conservative treatment and management for mild-moderate issues. If symptoms persist, you will then be referred onto a specialist.
Management
Initial treatment options for the management of RSI symptoms is conservative. This includes:
Rest, Ice, Compression, and Elevation (RICE principles)
Taking regular breaks between tasks and looking after your posture
Undertaking your activities and movements with appropriate form and posture
Intake of Nonsteroidal anti-inflammatory drugs (NSAIDs), both oral and topical as prescribed by the GP
Use of cold and heat to the impacted area
Administration of steroid injections into inflamed joints and tendons
Tailored exercise prescription from physiotherapists to correct posture and strengthen and stretch affected muscles
Acupuncture
Stress reduction and relaxation training
Use of splints and braces to help protect and rest the affected muscles and tendons
Ergonomically appropriate adjustments to your workstation and work environment may be recommended by your physio and GP- for example resetting your desk and chair if you’re working at computer, and alterations to your equipment and activities/motions to lessen the strain and stress on your muscles and joints. Surgery may be necessary in some cases.
Prevention
Minimizing repetitive actions particularly if they involve the use of heavy machinery or vibration. Improving your working posture and work-environment as well a taking regular breaks. Employers often undertake risk-assessments when you join a company to determine that the work area is ergonomically fit, comfortable and appropriate for you. You may be able to request for an assessment if you have not had one or are having issues with your work environment
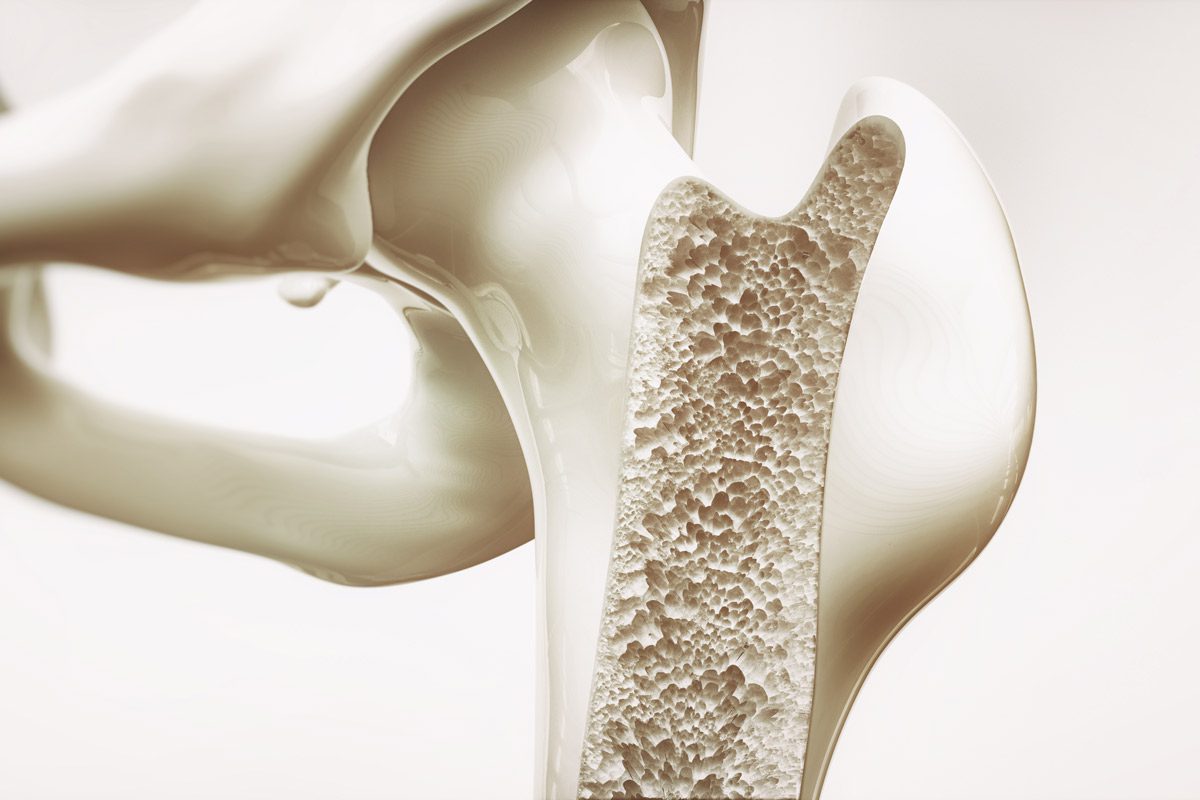
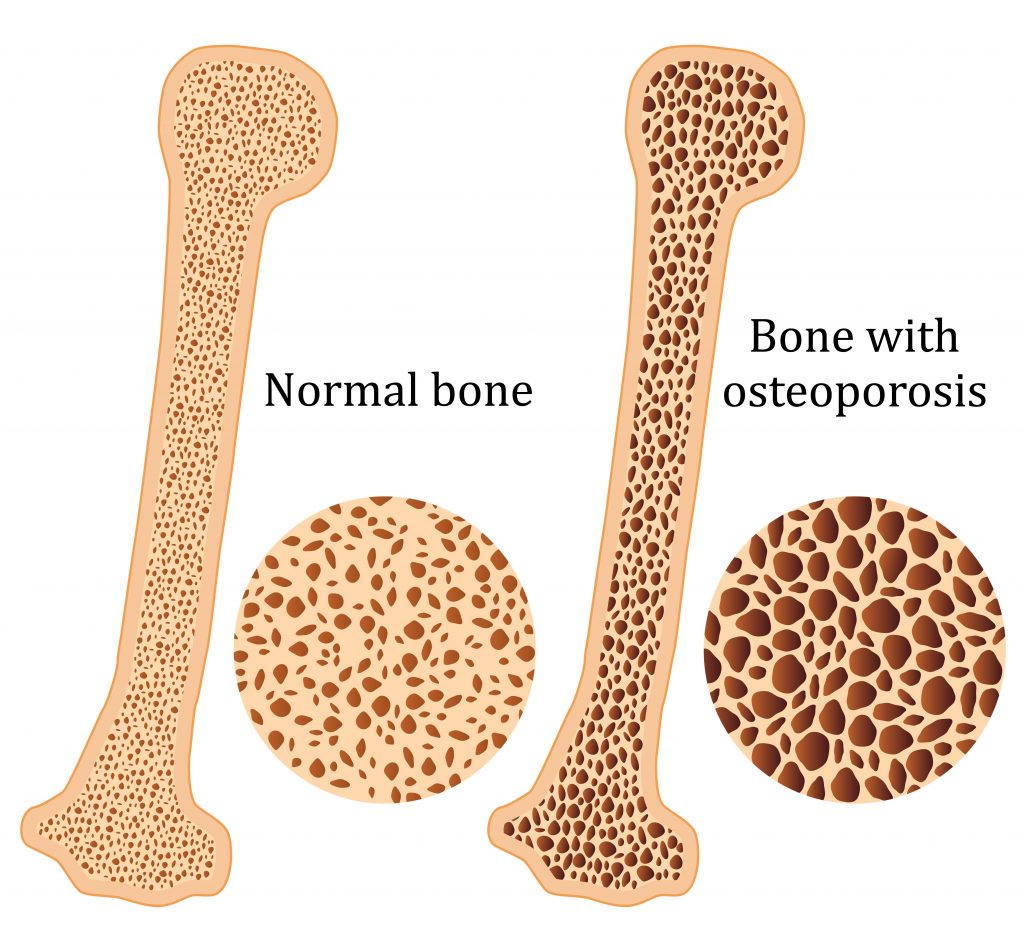
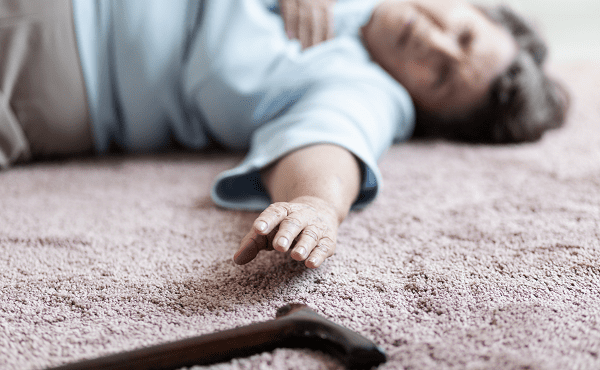
Osteoporosis is a condition which results in weak and brittle bones- to such degree that a fall or even mild stresses like coughing or bending over may result in a fracture. Bones are living tissues which are continually being broken down and replaced. However, your bones become osteoporotic when the formation of new bone does not keep up with the loss of old bone. This condition typically develops over time without any pain or other major symptoms, and is generally not diagnosed until you have sustained a fracture. The hip, pelvis, upper arm, spine and wrists are the most common structures affected by osteoporosis- related fractures.
How do you know if you have Osteoporosis?
Because there are no obvious early warning signs and symptoms, it is difficult to pre-diagnose osteoporosis. You may be unaware that you have this condition perhaps till you have one of the following:
Sustained a fracture from an incident more easily than you should have- like a simple fall or a bump
A decrease in the height of your spinal vertebrae over time
Change in posture – stooping or bending forwards
Back pain, due to a fractured or collapsed vertebra
Please see your doctor if you experience the following:
If you are over the age of 50 and have sustained a fracture
Sustained a spine, wrist, or hip for the first time
Sustained a fracture more easily than you should have (a simple fall or after a slight bump)
Risk factors
Key factors which may increase your risk of developing osteoporosis include:
Females- particularly post-menopausal Caucasian and Asian women
Over the age of 50
Excessive consumption of caffeine or alcohol
Smoking
Having a smaller or petite body frame
Poor physical activity levels and leading a very sedentary lifestyle
Family history of osteoporosis
Having low levels of vitamin D and poor dietary calcium intake
Decreasing levels of testosterone with ageing in men
Estrogen deficiency in women (irregular periods, early (before turning 40) or post-menopausal, surgical removal of the ovaries)
Use of long-term medication such as thyroid and epilepsy medications, corticosteroids
Having medical conditions such as gastrointestinal diseases; endocrine diseases; rheumatoid arthritis; cancer; and blood disorders
How will you be diagnosed?
Your doctor will review your signs and symptoms, family and medical history. You may be referred on for a specialized X-ray or CT scan to evaluate the bone density to help diagnose osteoporosis. Your bone density will be classified by comparing it to the typical bone density for a person of equivalent gender, size, and age.
How is Osteoporosis treated?
The treatment pathway chosen for the management of this condition is dependent on results of your bone density scan, gender, age, medical history and severity of the condition. Potential treatments for osteoporosis may include exercise, making positive lifestyle changes, vitamin and mineral supplements, and medications. Please consult your doctor for appropriate advice and treatment options.
How can Physiotherapy help?
Your physiotherapist will help you strengthen your bones and your muscles through a personalized and graduated rehabilitation program. Components of this rehabilitation program may include weightbearing aerobic exercises, resistance training using free weights/resistance bands/bodyweight resistance, and exercises to enhance posture, balance and body strength. Your physiotherapist will work with you to find activities that suit your needs and as per your physical activity level.
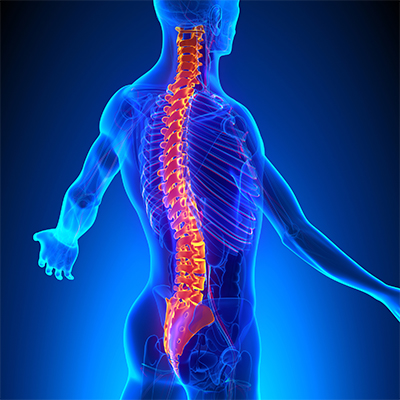
Low back pain is a common health problem which affects up to 80% of the population at some stage in their life.
In New Zealand ACC spends in excess of $130 million a year treating back pain related injuries.
Most back pain occurs between the ages of 25 and 60, and most typically in the 40s.
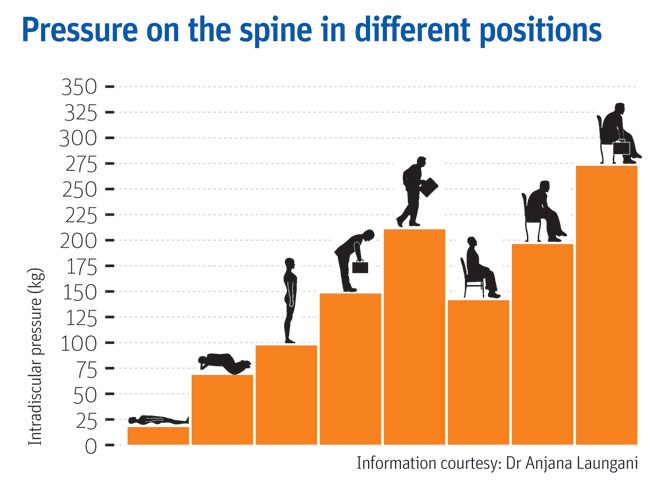
In an era of smart devices, posture has never been more important or harder to achieve. As technology continues to grow, sitting at a desk on a computer or on our phones is becoming more prevalent at work. Having a sedentary desk job can result in sitting for around 8 hours a day. This position actually increases the load on your spine more than standing. Spinal pressure “sits” around 140mm pressure. This pressure usually does not hurt the back right away however, builds up over time and can even change the structure structure of your spine. So, if you slouch then spinal pressure increases to 190mm; add some weight and you’ve put 275 pounds of pressure on your spine.
A compromised spine constricts your blood vessels and nerves, causing problems with your muscles, discs, and joints. And all of these problems can lead to headaches, fatigue, and even breathing problems. Your back is a delicate machine. When one part falls out of alignment, it can affect everything setting off a domino effect and wreak havoc throughout your back and body.
Below is a graph showing different postures and the pressure it exerts on the spine;
But, remember: While you may feel comfortable and supported in your chair and find a perfect sitting posture, staying in the same position for long periods is not healthy for your spine. Varying your postures by occasionally standing and moving around for at least a few minutes each half hour will help keep your spinal joints, muscles, tendons, and ligaments loose and pain free.
Stand Up for Your Spine
If you don’t have a sit-stand desk, you can still combat “sitting disease” and protect your spine. Consider these tips:
Do some work standing at a high table or counter.
Use a lumbar roll behind your back when sitting to improve seated posture
Set a timer on your computer for a stand-and-stretch break every 30 minutes.
Exercise to assist in improving body weight to lessen additional load on the spine
Strengthen the core to provide additional support
The focus is simple: Reduce your sitting throughout the day. But, remember that varying postures is best for your back and neck, so do not go the opposite extreme and never sit. Alternating sitting, standing and movement throughout your day is the best way you can keep your spine safe and body healthy—at work and beyond
Still having back pain?
Schedule an initial assessment with one of our Physiotherapists so they can determine the root of the problem. During this assessment your physiotherapist will be able to decide whether your pain is a source of nerve root irritation, discogenic, postural related, or musculoskeletal. After arriving with the consensus of the problem, we will be able to use many techniques to relieve the back pain. These include: manual therapy, therapeutic exercise, and postural recommendations.
To find your nearest Physio Fusion clinic and book an appointment call 09 6266186 or visit our websitehttps://physiofusion.co.nz
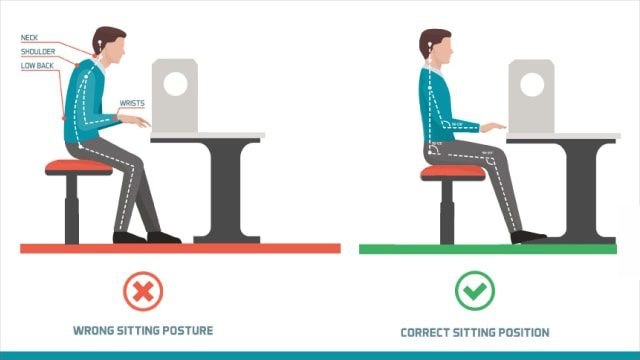
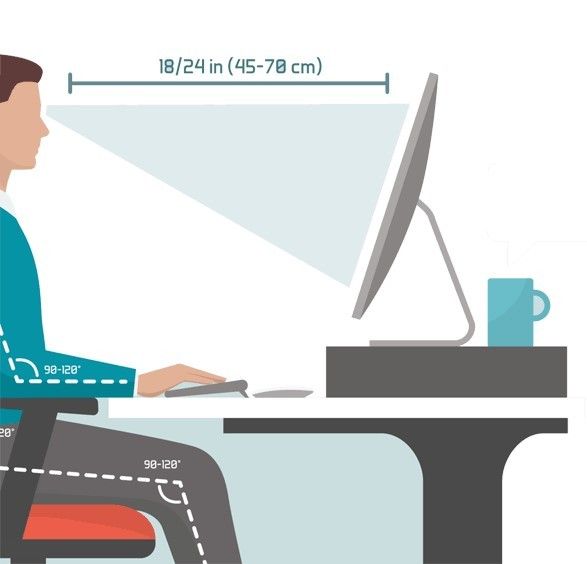
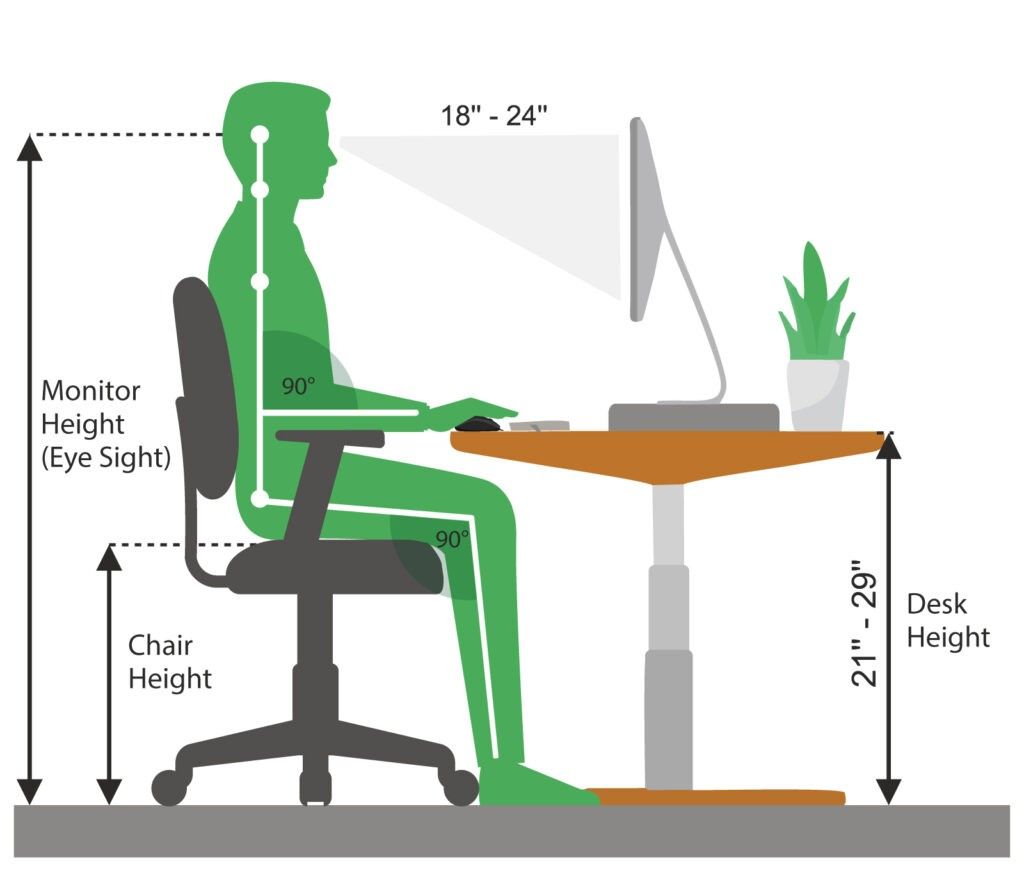
An ergonomically correct workstation has all the best practices to help maintain a healthy posture and improve your health and productivity.
Here are a few helpful tips;
1. Set up your screen
Adjust the monitor height so that the top of the screen is at—or slightly below—eye level. Your eyes should look slightly downward when viewing the middle of the screen. Position the monitor at least 20 inches (51 cm) from your eyes—about an arm’s length distance. If you have a larger screen, add more viewing distance.
2. Set up your chair
Height – You should be able to sit with your feet flat on the floor and your thighs roughly parallel to the floor. If you require a taller chair in order to reach the floor you can use a foot rest to ensure you achieve the right angle.
Backrest Recline and Tilt – Research has shown that a reclined seat (at least 135 degrees back) significantly reduces the pressure on your back, and is particularity beneficial for people with back
Lumbar support – the shape of the backrest should have a natural curve to support your lower back.
Arm rests – Look for armrests that are not just height adjustable and support the entire length of the forearms.
3. Adjust your Desk Height
Your legs should fit comfortably under the desk if you are sitting with your feet flat on the floor: you should have enough space to cross your legs.
The angle between your forearm and upper arm should be between 90 degrees and 110 degrees while your arms are at rest on the desk.
Make your desk organized using storage accessories i.e. Document holders
Use an ergonomic mouse pad; to keep your wrists supported.
4. Organizing your Desk space
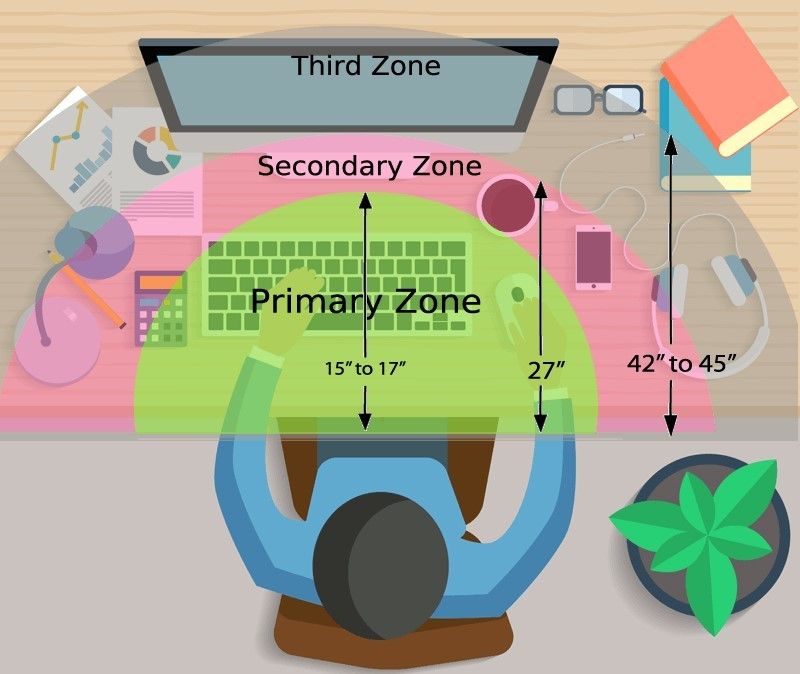
Organize all the items on the workstation according to their priorities and assign them to the proper ergonomic reach zones.
Primary Zone: High use items, easiest access
Secondary Zone :Medium use items, comfortable reach
Third Zone: Low use items, reduction in efficiency
MOVEMENT IS KEY
Its a simple action step, but mighty! Get up out of your chair and take frequent posture breaks!
When we sit in one position for hours without moving, our performance slowly starts to deteriorate, our body slows down, static loading takes over our muscles and we actually get fatigued even when we aren’t putting in any physical effort. However, when you consciously integrate these microbreaks into your day, you’re giving your body a much-needed refresher and an opportunity to wake up your muscles and replenish blood flow. Research has shown that movement can also help with creativity, or get you ‘unstuck’ so you can approach your work with a different or fresh perspective and energy.
If you think your desk set up could be better, or want us to have a quick look we can do this via a video call. Book in for an appointment www.physiofusion.co.nz or give us a call on (09) 626 6186
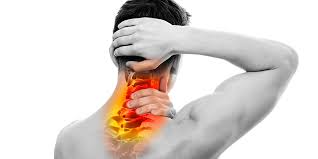
Headaches happen for lots of reason and can be cause by several sources- both primary and secondary. Once major “red flags” are ruled out, understanding the type of headache is important in order to have it properly addressed.
A cervicogenic headache is a secondary headache arising from a musculoskeletal dysfunction within the cervical spine, and is a disorder that many physiotherapists treat. The main players that are typically involved in generating the pain are the joints, discs, ligaments, nerves and/or muscles found in the upper portion of the neck.
Characteristics of a Cervicogenic Headache:
Pain usually one sided or one side dominant
Pain originates from the back of the neck and radiates along the forehead, orbits around the eye, temple area and ear.
Steady ache or dull, diffuse pain that travels into shoulder region
Limited neck movement especially when turning head
Tenderness to touch at the muscles at the base of the head.
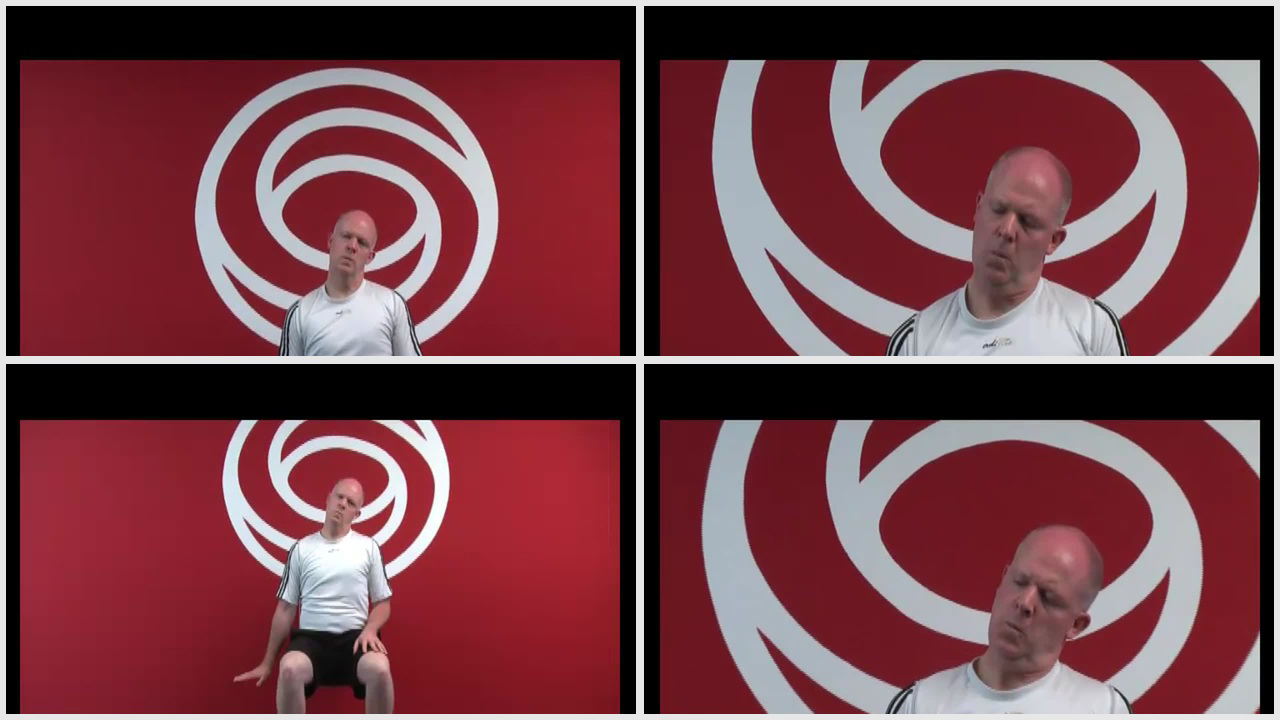
Here are some exercises that would help alleviate your pain:
Cervical side flexion with chin tuck
Sit upright in a chair.
With your shoulders relaxed, relax one arm to your side.
Drop your opposite ear to your shoulder until a stretch is felt.
Using your fingers, tuck your chin in, as to resemble a double chin.
Gently release pressure with your fingers and hold this position.
Relax and repeat
2. Levator stretch Neck stretch – levator scapula
Start in a seated position.
Place the hand of the side you want to stretch down by your side.
Tilt your head forwards and to the opposite side at an angle, as if you are trying to
look at your armpit.
Keeping your back straight and upright, continue to tilt your head down until you
feel a stretch from the base of your skull down into your shoulder blade.
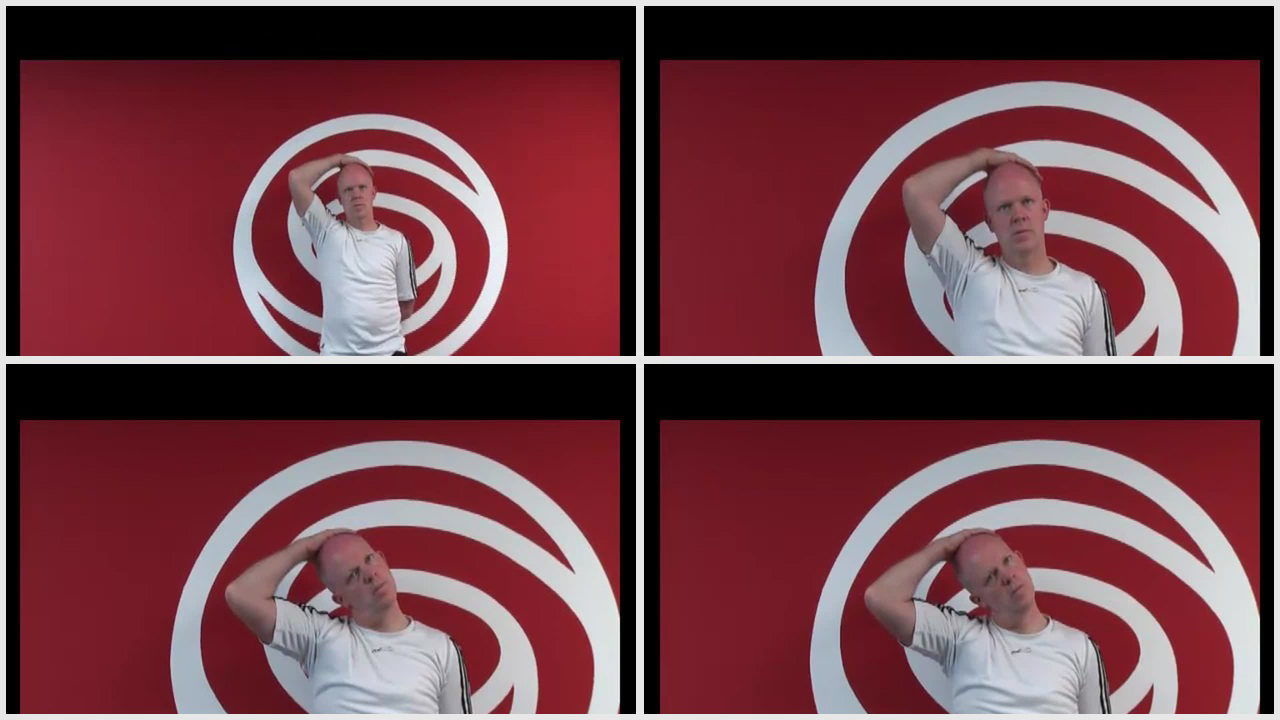
3. Neck stretching (Upper trapezius)
Stand up straight.
Take the hand on the symptomatic side and place it behind your back.
Take your other hand and place it on your head.
Tilt your ear directly down towards your shoulder and hold this position.
You should feel a stretch down the side of your neck.
If you believe you experience Cervicogenic Headaches get in touch with us https://physiofusion.co.nz/ for an in-depth assessment and lets knock out those headaches and decrease you dependence on pain meds
The restrictions and change brought by the outbreak of COVID-19 has resulted in a great deal of control being taken from our hands; this has been anxiety provoking for many of us. Nevertheless, it’s important to re-evaluate, acknowledge and place focus upon the matters that we DO have control over so that we can gain our personal power back!
Lockdown Productivity Tips
Check in with yourself: how is your body and mind feeling. Embrace your emotions and give yourself permission to feel the way toy do.
Stay connected: Social connection is inevitably limited at the moment but catching up with people via text or facetime will help prevent feelings of isolation.
Maintain some form of routine: Maintaining a routine helps provide some structure do days which often all seem to merge into one.
Get fresh air where possible: Daily fresh air can provide an easy change of scenery when we are stuck at home most of the day.
Gentle exercise is a MUST!
Stay Hydrated: Drinking enough water is important to keep your body hydrated and makes sure your body functions properly.
Eat well- You’d be surprised how your diet can affect how you feel. Gut health in particular is linked to mental health.
Get to that “thing” you’ve been delaying for months
Pick up a good book
Learn new habits or rediscover old ones
These may seem like simple strategies but sometimes it’s the simple things that are most effective
“One day this will all be over and we will be grateful for life in ways we never felt possible”
The gratitude we will have for the things we once took for granted will be unmeasurable- getting on a plane, an impromptu visit to the cinema, a shopping spree, going to the gym, even meeting a friend for lunch at a café. Keep going, nothing lasts forever and we have so much to look forward to. In the mean time take each day as it comes, be kind, support those who are struggling and keep going! You are stronger and more resilient than you know!
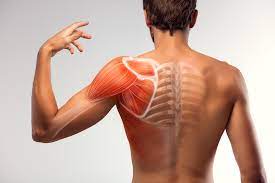
You may have seen videos or posts online about people talking about a specific area of your shoulder known commonly as the “Rotator Cuff” and wondered what they were on about. Your shoulders do a lot of important things you might take for granted! They help you get something off a high shelf, comb your hair, or play a game of cricket.
It’s a complicated process that your body makes look easy. And your rotator cuff is a big part of that. It protects and stabilizes your shoulder joint and lets you move your arms over your head. It’s importance is widely used in sports like swimming, tennis and netball.
In New Zealand healthcare, shoulder injuries have one of the highest prevalence when it comes to ACC claims and overall cost. Within this, rotator cuff injuries are among the most common pathologies affecting New Zealanders. Other pathologies include acromioclavicular injuries, dislocations, osteoarthritis and frozen shoulder.
So, what exactly is the cuff and how does it influence the shoulder?
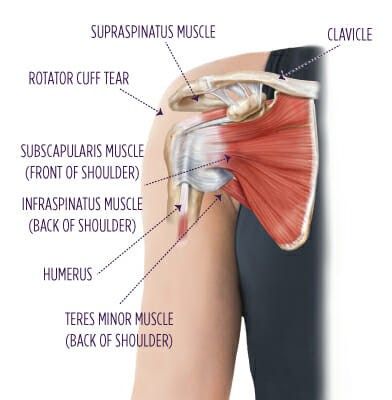
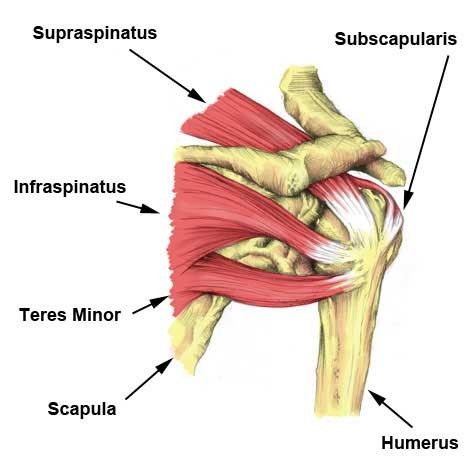
The rotator cuff (RC) is a combination of four muscles that run through and attach onto specific areas of the humeral head (top of the arm bone).
Supraspinatus, Infraspinatus, Teres minor and Subscapularis are the four muscles comprising the RC and each one plays an important role however they all contribute to shoulder stability:
Supraspinatus
Infraspinatus
Teres Minor
Subscapularis
A thin triangular muscle that helps perform abduction
A thicker, triangular muscle that performs external rotation.
The smallest muscle of the cuff, helps with rotation as well
The largest muscle of the cuff performs internal rotation (arm behind your back!)
Many people suffer from shoulder pain, so here are the most common injuries that can happen at the rotator cuff:
Rotator Cuff Tear:
A rotator cuff tear is often the result of high levels of load over a short amount of time or a high impact force stressing one or more of the tendons/muscles. Fortunately, majority of tears are partial. Tears are more common in people with jobs that involve heavy loading or lifting or in high impact sports like rugby. It also can happen suddenly if you fall on your arm or try to lift something heavy. Common and easily treatable with conservative management by a physiotherapist, a rotator cuff tear can come right.
Rotator Cuff Tendinopathy:
A rotator cuff tendinopathy is the most common shoulder pain complaint/injury resulting in inflammation and irritation of one or more of the cuff tendons. This pathology is more common in individuals who have an occupation where repetitive use of the shoulder, particularly in an overhead position such as carpenters or painters, or individuals that play highly repetitive, throwing sports like tennis, baseball or volleyball. Once again, this injury is treatable by a physiotherapist, conservative management can be very effective in treating these injuries with a thorough, well planned exercise program to help get patients back to doing what they love.
Majority of people experience pain around the shoulder joint, with some movements being highly provocative. Tenderness on touch at the affected site is also common – this helps your physiotherapist hone in on potentially which tendon is causing those problems!
Medical management vs Physio management
Medical management will be advised by your local GP if you decide to see them first. They might prescribe NSAIDs (anti-inflammatory medications such as ibuprofen) to help with the pain you’re experiencing and recommend you see a physiotherapist. Depending on your injury as well as your ability to function, surgery may be an option if conservative medical and physio treatments don’t help. Most people get by without the need of surgery but some tears can be too large to heal without the use of surgical intervention.
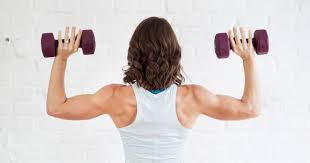
Physiotherapy management is designed around reducing pain and disability, restoring range of motion and helping people return to work or sports to perform how they were prior to the injury. In the early stages of these injuries, rest and ice and/or heat are recommended to allow the inflammation to settle – then your physiotherapist will begin to introduce a detailed exercise program, this may include:
Isometric (static hold) exercises
Resisted movements using bands
Range of motion exercises to restore lost movement
Functional loading – task specific or sport specific
If this is successful, the last step is to build back up the strength that was lost over time – this is done by concentrically (against gravity) loading the affected tendons/muscles in a way that they adapt and lay down more tissue, grow and becoming stronger in hopes that you get to return to what you enjoy!
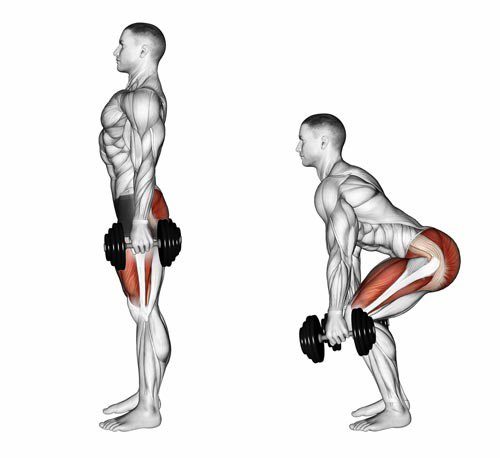
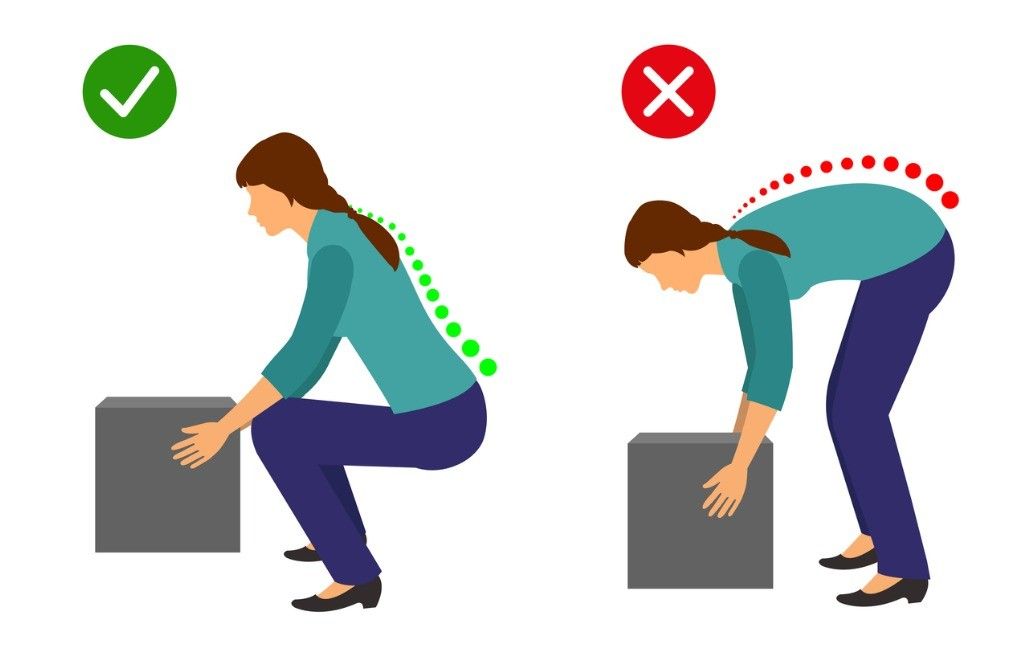
One common belief about lifting is that rounding your back when lifting an object is considered dangerous while lifting with a straight back is considered safe…
However, there is a lot of misinformation circulating around lifting mechanics and what is deemed “good technique” versus “bad technique.”
Here are some key myths and misinformation that you may have heard:
A ROUNDED BACK WHILE LIFTING OVER STRESSES THE BACK MUSCLES AND LIGAMENTS
Research has shown that regardless of lifting position, whether you’re stooped, squatting or weightlifting, your back has to produce the same amount of force. Statistically speaking, it’s not significantly different.
FLEXING THE SPINE WHILE LIFTING INCREASES THE LOAD ON THE LUMBAR DISCS
Under heavy loads, discs are unlikely to fail unless >95% flexion is achieved (which is near impossible)
With low loads, the disc is unlikely to fail unless you do thousands of repetitions continuously
Your body is an amazing adapter, this includes discs! Your discs can adapt and become more and more able to handle loads when stressed appropriately
THESE COMPOUND TO CAUSE INJURIES AND PAIN TO THE BACK MUSCLES AND DISCS
Resistance training has demonstrated through countless studies the ability to increase bone mineral density (BMD) of the lumbar spine. BMD is actually positively associated with the strength of the spinal discs and ligaments at that level. With appropriate loading and training, disc, ligament, bone and muscles are going to adapt favourably
A NEUTRAL SPINE IS SAFER, STRONGER, MORE EFFICIENT AND BETTER TO LIFT WITH
There is no significant difference between activities that encourage more spinal flexion and one’s that do not in the long term
Lifting with lumbar flexion is not a risk factor for low back pain
Research has shown lifting with a bent back is more metabolically and neuromuscularly efficient
When the spine is in extension during bent over activities, the hip is actually flexed to a greater degree – decreasing the ability for the glutes and hamstrings to create as much internal torque. Flexing the spine reduces this effect and reduces the moment arm for the hip extensors
STOP BACK PAIN & INJURIES BY LIFTING WITH A NEUTRAL SPINE
Your lumbar spine flexes every time your hip flexes! It is impossible to isolate one versus the other. It is also impossible to not flex while doing common movements
Extreme flexion however (>/=100%), may pose an increased risk under heavy loads, but not at light loads
You may still be wondering why you have back pain (stay tuned for our next blog!). Your pain may not be directly related to your lifting strategy.
Could you have pain with forward bending? Absolutely.
Is bending at the lumbar spine an increased risk for pain or injury? In the vast majority of situations, no.
If I have pain with forward bending, is it bad to temporarily limit doing so? Not at all.
Should I fear bending at the spine with or without pain or injury? No. Being fearful of flexing/moving your spine is actually a stronger predictor of disability and back pain.
Work on moving through your spine, after all it’s what it is designed to do! Choose comfortable movements and gain confidence over time, then build up your strength gradually with resistance training – try and not to push too fast, we want nice, healthy adaptation! Give your body time to adapt, back pain is not quick fix sometimes but you are resilient and with healthy, normal movements and some patience, you will be okay.