
Lower Back Pain with Deadlifting
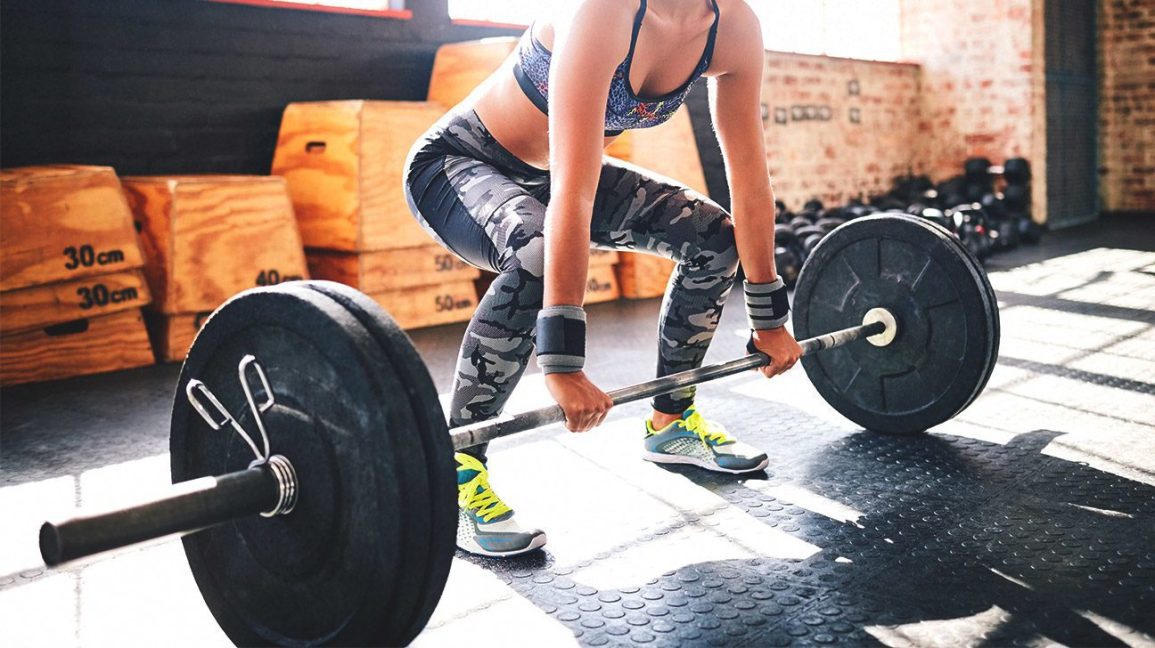
Deadlifting is one of the most very versatile exercises in the gym. There are about 11 variations of the exercise, whether you are doing it with dumbbells, kettle bells, barbells or traps bars. The variations and the technical complexity of the exercise can be extremely intimidating for some, especially for those who are combating lower back pain.
While there are multiple factors to consider when determining that causes of lower back pain, the technique and the execution of the exercise is by far the most common cause. Therefore, this blog will focus on the common mistakes you are likely making in the weights room resulting in your persisting lower back pain.
What are the benefits of deadlifts?
Deadlifting is one of the most respected exercises in the gym, often referred to the king or queen of all compound exercises. This means that at one shot of movement you are activating almost every key muscle in your body.
Including your heart – Yes, the heart!
Before we elaborate of the musculoskeletal system, here a little interesting information on why the heart. For starters, the heart is a muscle. Its prime function is to supply nutrients and oxygenated blood throughout the body for effective organ functioning. To do so effectively it regulates the blood pressure and heart rate. So yes – to simply put it deadlifts when done correctly as advised by a health practitioner can have tremendous health benefits on reducing heart rate, blood pressure and improves overall conditioning of the cardiovascular system.
As sides that, from a musculoskeletal stand point there are strategic strength, power, and coordination and aesthetic that are achieved. In the era of computers and laptops and sedentary jobs – Working at a desk for 7-8 hours a day, we become more dominant in using the muscles in the front of our body (the anterior chain) and the muscles in the back (posterior chain) tend to be inactive and weak.
For this reason, the deadlift is particularly regarded as the single most beneficial exercise one can do that targets the entire body at one go, perhaps with more emphasis on the posterior chain.
What muscles are used?
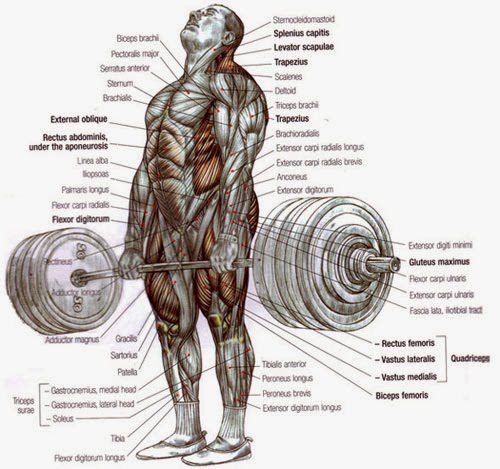
As seen in this picture on a ‘conventional variation’ of a deadlift almost every muscle is highlighted – from the gripping the bar with the hands to gripping the ground with the feet.
- core muscles
- gluteus
- hamstrings
- adductors
- quadriceps
Technique faults to consider
1. Poor core stabilization
Core-stabilisation is the foundation fundamental to almost any given exercises in the gym, let alone a deadlift.
When you are told to ‘brace’ your core – it’s not the sucking in of your belly or holding your breath. It about activating or ‘tightening’ up the key of your ‘core’ to contain the pressure (intra-abdominal pressure) from within. This is absolutely crucial in creating stability and preventing overloading for your spine, especially when lifting heavy.
For the simplicity of this blog, information around intra-abdominal pressure is kept brief and explained using the ‘soda can’ analogy.
What exactly is ‘core’?
What many people don’t know is that core is more than just abdominal muscles. The core aka the corset of our mid-section includes the deeper and the outer muscles.
- DEEP CORE
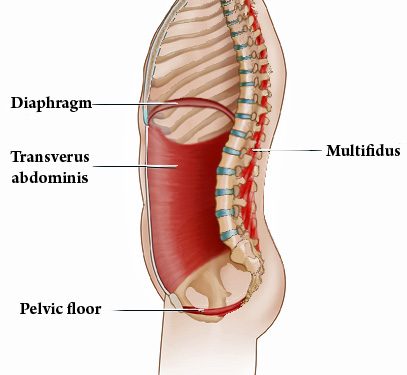
The deeper core, regarded as the main ‘core subsystem’ as seen in this picture essentially involves four muscles
strategically designed for maintaining pressure (intra-abdominal pressure) in our mid-section.
- OUTER CORE
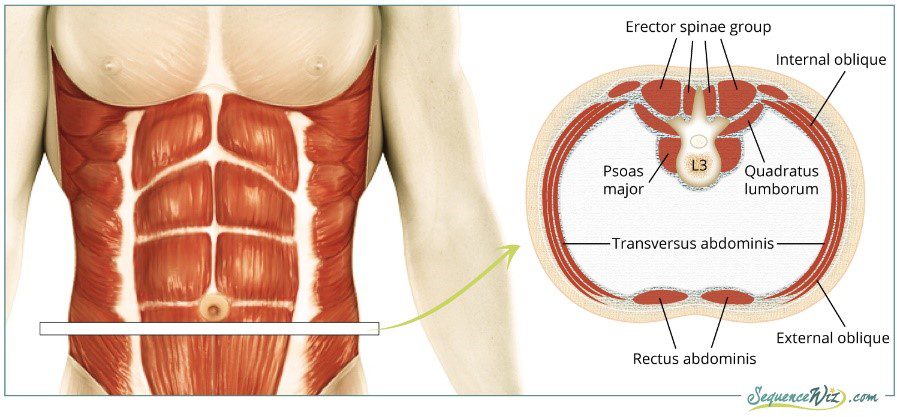
The outer core muscles as shown are stronger and bigger muscles covering most of the surface area of our mid-section. When activated, they support the the deeper core muscles in maintaining the intra-abdominal pressure. They include:
- Erector spinae
- External oblique
- Rectus abdominis
- Latissimus dorsi
How to brace your ‘core’
- Sit or stand tall with your hands resting against your abdomen.
- Take a deep breath in as though you are storing the air in the base of your lungs.
As you do this must feel your abdomen ballooning out. - Now, tighten your abdominal muscles firmly, as would before you cough.
- Then gradually released your breath whilst keeping your abdominals tight.
As you do this you will feel pressure building inside your abdomen. - Repeat this cycle until you get comfortable with the bracing.
2. Incorrect set up, initiation, lift and descend
INCORRECT SET UP
Most people approach the barbell with a squat stance. This means the hips drop too low in line with the knees and the bar is too far. This causes you to stretch your arms forward to reach the bar which prevents the optimal latissimus recruitment needed to secure the bar for the lift.
Tips:
1. Approach the barbell and stand with your feet shoulder width apart.
2. The barbell should be directly in line with your midfoot.
3. Feet can be pointing straight or slightly off centre positioned out.
4. Your knees should be tracking in the same direction as your feet.
5. Bend down to reach the bar and position your hands just outside your knees using an overhand grip. The bar should be close to your shins.
6. From a side view: your hips should be positioned between your shoulder blades and your knees.
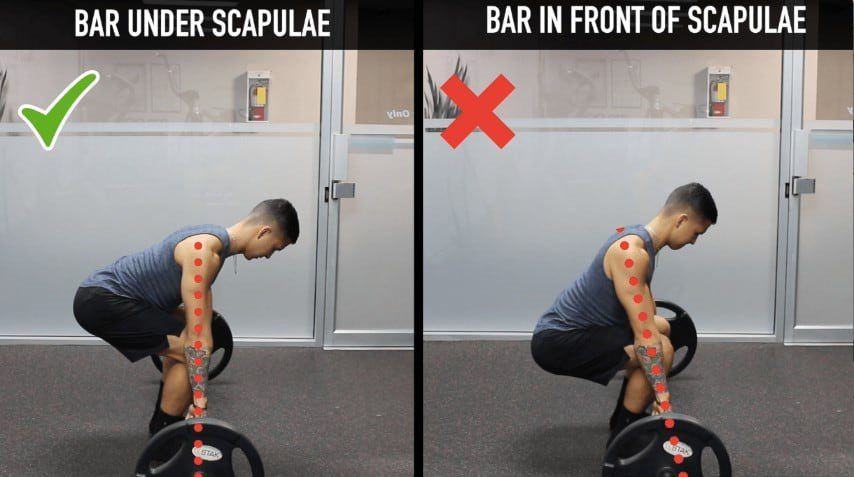
7. The barbell should be directly underneath your arm pits.
INCORRECT INITIATION
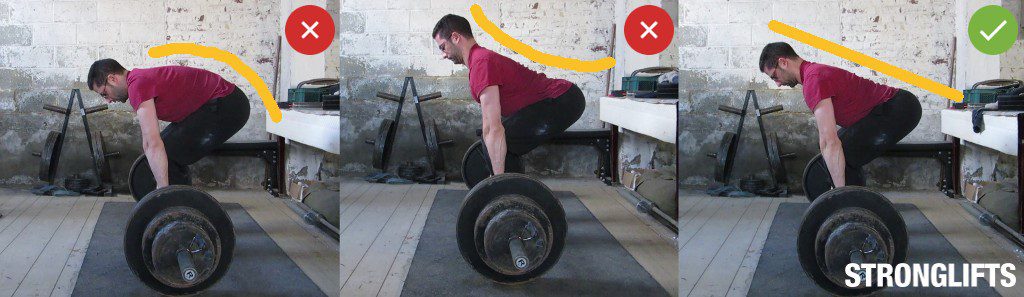
Head up and chest up, hyperextended back or head up, chest collapsed and rounded back are the two most common lifting mistakes seen when deadlifting. This means there is inefficient requirement of larger muscle groups in the lower extremities to be the ‘main drivers’ of the lift, instead heavy amounts of load is places on the spine and its surrounding soft-tissues (ligaments, muscles, fascia). Therefore, the risk of lower back injury is significantly greater and depending on the weights used and the training intensity, injuries can range from simple overly fatigued muscles to significant soft-tissue strain or in worst cases a herniated disc injury.
Tips:
8. From side view: align your torso with shoulders and hip
9. Activate the latissimus by squeeze your armpits down and slightly pinching your shoulders blades back
10. Before you lift, think about the lift. Rather than pulling the weight up with your upper body, think of bracing or stiffening your upper body and then pushing the ground away from your body with your feet and straightening your knees and your hips (similar to how you push the weight plate away during a leg press)
THE LIFT & DESCEND
Tips:
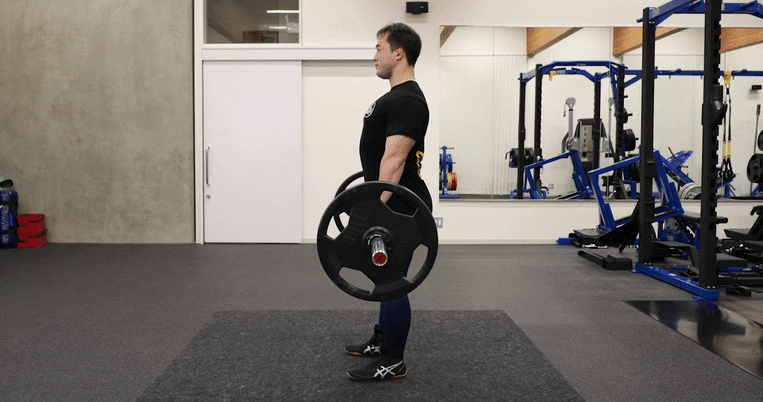
11. With your posture now set and body braced, push the ground away with your feet to straighten your knees and hips to stand up tall. From the time you initiate the lift until the barbell touches down to the ground, it should travel in a vertical line.
12. When standing tall, avoid hyperextending with your back. Make sure your body remains in the braced position ready to lower the bar down.
13. Push your bottom back, this will allow you to realign your arm pits with the barbell to steady your decline and allow the barbell to travel in a vertical line to the floor.
To consider:
While these are a few key principles to consider before you execute a perfect ‘conventional deadlift’, there is really no ONE size fits all . Technique to setting up and lifting should be strictly individualized based on your height, flexibility, lifting experience and goals.
So before you consider this all intimidating exercise, whether you are a novice, or someone who is getting back to action after an injury, follow these simple steps:
- Start slow and start low on weights.
- Have a gym partner spotting you, an extra pair of eyes to watch your technique will always help
- Or simply use a mirror – and practice, practice and practice.
It all comes down to efficiency, using the correct muscles to their best activation range as much as possible. So that when you reach close to the fatigue point it’s the major muscles such as the glutes, hamstrings fatiguing not the smaller less robust lower back muscles.