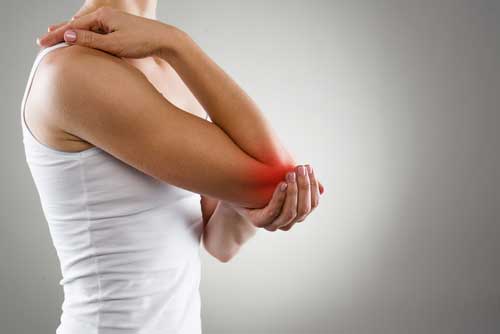
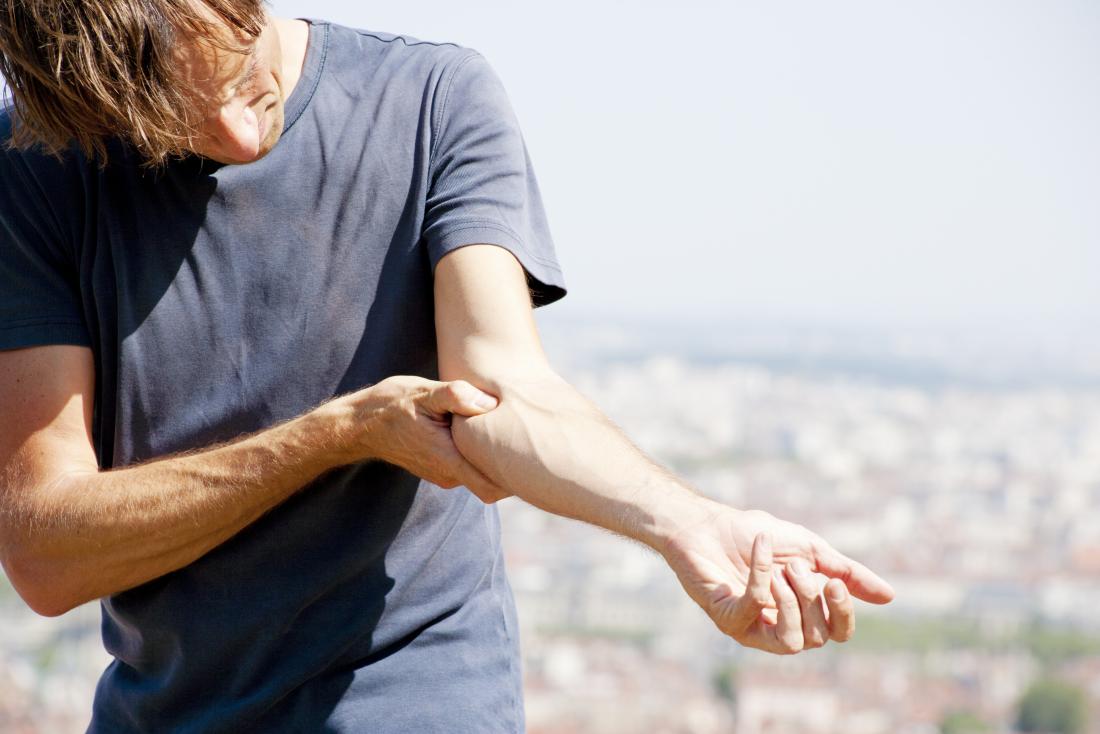
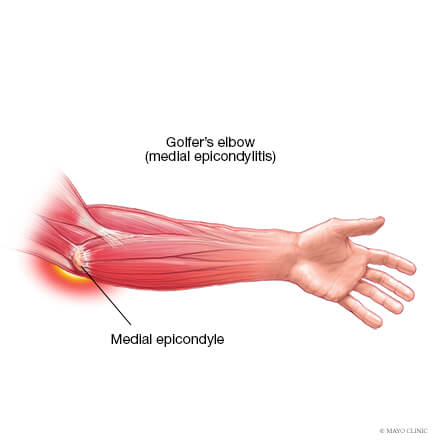
Medial elbow pain is also known as medial epicondylitis or golfer’s elbow. It is typically associated with pain on the inside (medial side) of your elbow and can spread into your forearm and wrist. This pain is the result of overloading and damage to the tendons that flex your wrist towards your palm.
Causes
This condition is triggered by damage to tendons and muscles which control your fingers and wrist. This damage is associated with excessive or repeated stresses- particularly repetitive and forceful finger and wrist movements, incorrect lifting, hitting and throwing techniques, lack of warmups and/or poor muscle conditioning.
Key risk factors for developing medial elbow pain may include smoking, obesity, being of in age bracket of 40 years old and over and undertaking repetitive activity with your arms for at least two hours daily. High risk occupations may include chefs, office desk workers, plumbers, construction workers, painters, butchers and assembly line workers. Those who partake in sports such as golf, racket sports, rowing, weight lifting and baseball are also at a higher risk.
Symptoms
Symptoms may be triggered suddenly due to a traumatic incident or may gradually develop over time and include but are not limited to:
Tenderness and pain is typically felt on the inner side of your elbow (particularly on the bony knob), and may refer along the inner side of your forearm and down to your wrist and fingers. It often worsens with certain movements. For example, bending your wrist towards your palm against resistance, or when squeezing a rubber ball.
You may feel stiffness in your elbow, and making a fist may hurt
You may experience weakness in your forearm, wrist and hand
You may experience tingling and numbness that can radiate into one or more fingers — typically to your ring and little fingers.
Diagnosis
This condition is typically diagnosed based on your medical and occupation history and a physical exam by your doctor or physiotherapist. To evaluate stiffness, strength and pain, your clinician may apply pressure to the impacted region and get you to move your elbow, wrist and fingers in various ways. You may also be referred on for imaging such as X-rays and Ultrasounds to aid diagnosis.
Management
A mix of non-surgical treatment options are effective for the majority of medial elbow pain cases, and self-resolves over time. You should rest your elbow and painful activities should be avoided. But it is very vital to maintain gentle movements of the forearm, elbow, and wrist through its range of motion.
Potential treatment options include:
Ice
Rest
Physiotherapy and acupuncture
Anti-inflammatory medications as recommended by your doctor or pharmacist
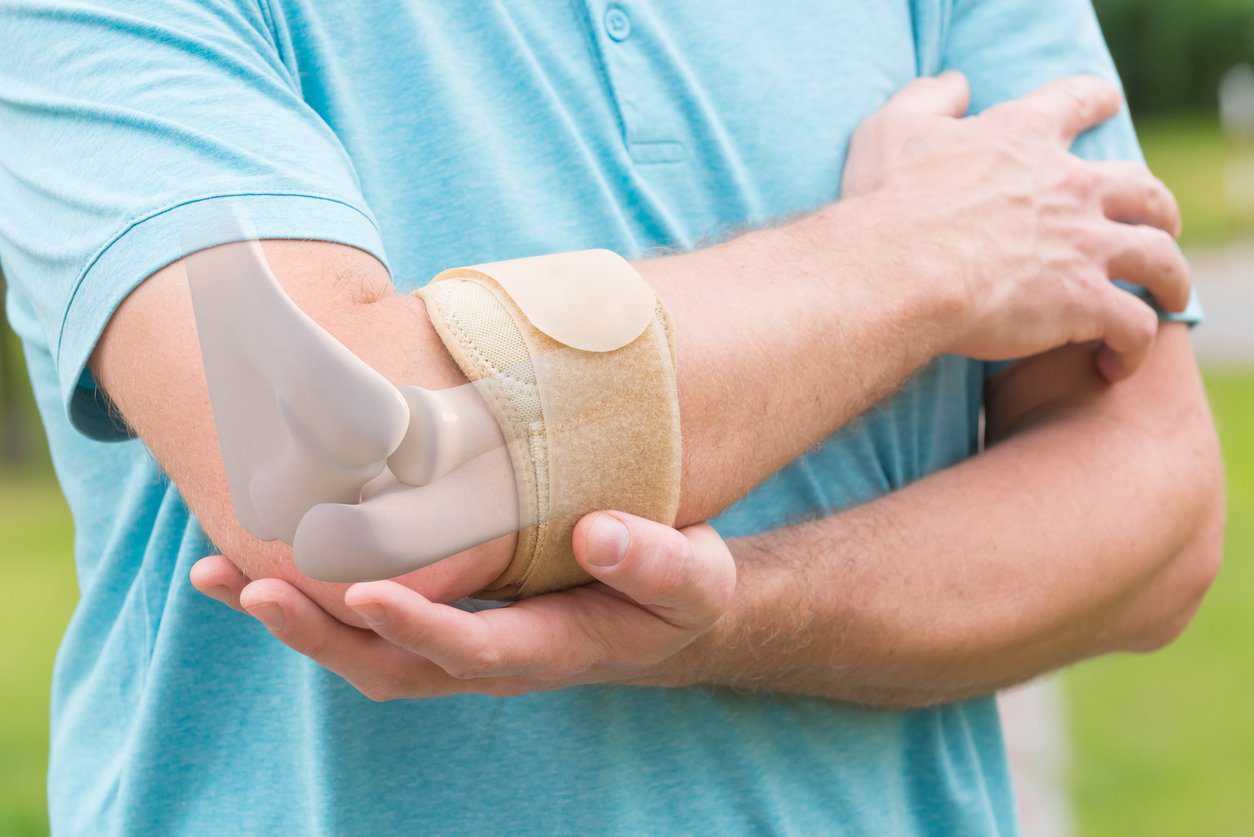
The use of a wrist and forearm brace or splint to support and rest your forearm
As your initial elbow pain lessens, your muscles around the elbow, forearm and wrist should be safely strengthened and stretched under guidance of a physiotherapist. Your physiotherapist will advise you on particular exercises, give you appropriate symptom management advice and take you through a personalised graduated rehabilitation program. If you continue to experience pain after 6-8 weeks of treatment, your physiotherapist can refer you back to your doctors, to consider administration of a cortisone injection into the elbow to help reduce pain and inflammation, and further referral onto see a specialist to seek guidance on other treatment options.
Prevention
Having a good comprehension of risk of injury and being conscious of your everyday activities may aid in the prevention of medial elbow pain. You should:
Adopt appropriate technique and form when undertaking repetitive activities or sporting motions
Keep up with adequate wrist, forearm, and shoulder muscle strength
Undertake gentle wrist and forearm stretches pre and post activities
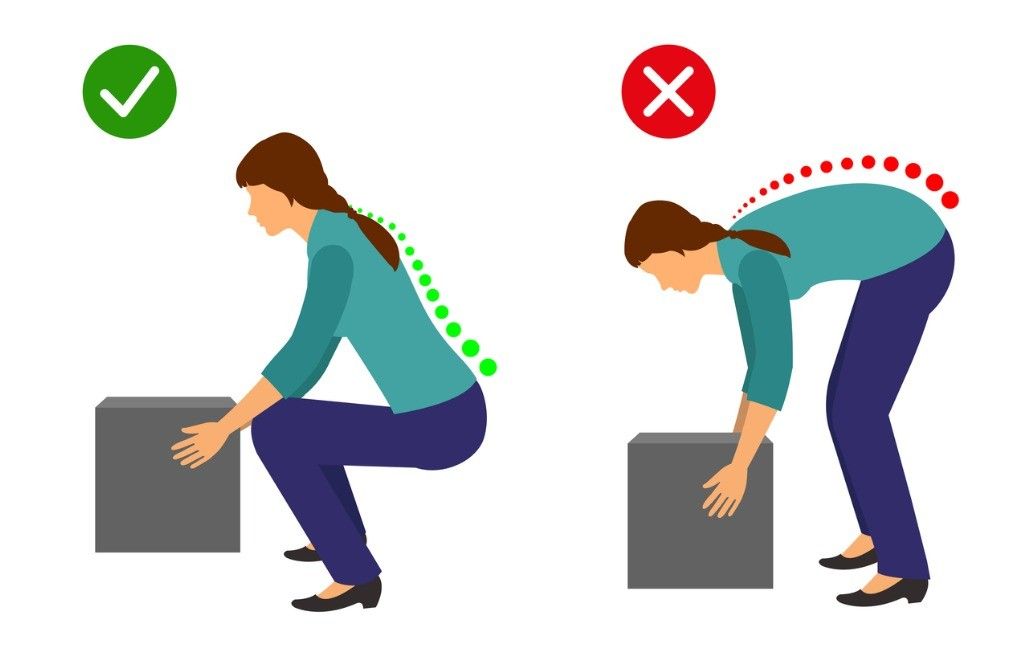
Adopt appropriate posture and body mechanics when lifting heavy objects to reduce joint strain- especially if doing so repetitively
RSI is typically defined as an overuse disorder- a gradual build-up of overload to nerves, tendons, and muscles arising from repetitive movements or activities. Repetitive use of the same motions leads to inflammation and damage to these soft tissues. This disorder mostly affects the upper limb- particularly the elbows, hands and wrists.
Causes
Possible causes of RSI include but are not limited to:
Undertaking the same and repetitive movements and stressing the same muscle groups
Working in cold environments
Assuming a sustained and/or awkward posture for prolonged periods of time
Undertaking a particular activity for prolonged periods of time with no rest-breaks
Frequent and prolonged use of vibrating equipment
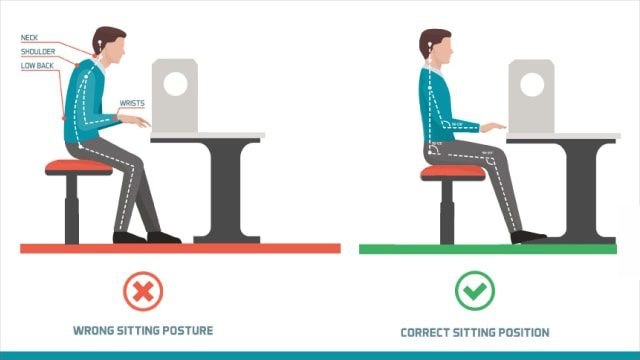
Adopting poor postures from working at inappropriately designed workstations
Undertaking a motion which involves carrying and/or lifting heavy items
Symptoms
RSI leads to a gradual development of a broad variety of symptoms, which range from mild to severe in severity. RSI particularly affects the muscles and joints of your wrists, hands, elbows, forearms, shoulders, neck. Having said this, RSI can affect other areas of the body as well.
Common symptoms may include:
Pain
Tingling
Cramping
Increased sensitivity to heat and cold
Tenderness
Fatigue
Loss of strength
Throbbing
Soreness
Achiness
Stiffness
Struggling with typical activities of daily living, such as gripping and twisting motions, carrying light weights, writing, kitchen prepping, dressing, personal cares etc
You may develop these symptoms when you undertake a task repetitively for a period of time, and can settle when you stop. Symptoms may settle over a few hours or over the course of a few days. However, if left untreated or is poorly managed, a minor RSI may gradually progress to a nasty chronic injury.
Diagnosis
If you experience mild discomfort whilst completing particular activities at home or at your job, it is a good idea to see your GP or physiotherapist to talk about RSI. But an RSI is not always simple to diagnose as there is no particular clinical test for it. Your GP will enquire about your medical history, occupation and work environment, and other activities to attempt to identify any repetitive motions you undertake that may be the cause of your symptoms. A physical examination will be undertaken, where they will assess your movement, check for pain, inflammation, sensation, tenderness, strength and reflexes in the impacted body part. RSI may be triggered by specific health disorders like bursitis, carpal tunnel, tigger finger, ganglion cyst, or tendonitis (inflammation in your tendons). Your GP can refer you on further diagnostic tests such as X-rays, Ultrasounds, blood tests, MRIs, nerve conduction tests etc, to determine if these underlying disorders may be the cause of your symptoms. You may be also be referred onto a physiotherapist and acupuncturist for conservative treatment and management for mild-moderate issues. If symptoms persist, you will then be referred onto a specialist.
Management
Initial treatment options for the management of RSI symptoms is conservative. This includes:
Rest, Ice, Compression, and Elevation (RICE principles)
Taking regular breaks between tasks and looking after your posture
Undertaking your activities and movements with appropriate form and posture
Intake of Nonsteroidal anti-inflammatory drugs (NSAIDs), both oral and topical as prescribed by the GP
Use of cold and heat to the impacted area
Administration of steroid injections into inflamed joints and tendons
Tailored exercise prescription from physiotherapists to correct posture and strengthen and stretch affected muscles
Acupuncture
Stress reduction and relaxation training
Use of splints and braces to help protect and rest the affected muscles and tendons
Ergonomically appropriate adjustments to your workstation and work environment may be recommended by your physio and GP- for example resetting your desk and chair if you’re working at computer, and alterations to your equipment and activities/motions to lessen the strain and stress on your muscles and joints. Surgery may be necessary in some cases.
Prevention
Minimizing repetitive actions particularly if they involve the use of heavy machinery or vibration. Improving your working posture and work-environment as well a taking regular breaks. Employers often undertake risk-assessments when you join a company to determine that the work area is ergonomically fit, comfortable and appropriate for you. You may be able to request for an assessment if you have not had one or are having issues with your work environment
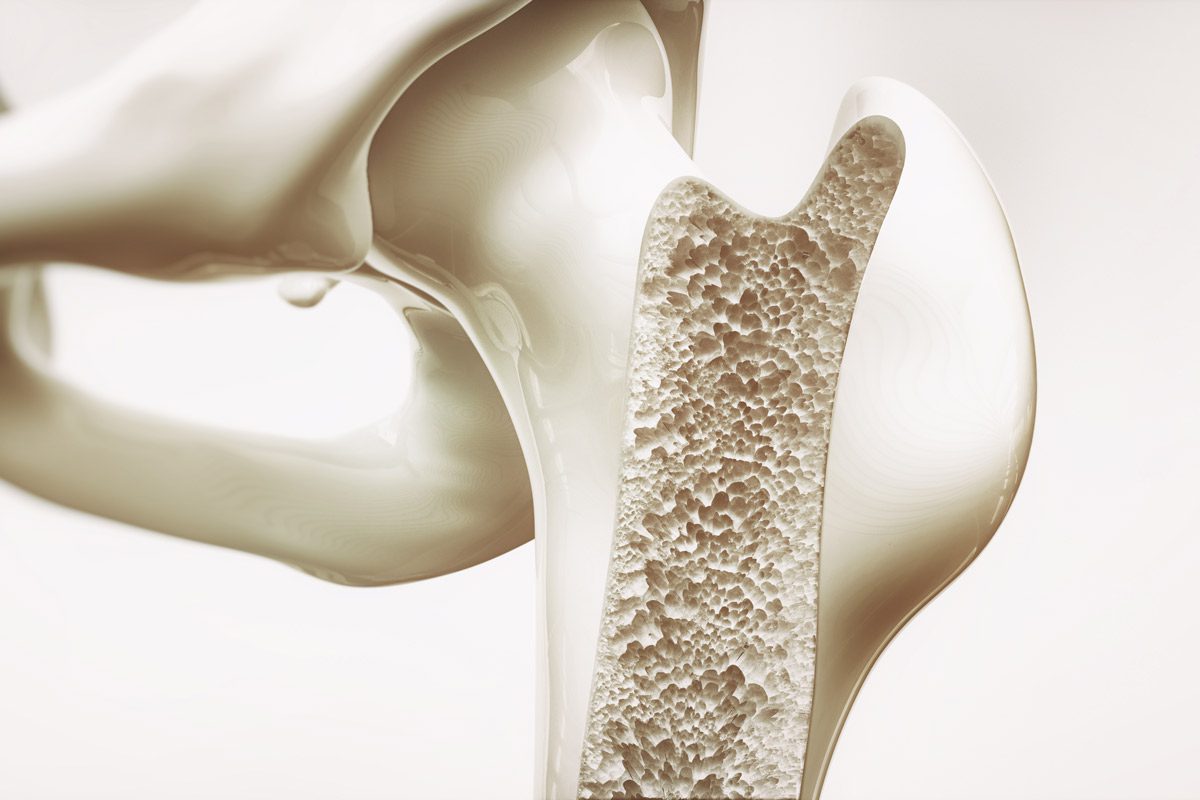
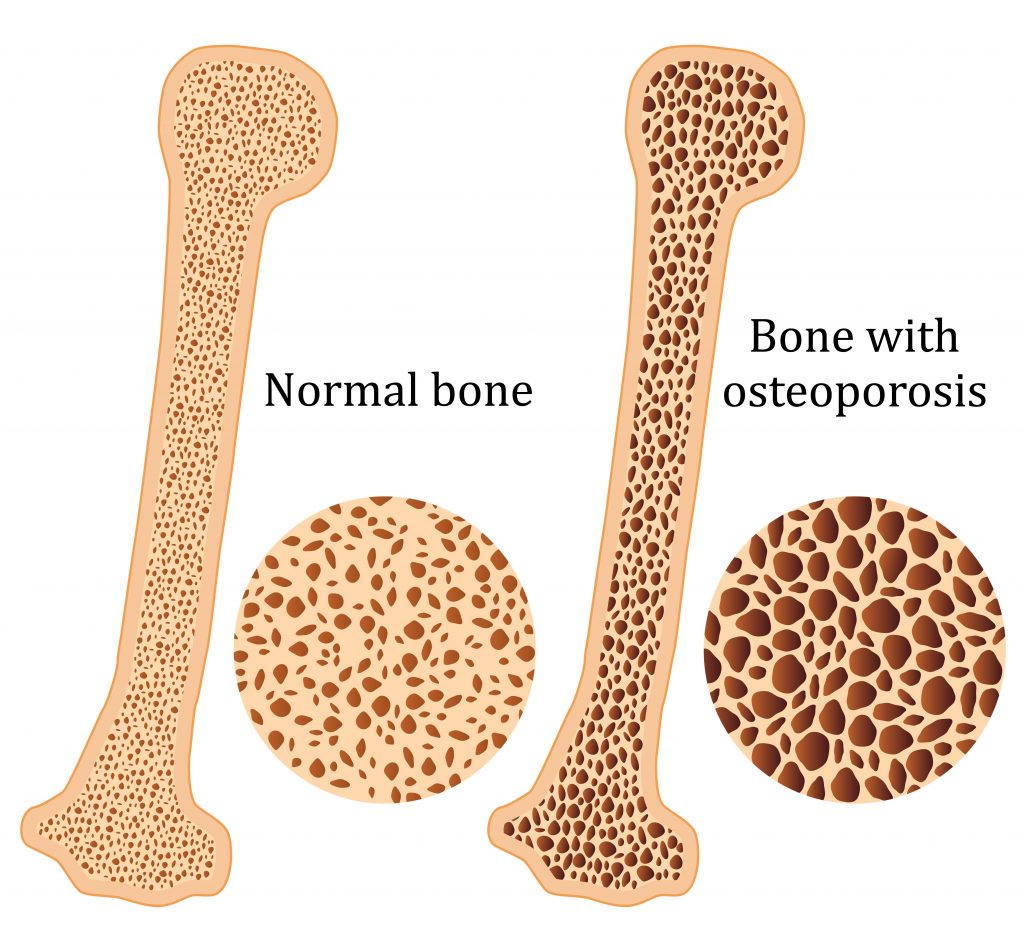
Osteoporosis is a condition which results in weak and brittle bones- to such degree that a fall or even mild stresses like coughing or bending over may result in a fracture. Bones are living tissues which are continually being broken down and replaced. However, your bones become osteoporotic when the formation of new bone does not keep up with the loss of old bone. This condition typically develops over time without any pain or other major symptoms, and is generally not diagnosed until you have sustained a fracture. The hip, pelvis, upper arm, spine and wrists are the most common structures affected by osteoporosis- related fractures.
How do you know if you have Osteoporosis?
Because there are no obvious early warning signs and symptoms, it is difficult to pre-diagnose osteoporosis. You may be unaware that you have this condition perhaps till you have one of the following:
Sustained a fracture from an incident more easily than you should have- like a simple fall or a bump
A decrease in the height of your spinal vertebrae over time
Change in posture – stooping or bending forwards
Back pain, due to a fractured or collapsed vertebra
Please see your doctor if you experience the following:
If you are over the age of 50 and have sustained a fracture
Sustained a spine, wrist, or hip for the first time
Sustained a fracture more easily than you should have (a simple fall or after a slight bump)
Risk factors
Key factors which may increase your risk of developing osteoporosis include:
Females- particularly post-menopausal Caucasian and Asian women
Over the age of 50
Excessive consumption of caffeine or alcohol
Smoking
Having a smaller or petite body frame
Poor physical activity levels and leading a very sedentary lifestyle
Family history of osteoporosis
Having low levels of vitamin D and poor dietary calcium intake
Decreasing levels of testosterone with ageing in men
Estrogen deficiency in women (irregular periods, early (before turning 40) or post-menopausal, surgical removal of the ovaries)
Use of long-term medication such as thyroid and epilepsy medications, corticosteroids
Having medical conditions such as gastrointestinal diseases; endocrine diseases; rheumatoid arthritis; cancer; and blood disorders
How will you be diagnosed?
Your doctor will review your signs and symptoms, family and medical history. You may be referred on for a specialized X-ray or CT scan to evaluate the bone density to help diagnose osteoporosis. Your bone density will be classified by comparing it to the typical bone density for a person of equivalent gender, size, and age.
How is Osteoporosis treated?
The treatment pathway chosen for the management of this condition is dependent on results of your bone density scan, gender, age, medical history and severity of the condition. Potential treatments for osteoporosis may include exercise, making positive lifestyle changes, vitamin and mineral supplements, and medications. Please consult your doctor for appropriate advice and treatment options.
How can Physiotherapy help?
Your physiotherapist will help you strengthen your bones and your muscles through a personalized and graduated rehabilitation program. Components of this rehabilitation program may include weightbearing aerobic exercises, resistance training using free weights/resistance bands/bodyweight resistance, and exercises to enhance posture, balance and body strength. Your physiotherapist will work with you to find activities that suit your needs and as per your physical activity level.
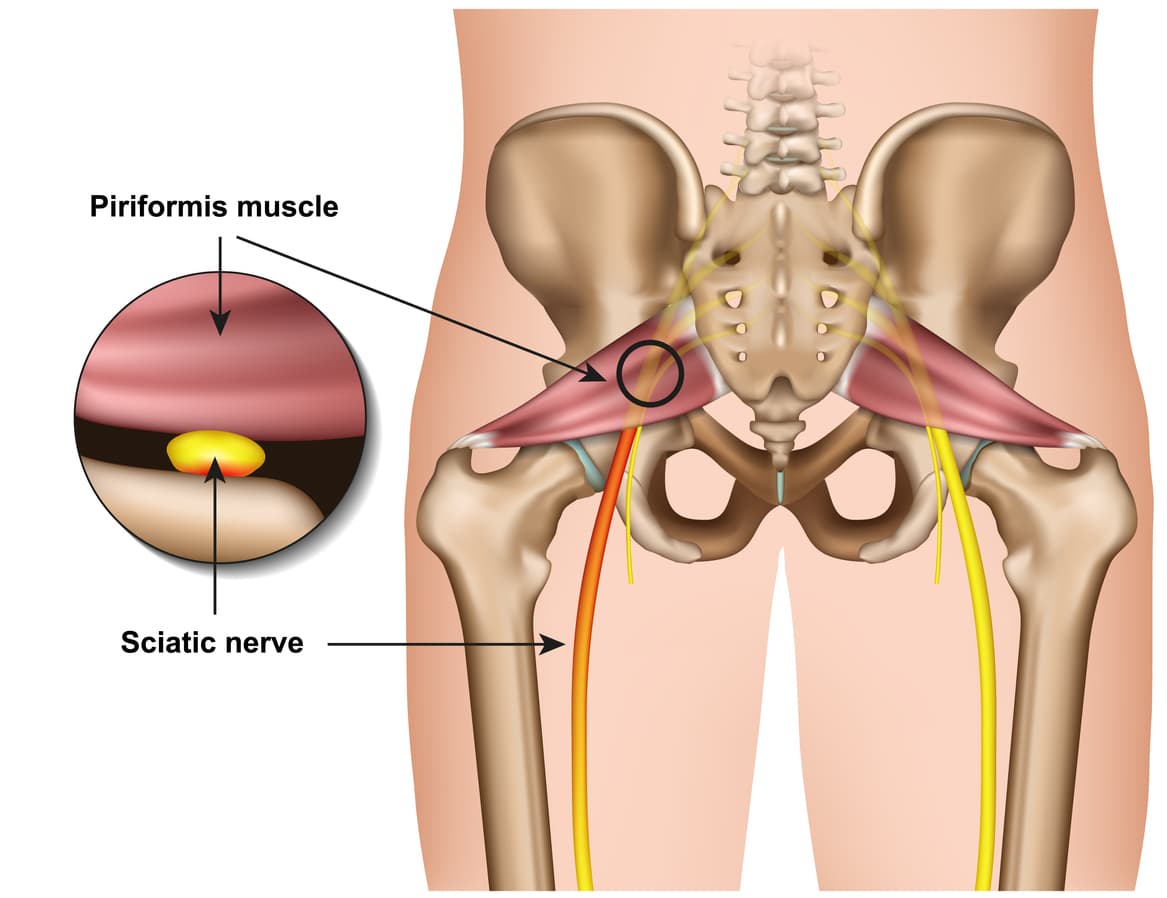
Piriformis syndrome refers to the dysfunction of the piriformis muscle which irritates the sciatic nerve. It is characterized by deep buttock region pain that radiates down leg and foot often accompanied by pins and needles and numbness traveling along the path of the sciatic nerve.
The simplistic reason for this widely distributed pain comes down to the piriformis muscle itself – Their close proximity means that direct trauma to the buttock region or the supporting structures can result in inflammation and muscle dysfunction which can compress and irritate the sciatic resulting in referred symptoms.
Piriformis syndrome symptoms may include:
Localised deep buttock region pain
Pain with continuous sitting or standing for 15 mins or over
Pins and needles along the leg down to the outer foot
Numbness in outer leg or foot (often resolves on movements)
Deep squatting or bending
Pain on direct palpation
Anatomy
The piriformis muscle originates from the outer surface of a large fused bone of our pelvis called the sacrum. It travels adjacently and inserts into the top of the hip joint. The piriformis muscle is a very active muscle involved in stabilizing the hip and pelvis during majority of our activities (walking, running, standing, sitting or standing, turning in bed). When the piriformis muscle contracts it helps the hip rotate outwards (external rotation) and lift thigh out and up (abduct).
The sciatic nerve originates from where the very base of the spine and the sacrum join known as the lumbosacral region (lower back and saddle region). In this region five separate branches of nerves travel outside of the bony openings of the spine called the nerve roots and connect into a single large nerve – the sciatic nerve. It then travels through the pelvis deep into the buttock region close proximity the piriformis and gluteal muscles. In some individuals the piriformis muscles can travel through the piriformis muscle subjecting them to piriformis syndrome.
Diagnosis
There are no specific tests to diagnose piriformis syndrome. Diagnosis of piriformis syndrome is made by the report of symptoms and by physical exam using a variety of movements to elicit pain to the piriformis muscle. In some cases, a contracted or tender piriformis muscle can be found on physical exam.
In cases where there is underlying pathology (such as disc injury, arthritis, sacroiliac dysfunction or hip injury) resulting in true sciatica – piriformis syndrome may develop to become an additional muscular dysfunction that is required to be addressed. Because symptoms can be similar in other conditions, radiologic tests such as MRIs may be required to rule out other causes of sciatic nerve compression, such as a herniated disc.
Consultation with a physiotherapist in this case is highly recommended as they will perform a comprehensive clinical examination to identify the root cause of your symptoms.
Exercises for piriformis syndrome
Corrective exercises with a combination of strength and flexibility regimen is an essential way to treat true piriformis syndrome (without involvement of other underlying pathologies).
The exercises outlined below follow a phase-by-phase progressive regimen to strength key muscles of the hip, buttock and legs.
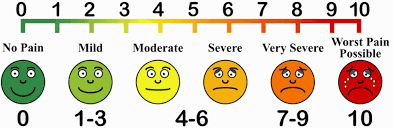
As you work through these exercises expect to feel some pain during and after your exercise. Pain you may feel during the exercise is an expected sign of muscle activity. Pain you may feel after the exercises is an expected sign of muscle healing and recovery. However, if you are unable to participate in the exercises due to symptom deterioration – it is highly recommended you consult your physiotherapist to rule out other potential causes.
Otherwise, to help you gauge the correct amount of pain you should expect during exercise – use this scale. The ideal range should be 2 to 5. If your baseline pain is over 6 or 7 – it is recommended that you consult your doctor for pain relief appropriate to manage your pain, followed by a consult with a physiotherapist. Your physiotherapist will be able to modify the following exercises or prescribe alternative exercises best suited based on your current level of function and symptoms.
Symptom noting – is a great way to keep track of your progress and symptom behaviour.
Take a diary
Note down pain before you begin the exercise.
Note down the pain rating after each exercise.
Note down pain at the end of the day
Repeat the pain recording process for the next 4-5 days
Examine the trend in your symptoms.
Interference with everyday tasks – Your participation or level of exertion with everyday activities may interfere with your symptoms impacting your exercise tolerance. It is therefore important to note any of these interferences’ contributory to your pain.
Phase 1 – is a beginner stage.
This phase is intended for gently priming muscle activation. It will demand your concentration on technique and compliance to change the possible compensation your body has been used to as a result of pain. This phase can last between 1-2 weeks.
Instructions:
3 sets of 10 repetitions. Hold each repetition for 8-10 seconds. Rest 10-15 seconds between sets, 30 seconds between exercises. Do this exercise 1-2 times per day.
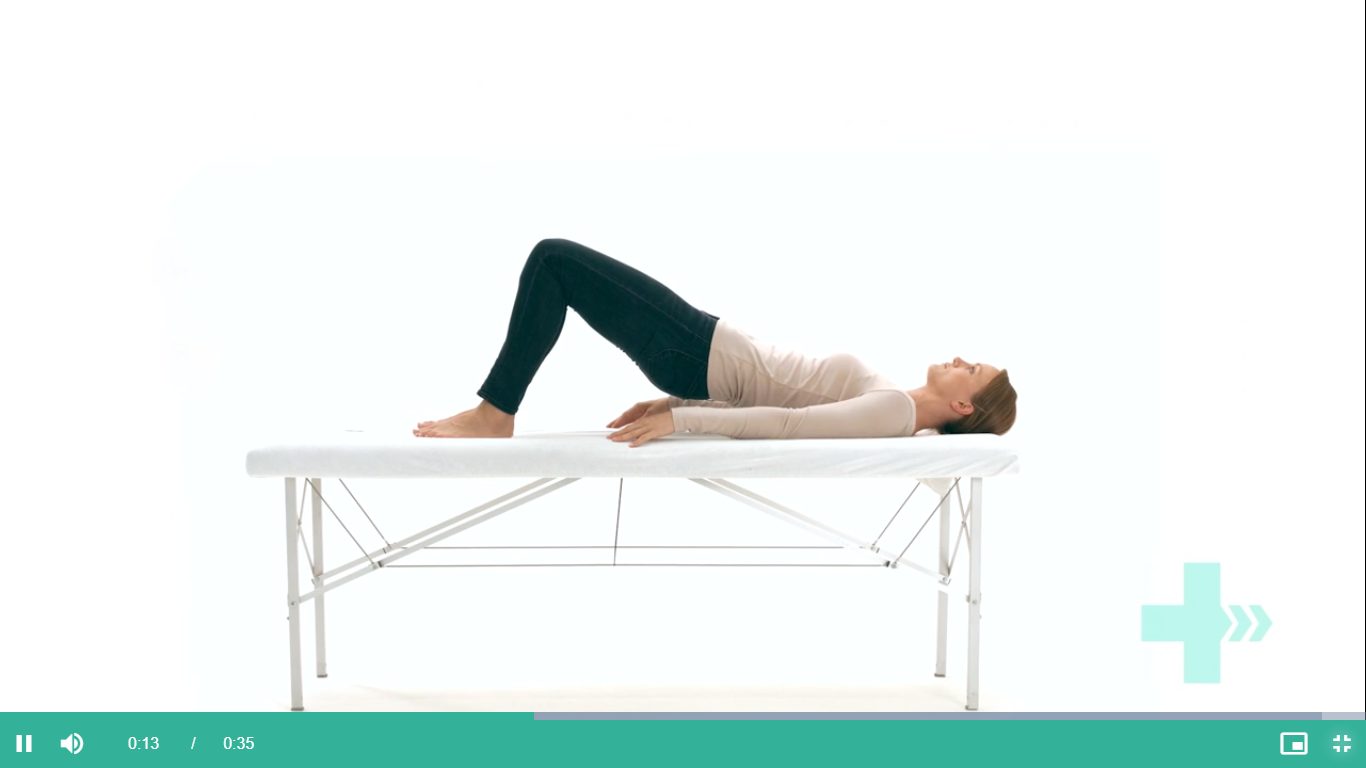
Bridges
Lie on your back.
Bend both knees and place your feet flat on the bed.
Lift your buttocks from the bed.
Place your buttocks back on the bed.
Repeat this exercise and remember to continue to breathe properly.
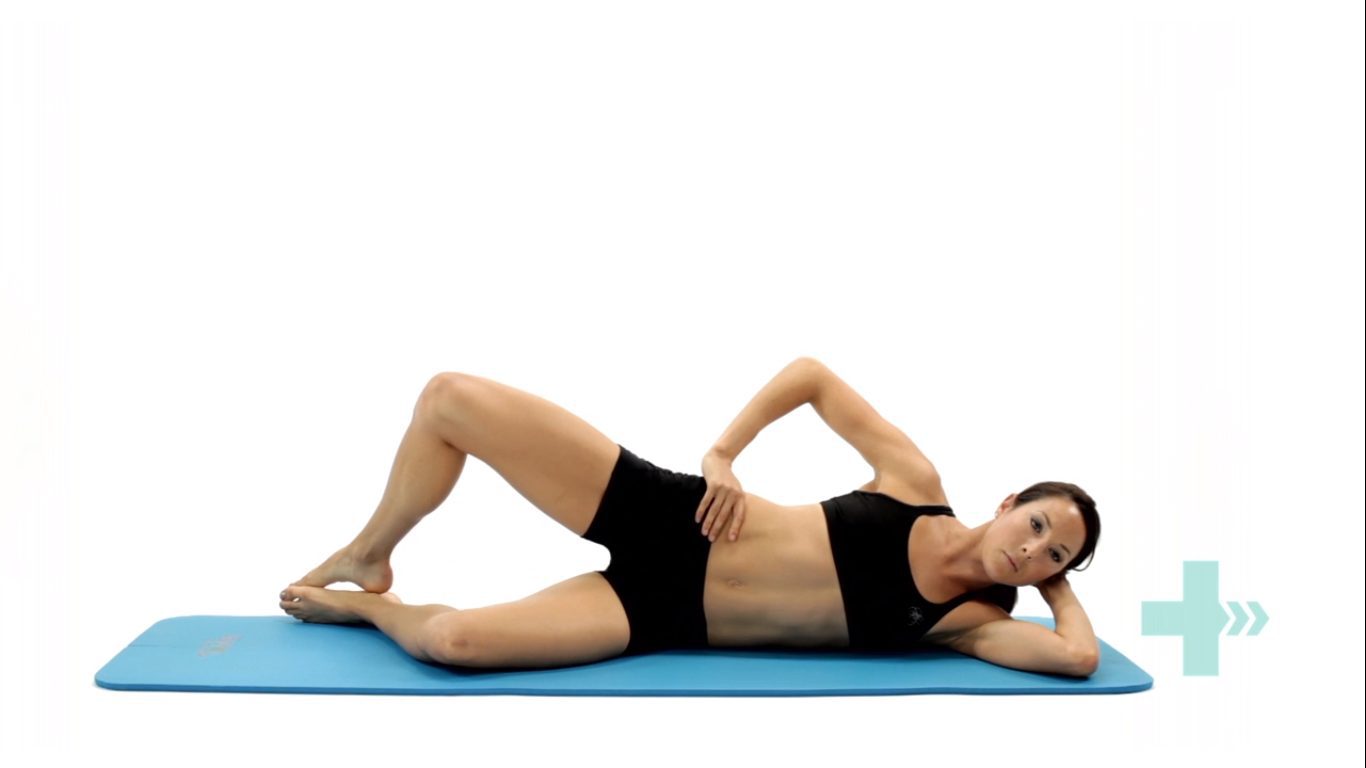
Clam shells
Lie on your side with your feet, ankles and knees together.
Bend the legs a little and tighten your core stability muscles.
Keeping the feet together, lift the top knee up.
Make sure you don’t roll your body back with the movement.
Control the movement as you bring the knee back down to the starting position.
Phase 2 – intermediate stage
The intermediate phase is similar to the beginner stage with the difference of using changing elements of progression to challenge the muscles capacity further. In this stage you may choose to progress the exercises by choosing to change ONE factor:
Increase repetitions
Increase hold time
Increase sets
Add appropriate resistance
Instructions:
3 sets of 10-15 repetitions. Hold each repetition for 10-15 seconds.
Rest 10-15 seconds between sets, 30 seconds between exercises.
Do this exercise 1-2 times per day.
Bridges with resistance
Tie a resistance band around both thighs, just above your knees.
Lie on your back with your knees bent and legs hips width apart.
There should be tension in the band.
Raise your hips up into a bridge, keeping the knees hips width apart.
Control the movement back down to the start position, maintaining constant tension on the band.
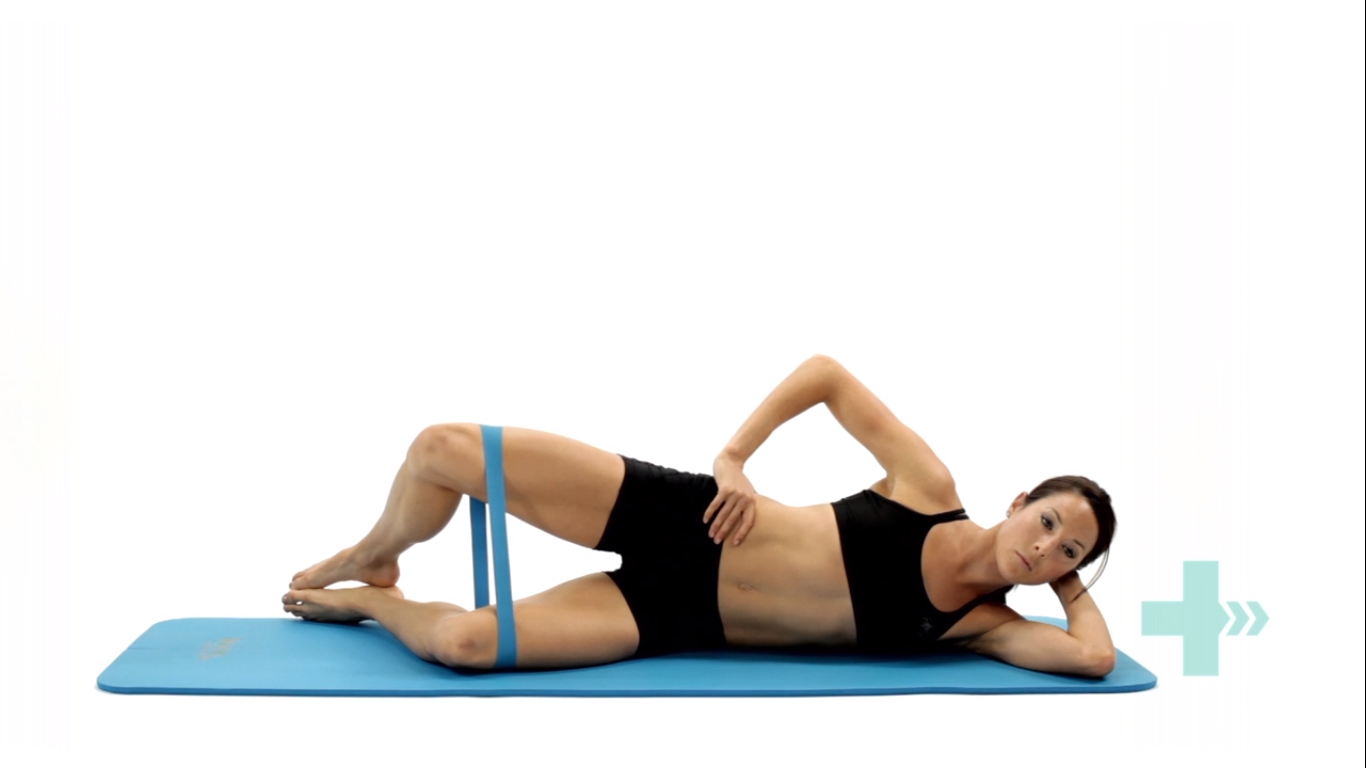
Clams with resistance
Lie on your side and place a band above your knees, approximately an inch or two above the knee joint.
Bend your legs a little, keeping the feet in line with your back.
Use your core stability muscles to keep the body stable.
Keeping your feet together, lift the top knee up against the resistance of the band.
Ensure you stay on your side and do not roll your hips and your body back with the movement.
Lower the knee back down, controlling the resistance.
Phase 3 – advance stage
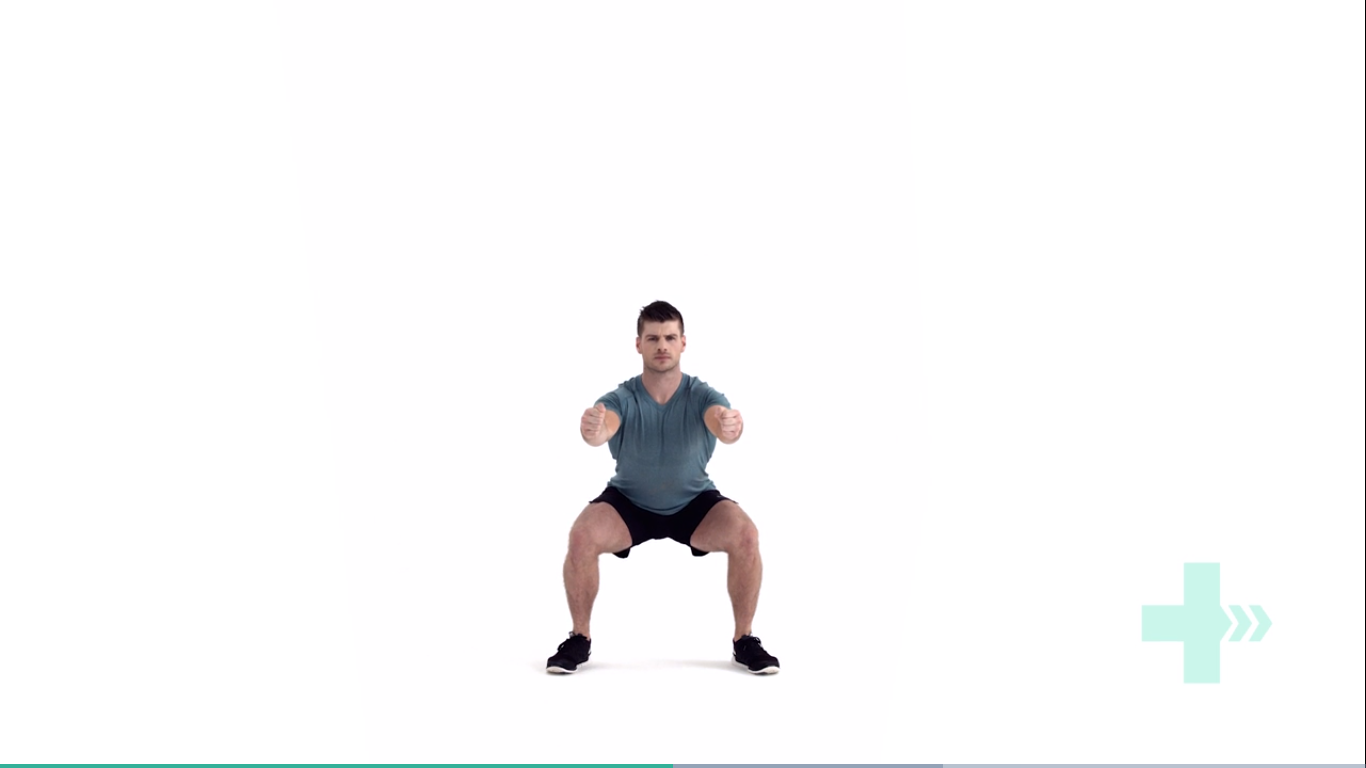
Body weight squats
Start position is standing straight with the arms out in front and bent at the elbows, the fists should be clenched and the palms facing inwards.
Move downwards into a squat position so that the knees are aligned over the toes and the heels are in contact with the floor, make sure the back is straight.
Keep the head and chest upright and the gaze horizontal.
Hold for 2 seconds and return to the start position.
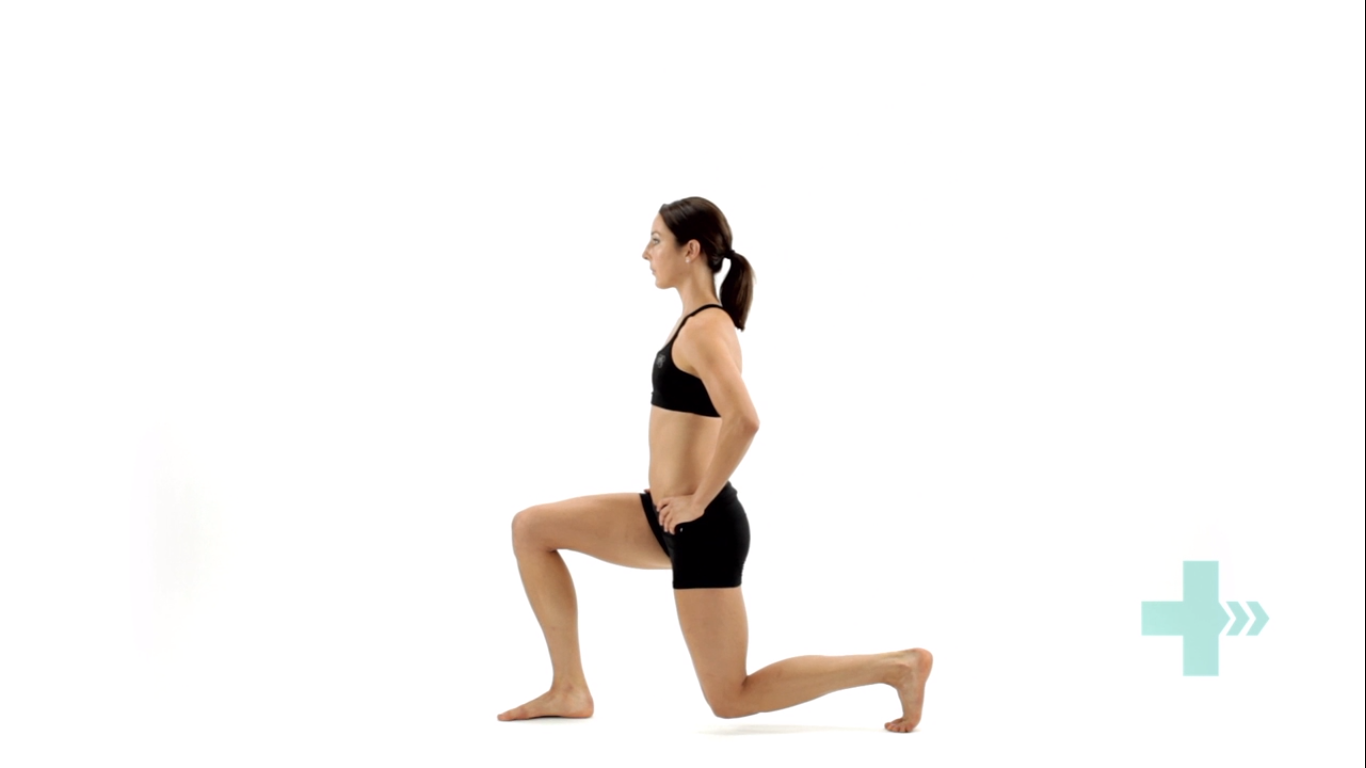
Lunges
Stand straight with your arms to the side or on your hips.
Take a large step forwards on your affected leg, then drop your hips directly down between both feet, bending your hips and knees to a 90 degrees.
Push back up to the starting position, and repeat.
Make sure you take a large enough step that your front knee does not travel over your foot, and ensure your knee travels directly forwards.
Keep your body up straight throughout the movement.
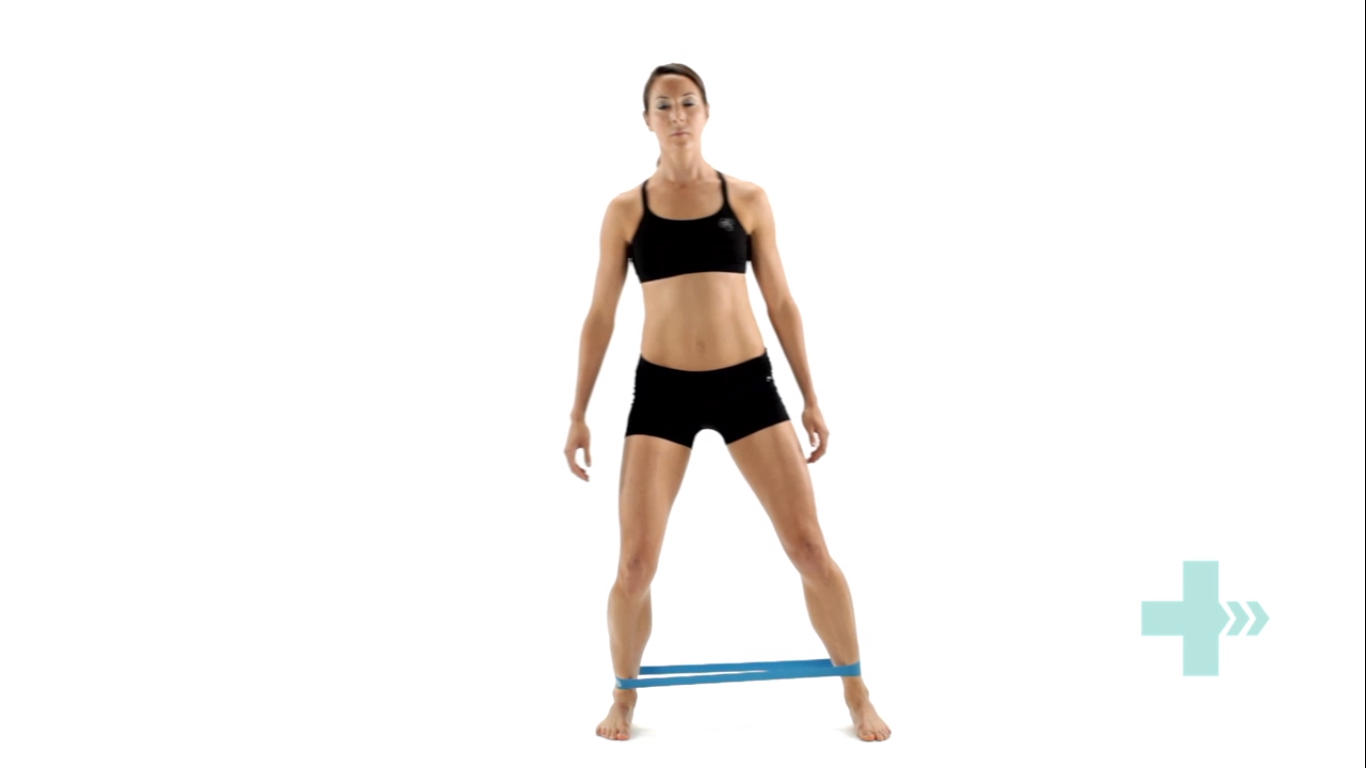
Crab walks
Place a band around your ankles and gather some tension.
Side-step keeping constant tension on the band.
Make sure you do not bring your feet too close together and keep your toes and knees pointing forwards.
Phase 4 – return to activities
Stretching
Do you always need to stretch the muscle? The answer is NO. While stretching is an important tool to improve muscle elasticity. You may not always need to stretch a muscle if it is NOT tight. Thus, stretching is recommended to be limited to areas you feel are TIGHT when you perform a given movement. Check the affected side and unaffected side – don’t need to stretch a muscle that doesn’t need to be stretched.
Seated piriformis stretch
Start in a seated position.
Cross the symptomatic leg your ankle is resting on, to the opposite knee.
Apply gentle pressure to the knee as you lean forward, increasing the depth of the stretch.
Hold this position, you should feel a comfortable tension with no pain.
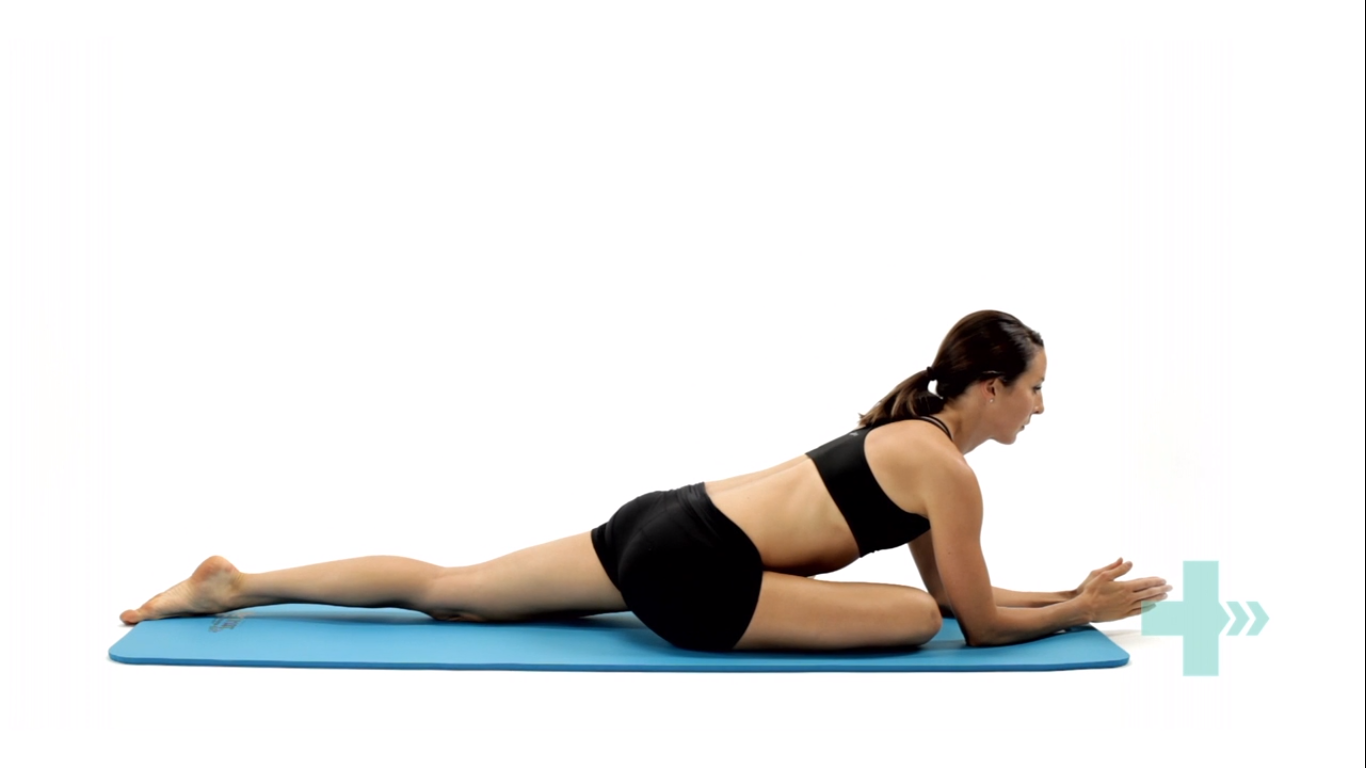
Pigeon stretch
Start on your hands and knees.
Cross the symptomatic leg underneath you, then lower your hips down to the ground.
Rest your body forwards on your arms.
You should feel a stretch across the buttock.
Have you been experiencing pain, pins and needles or numbness in your wrist and hands, especially after using the keyboard, chopping up a few veges, reading a book, using your mobile phone or with driving?
If you answered yes – then you are most likely to have Carpal tunnel syndrome.
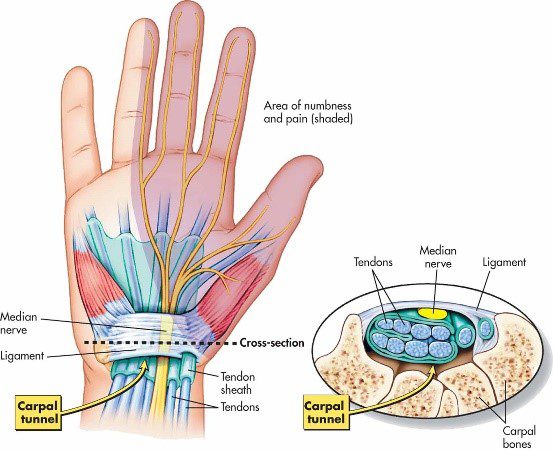
What is Carpal Tunnel Syndrome?
Carpal tunnel syndrome is the most common condition in the arm. It is caused by compression of one of the three major nerves in the forearm – the median nerve, which travels through the wrist into the hand and fingers. Entrapment of the median nerve usually due to inflammation, occurs in the wrist commonly resulting in tingling of the wrist and hand (in some cases forearm), numbness, pain and weakness of the hand.
Signs and Symptoms
Often unrelated to a specific incident or an injury, symptoms of carpal tunnel syndrome usually develop gradually overtime. Symptoms may be worse in the morning and night. Many people find that the frequency and duration of symptoms increase as the conditions worsen.
Signs and symptoms may include:
Tingling, numbness or burning sensation of the thumb, index, middle and ¾ of ring fingers of the hand
Electric shock like radiating pain through the hand into thumb, index, middle and ¾ of ring finger
Weakened grip, loss of dexterity and fine movements such as picking up a hair pin, buttoning clothes.
Hypersensitivity or in other cases lessened sensation of hand to pressure, heat or cold temperatures
Swollen wrist
Let’s take a closer look at the anatomy!
As its name suggests – a group of small bones aka carpal bones form a tunnel like passageway in the wrist (palmar view). This unique architectural design allows for the tendons of the forearm muscles and the all-important median nerve to pass through the narrow tunnel through the wrist and into the hand and fingers, supplying sensation and motor function.
Causes
Common causes and risk factors that increase the likelihood of carpal tunnel syndrome include:
Repetitive wrist & hands movements – during work related tasks or leisure activities may irritate the tendons in the wrist, resulting in inflammation that irritates the nerve.
Wrist or hand injury – recurring sprains, swelling and reduced wrist movements reduces the space in the carpal tunnel
Pregnancy and menopause – hormonal changes can increase fluid retention in body increasing pressure in the carpal tunnel compressing the median nerve
Genetic history – petite
Medical conditions (rheumatoid arthritis, diabetes, hyperthyroidism)
Interesting facts about carpal tunnel syndrome
Women are 3 times more susceptible to develop carpal tunnel syndrome than men. This can be due to hormonal changes during pregnancy or menopause and also because women tend to have smaller carpal tunnels.
Not all fingers are affected. Median nerve supplies movement and sensation in the thumb, all fingers except the little finger.
Computers/keyboard are not the only reasons to blame – repetitive nature of any work related or leisure word increases risk of developing carpal tunnel syndrome
Diagnosis
Carpal tunnel syndrome is fairly easily diagnosed by your physiotherapy, doctor or a hand therapist.
Your health practitioner will gather information on your general health, history and nature of your symptoms. They will then carefully conduct a thorough clinical assessment to assess the movements of your hand and wrist, strength and use a collection of tests in effort diagnose your symptoms. In some cases, your therapist may examine your neck, shoulders and arms to rule out other potential causes.
You may often hear the physiotherapist or hand therapist mention that they want to conduct a functional assessment – A functional assessment is activity specific, where the therapist will watch you perform the activity that aggravates your symptoms the fastest. For example, if using a keyboard is generally when you feel your symptoms start – the therapist may observe you performing the very task to examine your overall posture.
Referral to scans or nerve conduction tests may be arranged by your doctor or therapist depending on the severity or complexity of your symptoms.
Scans
Referral to scans or nerve conduction tests may be arranged by your doctor or therapist depending on the severity or complexity of your symptoms.
Xray – provides key information on bone health, when dealing with a potential injury, or arthritis
Ultrasound – can examine potential soft tissue injury or inflammation compressing the median nerve
MRI – this advanced imaging provides in depth review of your wrist and hand. Usually arranged by your doctor or a specialist
Nerve conduction study – studies the electrical activity of the median nerve. This test will help you doctor examine the severity of your problem.
Treatment
In most cases, carpal tunnel syndrome will progressively worsen overtime. So, the key is early intervention!
Conservative management
Mild symptoms can be easily managed with a conservative approach.
Wearing splints or braces – keeps your wrist straight to prevent repetitive use of hands, thus reducing pressure or inflammation in the carpal tunnel.
Non-steroidal anti-inflammatory medications – such as celecoxib and ibuprofen as prescribed by your doctor may decompress the median nerve by reducing the inflammation in your body and wrist.
Activity modification: your physiotherapist will play an important role in providing you with advice around to modifying your activities to reduce your symptoms. They will also prescribe you with effective stretches and exercises to help manage your symptoms while safely aiding your recovery.
Steroid injections: your physiotherapist or doctor may recommend a ‘cortisone’, also known as a ‘corticosteroid’ injection to control your symptoms. It contains an anti-inflammatory substance that is injected into your carpal tunnel. The effects of the steroid injection may be temporary and can vary person to person depending on many factors (cause of symptoms, stage of your condition).
In mild to moderate cases, the effects of injection may last between 3-6months.
Surgical intervention
If non-surgical approaches have failed to relieve your symptoms, surgery may be required.
By this stage you would have consulted an orthopaedic surgeon. Your surgeon will thoroughly examine your overall health, symptoms, results from the scans and the nerve conduction study to help you decide on the best treatment approach.
If you decide to undergo surgery – the surgical procedure your surgeon will perform is called ‘carpal tunnel release’.
Recovery and outcomes
After your surgery you may be given a splint or a brace for a period of time specified by your surgeon. While in the splint or brace you will be encouraged to move your fingers to prevent stiffness and swelling.
Expect to experience minor pain, stiffness and swelling for a couple of weeks to months after your surgery. Pain medications provided by your surgeon must be taken as prescribed.
You may be encouraged to see your physiotherapist, who will work closely with your surgeon to help meet post-operative outcomes.
You will have regular 6-8 weekly follow ups with your surgeon as required to assess your healing and discuss gradual return to light activities and return to work.
If you have underlying medical conditions such as arthritis, except that your recovery may be slower than otherwise expected. It is important that you follow post-operative protocols your surgeon, doctor and physiotherapist recommend.
Rotator cuff injuries are the most common source of shoulder problems. They can range from minor sprains causing impingement type symptoms, to massive tears resulting in severe loss of function and pain. They commonly occur as a result of acute injuries (sports, falls), chronic overuse (repetitive loading) or due to gradual aging.
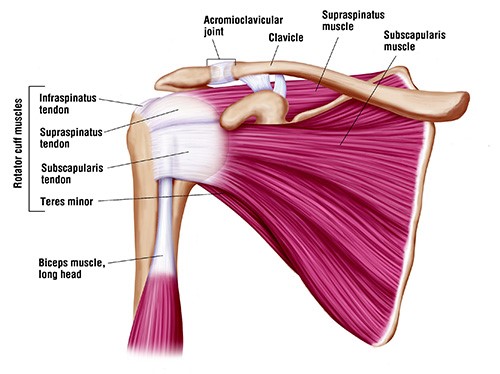
Anatomy of shoulder
The shoulder joint (glenohumeral joint) is the most mobile joint in the human body. It comprises of the humeral head (top portion of upper arm bone) which fits in the glenoid cavity of the scapula (shoulder blade) to create a ball and socket configuration. This anatomical configuration results in limited bony contact between the humeral head and the glenoid fossa, which reduces the stability of the joint.
Several passive and active structures stabilize and maintain proper biomechanics of the shoulder joint.
Passive stabilizers include the ligaments, joint capsule, cartilage and the bony concavity of glenoid fossa. Thick cartilage known as labrum lines the glenoid fossa to further deepen the groove by about 50% which is advantageous in stabilizing the shoulder joint during the articulation.
Dynamic stabilizers of the glenohumeral joint is gained from the coordination of rotator cuff muscles that compress the passive structures providing stability and mobility as whole.
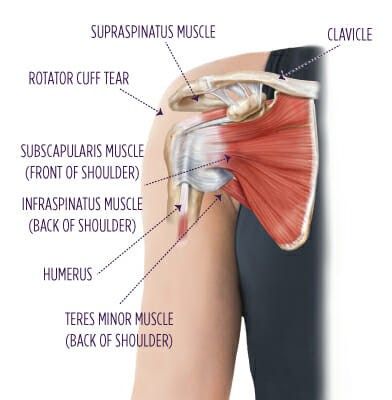
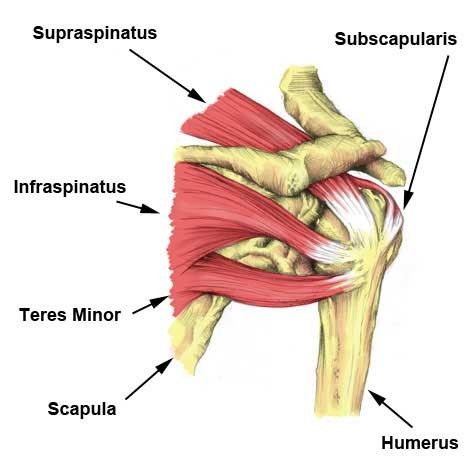
The rotator cuff muscles include:
supraspinatus
infraspinatus
subscapularis
teres minor
Injury to any or all these four muscles, including the tendons that attach the muscles to bone can result movement dysfunction and severe pain.
Other important joints of the shoulder complex include:
sternoclavicular joint
arcomioclavicular joint
scapulothoracic joints
Types of rotator cuff pathology
Tendinitis and Tendinosis
More often than not the term tendinitis and tendinosis are interchangeably used to describe a similar tendon pathology. However, the factor that differentiates the two is the time of injury (acute or chronic).
Tendinitis results from acute injury to the tendon which sets off an inflammatory process characterized by pain, swelling, and redness. On the other hand, tendinosis is a chronic pathology that does not involve an inflammatory process. It is characterized by degeneration of collagen fibers in response to persistent micro-trauma, vascular compromise and aging.
Acute rotator cuff tear
Acute tears result from sudden forceful lifting of the arm against resistance or in an attempt to cushion a fall (for example, heavy lifting or a fall on the shoulder).
Chronic injuries
Most commonly resulting from occupational or sports requiring excessive repetitive overhead activity.
Signs and symptoms
Symptoms of a rotator cuff injury are due to the inflammation that accompanies the strain. Swelling that forms within the small space of the joint prevents the normal mechanics of the shoulder, resulting in the clinical picture of pain and decreased range of motion.
Acute rotator cuff tears
Tearing sensation
Immediate severe localised pain
Reduced strength
Symptomatic clicking
Reduced and worsening pain with movements
Affects daily activities (personal care, lifting, reaching etc)
Chronic rotator cuff tears
Generalized deep dull ache, sharp onset of pain with movements
Global shoulder weakness
Reduced movements and daily activities (especially moving to the side, reaching behind back)
When to seek medical treatment
See your doctor or a physiotherapist if you experience any of the following symptoms in the shoulder:
Pain, especially pain that does not improve with rest
Swelling, redness or tenderness around the joint
Shoulder weakness
Reduced shoulder movement
For more severe rotator cuff injuries, you may require immediate medical attention.
Seek immediate medical attention if you experience the following symptoms:
Sudden, severe pain
Visible joint deformity
Inability to move or use your shoulder joint
Sudden swelling, discoloration
Diagnosis
To diagnoses an injured rotator cuff, your physiotherapist will begin with a thorough subjective and physical examination of your shoulder.
Subjective assessment
Your physiotherapist will begin with a thorough subjective assessment inquiring about your signs and symptoms of an acute injury as well as any symptoms that may suggest a more long-term problem.
Physical assessment
The physical examination often involves observation to look for muscle wasting, deformities, and/or changes in appearance of the injured shoulder to the unaffected side. Your physiotherapist will also palpate different areas of the shoulder complex to find the area of pain or tenderness. Further examination will involve assessment of movement and strength to establish injury to muscles or tendons.
Radiology
In addition, your physiotherapist may refer you for imaging tests to diagnosis the cause of your symptoms:
MRI: provides detailed imaging of areas injured (referred by doctors, specialists or surgeons)
Treatment
Early diagnosis and treatment of a rotator cuff tear may prevent symptoms such as loss of strength and loss of motion from setting in.
Initial treatment of rotator cuff tendinitis involves managing pain and swelling to promote healing. This can be done by:
avoiding activities that cause pain
applying cold packs to your shoulder three to four times per day
taking anti-inflammatory medications like ibuprofen and naproxen
Rehabilitation plays a critical role in both the nonsurgical and surgical treatment of a rotator cuff tear.
When a tear occurs, there is frequently atrophy of the muscles around the arm and loss of motion of the shoulder. An individualized physiotherapy program is necessary to regain strength and improve function in the shoulder.
Physical therapy
Physiotherapy will initially consist of passive exercises to help restore range of motion and ease pain.
Once the pain is under control, your physiotherapist will prescribe exercises to help regain strength in your arm and shoulder.
Steroid injection
If you have persisting symptoms, your physiotherapist may recommend a steroid injection. This is injected into the tendon to reduce inflammation, which reduces pain.
Surgery
Surgery is recommended if you have persistent pain or weakness in your shoulder that does not improve with nonsurgical treatment. In which case, your physiotherapist will refer you to surgeon for an opinion of surgical intervention.
Exercises
Range of movement exercise
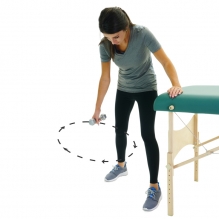
Pendulums
Lean forward with one arm hanging freely. Use your unaffected arm to brace against a chair for support.
With your affected side, gently swing the hanging arm from side to side, forward and back, and in a circular motion for 15-20 seconds each direction.
Slowly return to a standing position.
Repeat 4-5 times a day
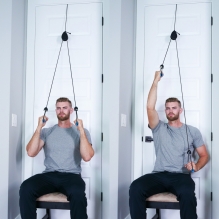
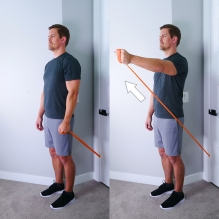
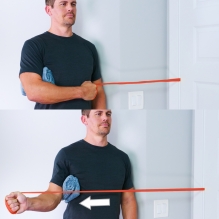
Shoulder pulley (Flexion)
Put a chair against the door and sit so you are facing away from the door.
Grasp the door pulley handles with both hands.
Pull down on the pulley with your unaffected arm. This will lift your injured arm up over your head. Pull it as high as you can.
DO NOT FORCE THE MOVEMENT. Your affected arm should be relaxed. The unaffected arm does the work.
Hold for 5 seconds. Relax and repeat 10-15 times, 3 sets.
Three times a day.
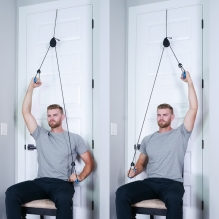
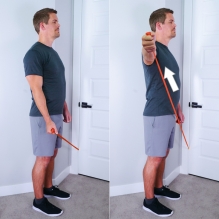
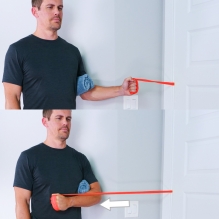
Shoulder pulley (Abduction)
Put a chair against the door and sit so you are facing away from the door.
Using door pulleys slowly pull down with your unaffected arm so that your affected arm raises up and to the side without effort.
Your affected arm should be relaxed. The unaffected arm does the work.
Hold for 5 seconds. Relax and repeat 10-15 times, 3 sets.
Three times a day.
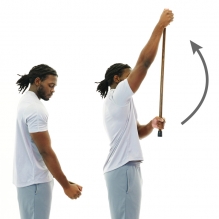
Wand flexion
Stand upright and hold a stick in both hands
Cup the top end of stick with affected hand
Using your unaffected arm hold the stick midway and drive the affected arm forward and up.
Ensure your elbow is straight throughout
Hold for 5 seconds and return to the starting position.
Repeat 10 times.
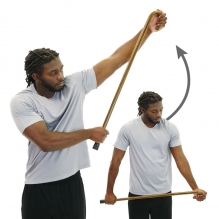
Wand Abduction
Stand upright and hold a stick in both hands
Cup the top end of stick with affected hand
Using your unaffected arm hold the stick midway and drive the affected to the side as high as able.
Ensure your elbow is straight throughout.
Hold for 5 seconds and return to the starting position.
Repeat 10 times.
Strengthening exercises with band
Flexion
Stand on one end of the band while holding the other end with your affected side.
Whilst keeping your elbow straight, lift the band up to 90 degrees to shoulder level.
Hold at the top for 1-2 seconds then lower slowly to starting position.
Attach the resistance band to a secure anchor at belly button height.
Stand with unaffected arm perpendicular to the anchor.
Place a towel between your elbow and your torso to stabilize your elbow
Grab the band using your affected side and then slow pull the band away from your body by squeezing your shoulder blade in towards the middle of your back.
The ankle is the most commonly injured joint in sport. This does not exclude other people such as active hikers, beach goers and even your average Sunday stroller. Good news though – your ankle injury is highly likely to be uncomplicated.
It is still vital that your ankle is examined, evaluated and treated early. This will ensure a swift return to activity and prevent further complications.
The road to recovery
Your clinician will ask you some questions related to how you injured your ankle, pain, instability and any past episodes of injury. The earlier you get your ankle checked, the sooner your recovery will begin.
Keeping a mental note of things like initial pain, swelling, ability to walk and balance will go a long way in assisting your clinician to making an accurate diagnosis.
Investigations
In most cases, initial X – rays are done to rule out broken bones.
Ultrasounds can be used to diagnose some ligament and tendon damage.
MRI is the best form of imaging but this does come at a higher cost and higher exposure to radiation. These are usually done after failed conservative treatment or in instances where pain remains high for longer periods.
A CT scan is helpful with complicated foot and ankle fractures. It will normally be ordered by a specialist surgeon who is planning for an operation.
What to look out for
Ankle sprains:
This is normally a twisting injury that causes a stretch or tear of ligaments surrounding the ankle. Your health care professional will provide you with all the information and tools you need for recovery.
These heal relatively quickly when the outside border of the foot is affected and a little slower when the inside border of the ankle is affected.
You will normally feel pain on certain ankle movements, stiffness in the ankle and experience some swelling and bruising.
Ankle Fractures:
These normally present with swelling, bruising and pain initially – although not always. In some cases, it is too painful to put weight on the ankle.
They are usually best confirmed with X – ray and specialist referral.
Management may be surgical or non-surgical depending on the severity and site of the fracture.
Fractures generally take longer to recover compared to sprains.
What treatment to expect
Acute phase:
Your healthcare professional will normally initiate techniques to minimise your pain and swelling with rest, ice, compression and elevation.
Analgesia and anti – inflammatory medication may also be used.
Strapping may be used for stability at this stage and can be done by your physiotherapist.
You will also be encouraged to increase movement and begin strengthening.
Rehabilitation phase:
Balance and proprioceptive exercises will be given to you by your physiotherapist.
Strengthening will continue and running will start soon.
Once running in a linear motion pain free, you will progress to sport specific exercises.
Finally, you will return to sport or previous function such as trekking with a graded program.
Strapping may continue for up to 12 months after your injury in order to prevent re–injury.
What can you do on the day of the injury?
Rest by reducing time spent walking or standing. This will help the ankle to heal.
Ice the ankle for up to 20 minutes every couple of hours.
Compress the ankle with a firm bandage during the day and remove the bandage at night.
Elevate the leg.
Attempt circulatory exercises such as ankle circles and foot pumps (About 10 – 30 repetitions every couple of hours).
Contact your health professional or physiotherapist in order to make appointment for assessment.
If you are unable to stand on your leg or have excruciating pain in the ankle, head on to the local emergency department for immediate investigation.
Remember, your injury will heal and you will recover!
To find your nearest Physio Fusion clinic and book an appointment call 09 6266186 or visit our websitehttps://physiofusion.co.nz
Headaches happen for lots of reason and can be cause by several sources- both primary and secondary. Once major “red flags” are ruled out, understanding the type of headache is important in order to have it properly addressed.
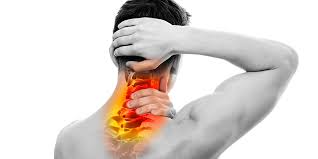
A cervicogenic headache is a secondary headache arising from a musculoskeletal dysfunction within the cervical spine, and is a disorder that many physiotherapists treat. The main players that are typically involved in generating the pain are the joints, discs, ligaments, nerves and/or muscles found in the upper portion of the neck.
Characteristics of a Cervicogenic Headache:
Pain usually one sided or one side dominant
Pain originates from the back of the neck and radiates along the forehead, orbits around the eye, temple area and ear.
Steady ache or dull, diffuse pain that travels into shoulder region
Limited neck movement especially when turning head
Tenderness to touch at the muscles at the base of the head.
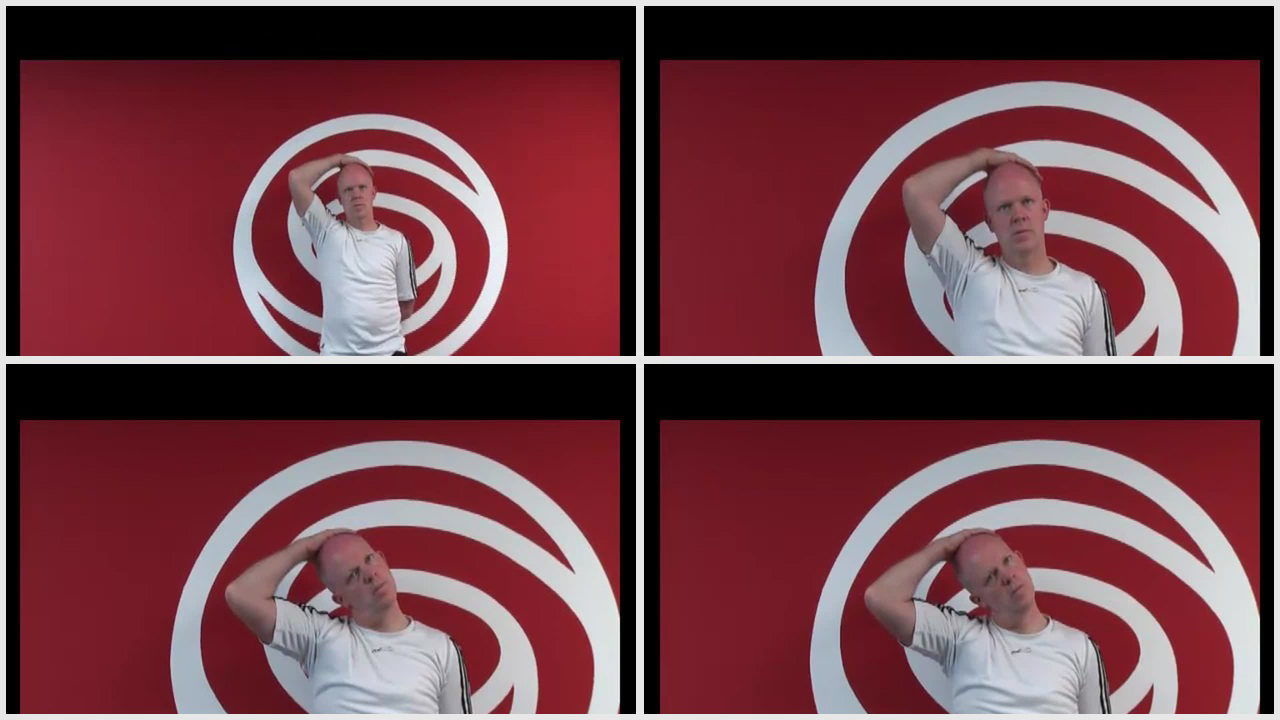
Here are some exercises that would help alleviate your pain:
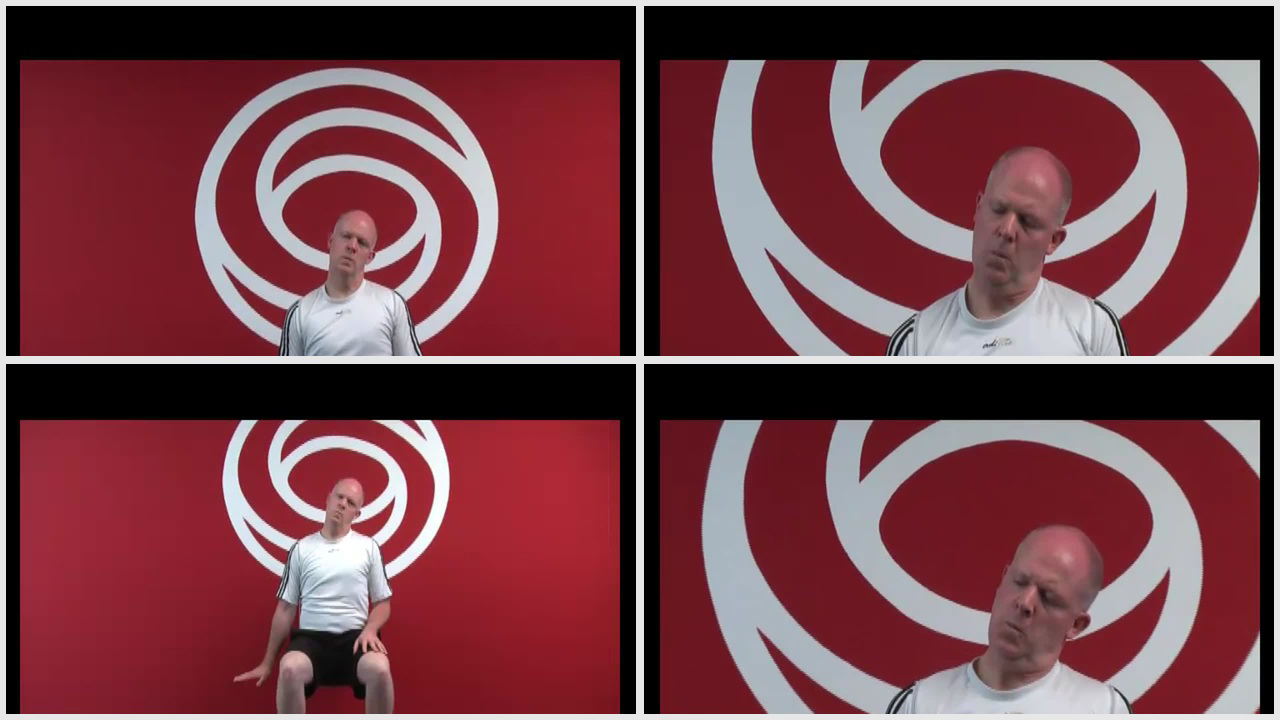
Cervical side flexion with chin tuck
Sit upright in a chair.
With your shoulders relaxed, relax one arm to your side.
Drop your opposite ear to your shoulder until a stretch is felt.
Using your fingers, tuck your chin in, as to resemble a double chin.
Gently release pressure with your fingers and hold this position.
Relax and repeat
2. Levator stretch Neck stretch – levator scapula
Start in a seated position.
Place the hand of the side you want to stretch down by your side.
Tilt your head forwards and to the opposite side at an angle, as if you are trying to
look at your armpit.
Keeping your back straight and upright, continue to tilt your head down until you
feel a stretch from the base of your skull down into your shoulder blade.
3. Neck stretching (Upper trapezius)
Stand up straight.
Take the hand on the symptomatic side and place it behind your back.
Take your other hand and place it on your head.
Tilt your ear directly down towards your shoulder and hold this position.
You should feel a stretch down the side of your neck.
If you believe you experience Cervicogenic Headaches get in touch with us https://physiofusion.co.nz/ for an in-depth assessment and lets knock out those headaches and decrease you dependence on pain meds
I know how hard it can be when it comes to working out and its really easy to find an excuse to avoid lockdown workouts but it’s not just about staying in shape its also about keeping active to feel mentally strong. We know that exercise does wonders for mental health and at a time where its all uncertainty, anxiety, and a daily dose of doom and gloom, we all need to work out that frustration somewhere!
If you’re struggling with a lack of motivation or negative mindsets there’s only one way to turn it all around: Take ACTION
How much exercise is enough?
You’ve heard the saying something is always better than nothing and that’s the case when it comes to exercise. The current recommendation for adults according to Best Exercises for Health and Weight Loss.org is to aim for 150 minutes of moderate intensity activity every week (or 75 minutes of vigorous intensity) with two sessions of strength building activities per week. That’s about 30 minutes of movement, five times per week.
This is a quick full body routine:
Bodyweight Squats
Stand with your feet shoulder-width apart. Engage your core muscles and gently squat down. As you squat, bend from your hips. Keep your back straight as you push your hips back and counterbalance by leaning your torso forwards. Keep your knees aligned with your toes. Your weight should be evenly on your heels and the balls of your feet, not your toes. It might help to image your are trying to sit down in a chair that is too far away from you. Tense your bottom muscles at the bottom of the squat and keep them tense as you straighten back up to the start position.
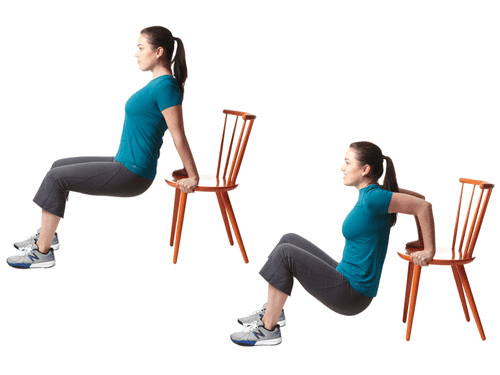
Arm dips
Start in a seated position. Place your hands on the seat of the chair and use your arms to move yourself forwards towards the front of the chair. You will need to move your feet further forwards to help your stability. From this position, use the strength of your arms to slowly lower your body directly down towards the floor and then raise yourself back up. Do not actually sit on the floor and keep your hands close in beside you. Relax and repeat.
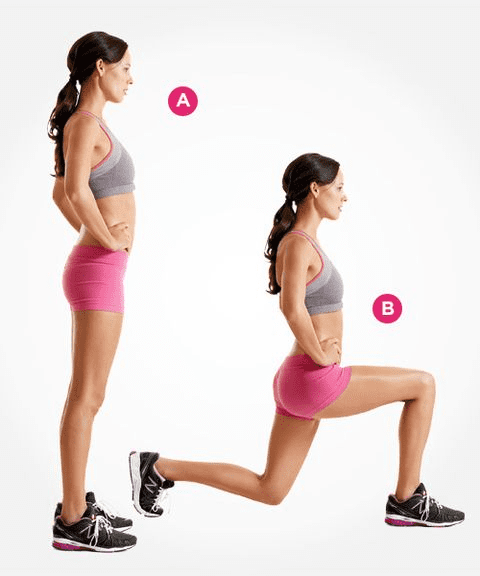
Lunges
Stand straight with your arms to the side or on your hips. Take a large step forwards on your affected leg, then drop your hips directly down between both feet, bending your hips and knees to a 90 degrees. Push back up to the starting position, and repeat. Make sure you take a large enough step that your front knee does not travel over your foot, and ensure your knee travels directly forwards. Keep your body up straight throughout the movement.
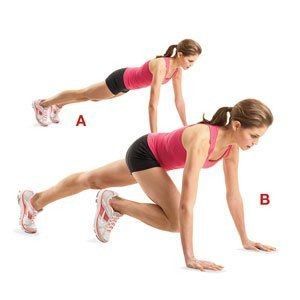
Mountain Climbers
Adopt a plank position insuring your hands are directly beneath your shoulders.
Fully flex one hip and hold.
Extend the bent leg to the rear and repeat the movement pattern on the opposite side
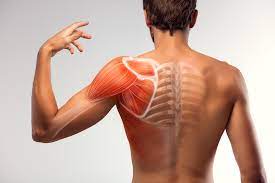
You may have seen videos or posts online about people talking about a specific area of your shoulder known commonly as the “Rotator Cuff” and wondered what they were on about. Your shoulders do a lot of important things you might take for granted! They help you get something off a high shelf, comb your hair, or play a game of cricket.
It’s a complicated process that your body makes look easy. And your rotator cuff is a big part of that. It protects and stabilizes your shoulder joint and lets you move your arms over your head. It’s importance is widely used in sports like swimming, tennis and netball.
In New Zealand healthcare, shoulder injuries have one of the highest prevalence when it comes to ACC claims and overall cost. Within this, rotator cuff injuries are among the most common pathologies affecting New Zealanders. Other pathologies include acromioclavicular injuries, dislocations, osteoarthritis and frozen shoulder.
So, what exactly is the cuff and how does it influence the shoulder?
The rotator cuff (RC) is a combination of four muscles that run through and attach onto specific areas of the humeral head (top of the arm bone).
Supraspinatus, Infraspinatus, Teres minor and Subscapularis are the four muscles comprising the RC and each one plays an important role however they all contribute to shoulder stability:
Supraspinatus
Infraspinatus
Teres Minor
Subscapularis
A thin triangular muscle that helps perform abduction
A thicker, triangular muscle that performs external rotation.
The smallest muscle of the cuff, helps with rotation as well
The largest muscle of the cuff performs internal rotation (arm behind your back!)
Many people suffer from shoulder pain, so here are the most common injuries that can happen at the rotator cuff:
Rotator Cuff Tear:
A rotator cuff tear is often the result of high levels of load over a short amount of time or a high impact force stressing one or more of the tendons/muscles. Fortunately, majority of tears are partial. Tears are more common in people with jobs that involve heavy loading or lifting or in high impact sports like rugby. It also can happen suddenly if you fall on your arm or try to lift something heavy. Common and easily treatable with conservative management by a physiotherapist, a rotator cuff tear can come right.
Rotator Cuff Tendinopathy:
A rotator cuff tendinopathy is the most common shoulder pain complaint/injury resulting in inflammation and irritation of one or more of the cuff tendons. This pathology is more common in individuals who have an occupation where repetitive use of the shoulder, particularly in an overhead position such as carpenters or painters, or individuals that play highly repetitive, throwing sports like tennis, baseball or volleyball. Once again, this injury is treatable by a physiotherapist, conservative management can be very effective in treating these injuries with a thorough, well planned exercise program to help get patients back to doing what they love.
Majority of people experience pain around the shoulder joint, with some movements being highly provocative. Tenderness on touch at the affected site is also common – this helps your physiotherapist hone in on potentially which tendon is causing those problems!
Medical management vs Physio management
Medical management will be advised by your local GP if you decide to see them first. They might prescribe NSAIDs (anti-inflammatory medications such as ibuprofen) to help with the pain you’re experiencing and recommend you see a physiotherapist. Depending on your injury as well as your ability to function, surgery may be an option if conservative medical and physio treatments don’t help. Most people get by without the need of surgery but some tears can be too large to heal without the use of surgical intervention.
Physiotherapy management is designed around reducing pain and disability, restoring range of motion and helping people return to work or sports to perform how they were prior to the injury. In the early stages of these injuries, rest and ice and/or heat are recommended to allow the inflammation to settle – then your physiotherapist will begin to introduce a detailed exercise program, this may include:
Isometric (static hold) exercises
Resisted movements using bands
Range of motion exercises to restore lost movement
Functional loading – task specific or sport specific
If this is successful, the last step is to build back up the strength that was lost over time – this is done by concentrically (against gravity) loading the affected tendons/muscles in a way that they adapt and lay down more tissue, grow and becoming stronger in hopes that you get to return to what you enjoy!