fbpx
Your first step to recovery

Lower Back Pain with Deadlifting

Deadlifting is one of the most very versatile exercises in the gym. There are about 11 variations of the exercise, whether you are doing it with dumbbells, kettle bells, barbells or traps bars. The variations and the technical complexity of the exercise can be extremely intimidating for some, especially for those who are combating lower back pain.

While there are multiple factors to consider when determining that causes of lower back pain, the technique and the execution of the exercise is by far the most common cause. Therefore, this blog will focus on the common mistakes you are likely making in the weights room resulting in your persisting lower back pain.


What are the benefits of deadlifts?

Deadlifting is one of the most respected exercises in the gym, often referred to the king or queen of all compound exercises. This means that at one shot of movement you are activating almost every key muscle in your body.
Including your heart – Yes, the heart!

Before we elaborate of the musculoskeletal system, here a little interesting information on why the heart. For starters, the heart is a muscle. Its prime function is to supply nutrients and oxygenated blood throughout the body for effective organ functioning. To do so effectively it regulates the blood pressure and heart rate. So yes – to simply put it deadlifts when done correctly as advised by a health practitioner can have tremendous health benefits on reducing heart rate, blood pressure and improves overall conditioning of the cardiovascular system.

As sides that, from a musculoskeletal stand point there are strategic strength, power, and coordination and aesthetic that are achieved. In the era of computers and laptops and sedentary jobs – Working at a desk for 7-8 hours a day, we become more dominant in using the muscles in the front of our body (the anterior chain) and the muscles in the back (posterior chain) tend to be inactive and weak.

For this reason, the deadlift is particularly regarded as the single most beneficial exercise one can do that targets the entire body at one go, perhaps with more emphasis on the posterior chain.


What muscles are used?

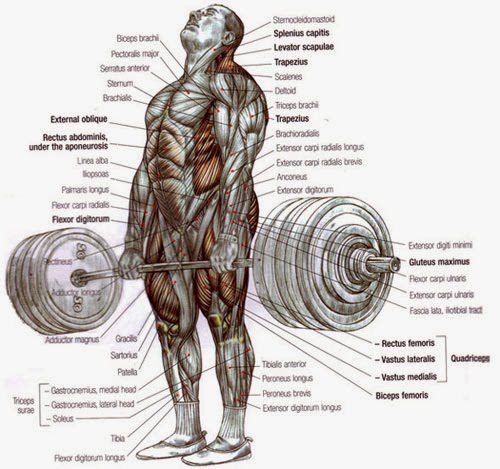
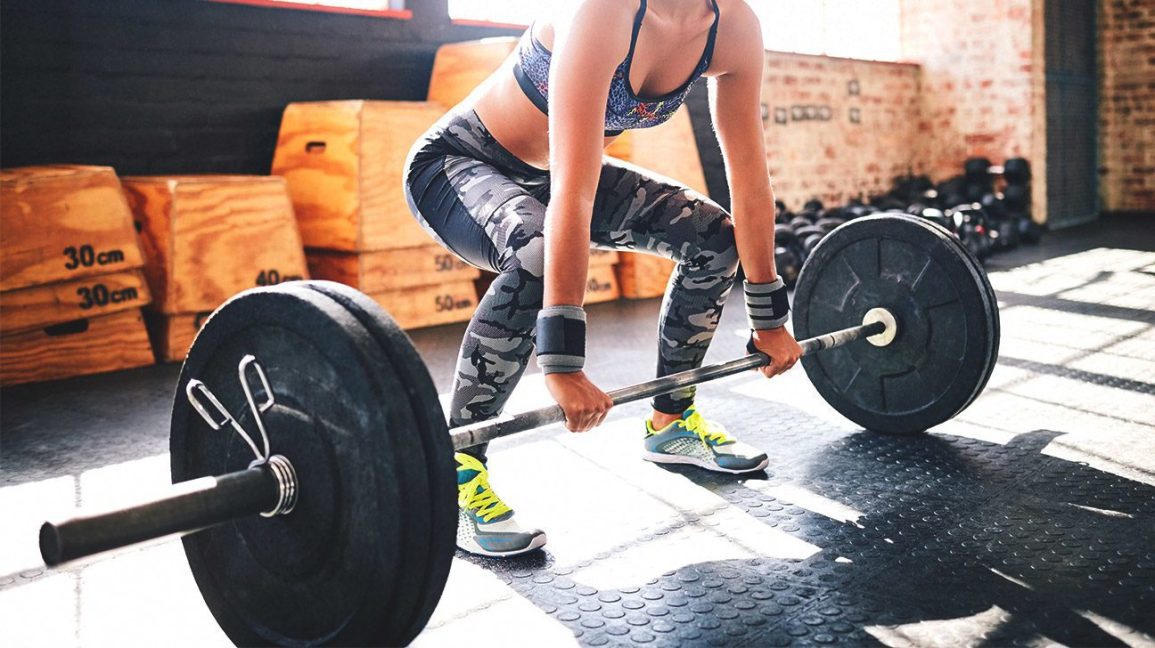
As seen in this picture on a ‘conventional variation’ of a deadlift almost every muscle is highlighted – from the gripping the bar with the hands to gripping the ground with the feet.

  • core muscles
  • gluteus
  • hamstrings
  • adductors
  • quadriceps 

Technique faults to consider

1. Poor core stabilization

Core-stabilisation is the foundation fundamental to almost any given exercises in the gym, let alone a deadlift.
When you are told to ‘brace’ your core – it’s not the sucking in of your belly or holding your breath. It about activating or ‘tightening’ up the key of your ‘core’ to contain the pressure (intra-abdominal pressure) from within. This is absolutely crucial in creating stability and preventing overloading for your spine, especially when lifting heavy. 

For the simplicity of this blog, information around intra-abdominal pressure is kept brief and explained using the ‘soda can’ analogy.

What exactly is ‘core’? 

What many people don’t know is that core is more than just abdominal muscles. The core aka the corset of our mid-section includes the deeper and the outer muscles.

  • DEEP CORE

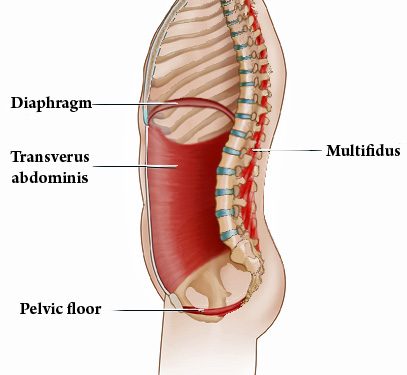
The deeper core, regarded as the main ‘core subsystem’ as seen in this picture essentially involves four muscles
strategically designed for maintaining pressure (intra-abdominal pressure) in our mid-section.

  • OUTER CORE

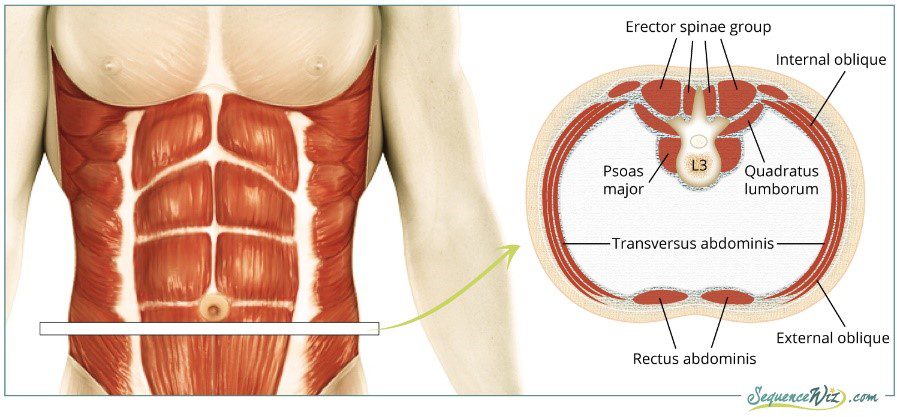
The outer core muscles as shown are stronger and bigger muscles covering most of the surface area of our mid-section. When activated, they support the the deeper core muscles in maintaining the intra-abdominal pressure. They include:

  • Erector spinae
  • External oblique
  • Rectus abdominis
  • Latissimus dorsi

How to brace your ‘core’

  • Sit or stand tall with your hands resting against your abdomen.
  • Take a deep breath in as though you are storing the air in the base of your lungs.
    As you do this must feel your abdomen ballooning out.
  • Now, tighten your abdominal muscles firmly, as would before you cough.
  • Then gradually released your breath whilst keeping your abdominals tight.
    As you do this you will feel pressure building inside your abdomen. 
  • Repeat this cycle until you get comfortable with the bracing.

2. Incorrect set up, initiation, lift and descend 

INCORRECT SET UP 

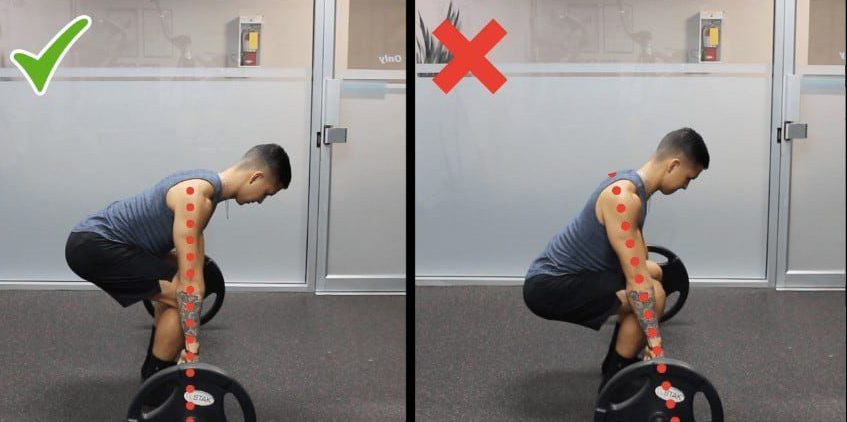
Most people approach the barbell with a squat stance. This means the hips drop too low in line with the knees and the bar is too far. This causes you to stretch your arms forward to reach the bar which prevents the optimal latissimus recruitment needed to secure the bar for the lift.

Tips:

1. Approach the barbell and stand with your feet shoulder width apart.

2. The barbell should be directly in line with your midfoot.

3. Feet can be pointing straight or slightly off centre positioned out.

4. Your knees should be tracking in the same direction as your feet.

5. Bend down to reach the bar and position your hands just outside your knees using an overhand grip. The bar should be close to your shins.

6. From a side view: your hips should be positioned between your shoulder blades and your knees.

7. The barbell should be directly underneath your arm pits. 

INCORRECT INITIATION

Head up and chest up, hyperextended back or head up, chest collapsed and rounded back are the two most common lifting mistakes seen when deadlifting. This means there is inefficient requirement of larger muscle groups in the lower extremities to be the ‘main drivers’ of the lift, instead heavy amounts of load is places on the spine and its surrounding soft-tissues (ligaments, muscles, fascia).  Therefore, the risk of lower back injury is significantly greater and depending on the weights used and the training intensity, injuries can range from simple overly fatigued muscles to significant soft-tissue strain or in worst cases a herniated disc injury. 

Tips:

8. From side view: align your torso with shoulders and hip

9. Activate the latissimus by squeeze your armpits down and slightly pinching your shoulders blades back

10. Before you lift, think about the lift. Rather than pulling the weight up with your upper body, think of bracing or stiffening your upper body and then pushing the ground away from your body with your feet and straightening your knees and your hips (similar to how you push the weight plate away during a leg press)

THE LIFT & DESCEND 


Tips:

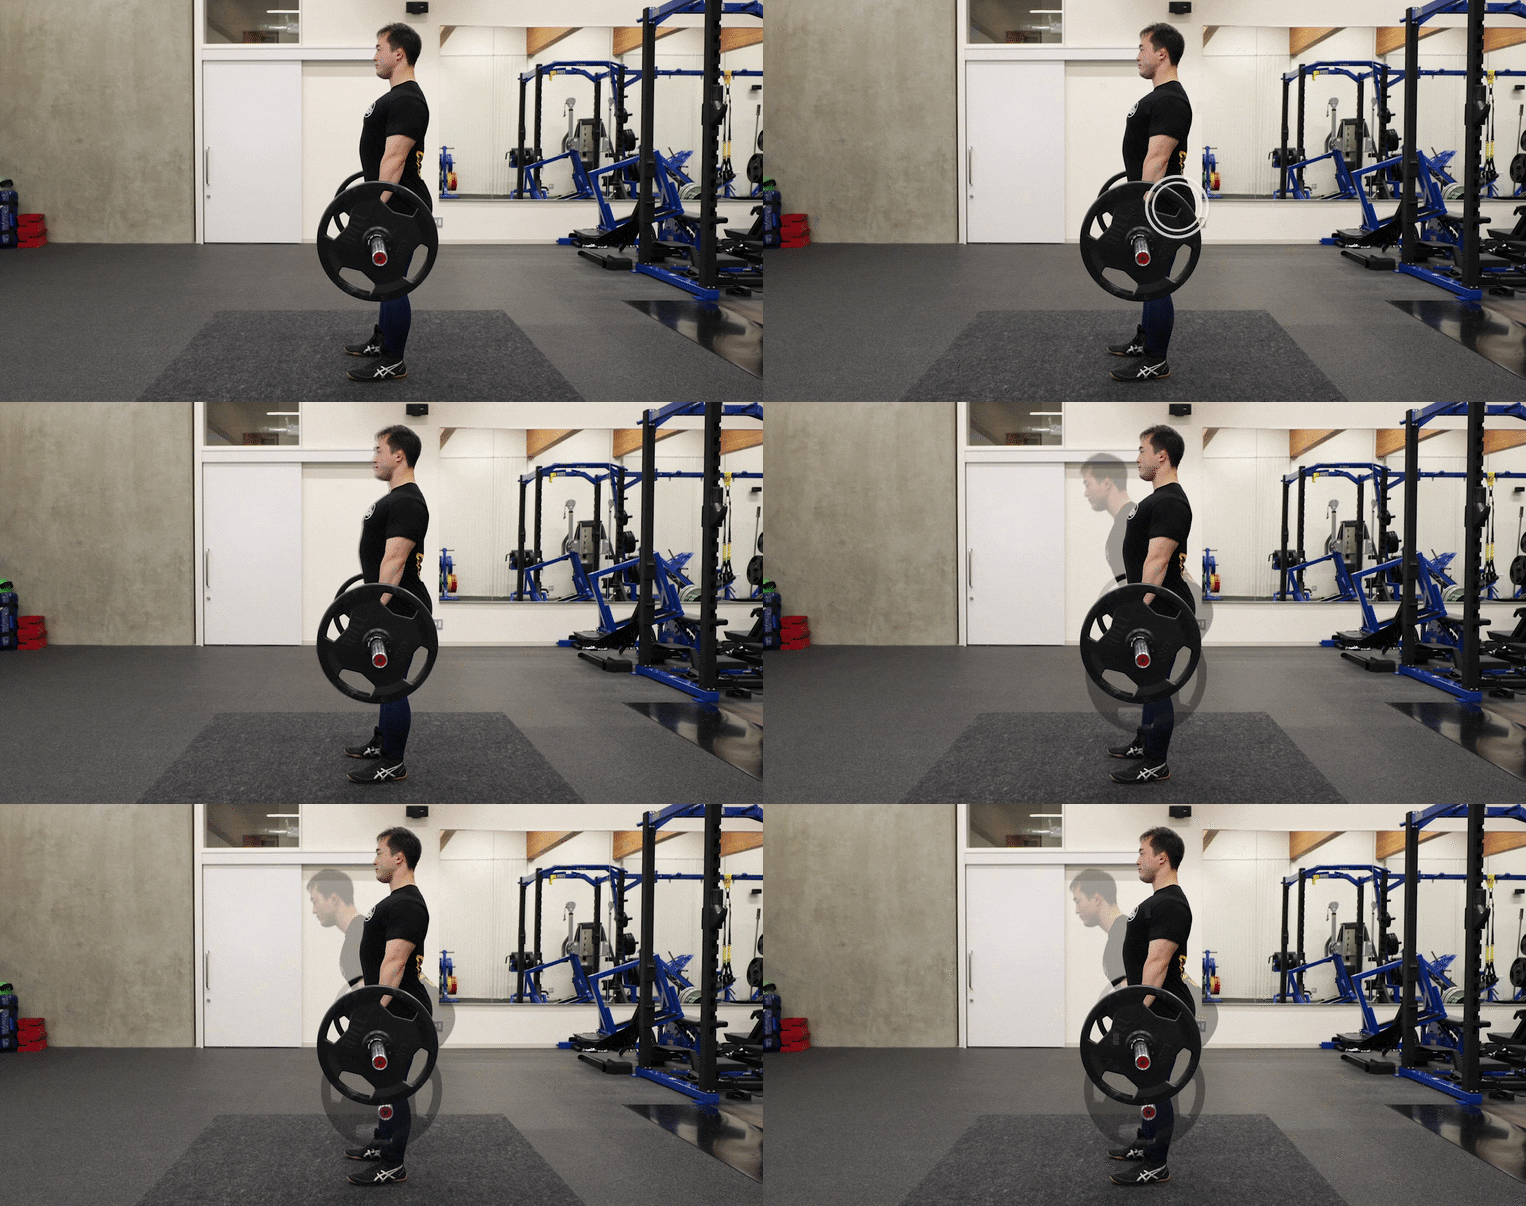
11.  With your posture now set and body braced, push the ground away with your feet to straighten your knees and hips to stand up tall. From the time you initiate the lift until the barbell touches down to the ground, it should travel in a vertical line.

12. When standing tall, avoid hyperextending with your back. Make sure your body remains in the braced position ready to lower the bar down.

13. Push your bottom back, this will allow you to realign your arm pits with the barbell to steady your decline and allow the barbell to travel in a vertical line to the floor.   


To consider:

While these are a few key principles to consider before you execute a perfect ‘conventional deadlift’, there is really no ONE size fits all . Technique to setting up and lifting should be strictly individualized based on your height, flexibility, lifting experience and goals.

So before you consider this all intimidating exercise, whether you are a novice, or someone who is getting back to action after an injury, follow these simple steps:

  • Start slow and start low on weights.
  • Have a gym partner spotting you, an extra pair of eyes to watch your technique will always help
  • Or simply use a mirror – and practice, practice and practice.

It all comes down to efficiency, using the correct muscles to their best activation range as much as possible. So that when you reach close to the fatigue point it’s the major muscles such as the glutes, hamstrings fatiguing not the smaller less robust lower back muscles.

What are muscle knots or myofascial trigger points?

“My neck feels so tight and knotted up”, “can you give my shoulder a rub, there are so many knots in them”, etc.

We have heard people referring to these terms time to time in our daily life, but we have hardly ever put real interest in finding out what the real meaning behind it. So, what are muscle knots? What causes them? But most importantly, what can we do to treat and get rid of them?


What are muscle knots?

Muscle knots are jargon term for a more scientific term of trigger points. A trigger point is a hyperirritable spot and a hard, palpable nodule in a taut band of the skeletal muscle that can be either extremely painful with external pressure or compression onto it such as palpation (they are usually called active trigger points), or not very painful at all even with palpation (these are usually called latent trigger points). Myofascial trigger points can lead to pain, weakness, muscle dysfunction, and sometimes loss of range of motion secondary to muscle tightness.

Often these trigger points can lead to a common condition known as myofascial pain syndrome. It can be an acute condition resulted from a certain overuse injury/event, or chronic condition which resulted from years of repetitive work. It does not only involve the primary muscle, but also its surrounding connective tissue known as fascia (fascia is a thin connective tissue casing and holding all the soft tissues together – imagine that when we process a piece of meat, there is a thin white film on top of the meat that we normally try to remove). Trigger points also cause the muscle to be more sensitive to pain with sensitization of the nerve tissue.

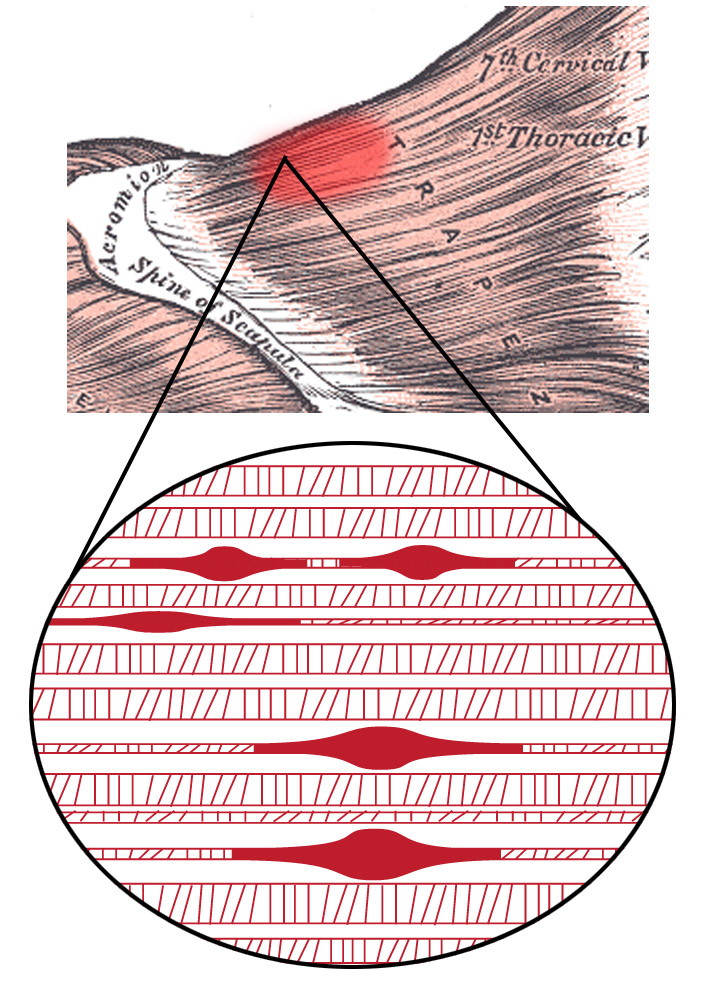
Fig 1. Multiple trigger points in the trapezius under cellular view


Most common types of myofascial trigger points:

  1. Primary or central trigger points are those that cause severe pain locally at the pressure with irradiation according to referred pain map. Usually are based around the centre of a muscle belly – and it is almost always the active trigger points.
  2. Secondary or satellite trigger points arise in response to existing central trigger points in surrounding muscles. They usually spontaneously withdraw when the central trigger point is healed. Can be present in the form of a cluster – and most of the satellite trigger points are latent ones, but they can eventually become active if it is provoked/aggravated.

Etiology/causes of myofascial trigger points:

Muscle knots or trigger points are formed from various reasons, but most common causes are overuse or trauma. However, our bodies are very complex and they can also be formed due to psychological stressors. Muscle knots or trigger points can also be formed from enough stress in the soft tissues with sustained abnormal/bad postures or repetitive activities, and they can begin to elicit pain.

Causes of trigger points:

  • Aging
  • Injury sustained by a fall, stress, or birth trauma
  • Lack of exercise – commonly in sedentary persons between 27.5-55 years, of which 45% of men
  • Bad posture – swayback posture, telephone posture, cross-legged sitting
  • Muscle overuse and respective microtrauma – weightlifting
  • Chronic stress condition – anxiety, depression, psychological stress trauma
  • Vitamin deficiencies – vitamin C, D, B; folic acid; and iron
  • Sleep disturbance
  • Joint problems and hypermobility

Myofascial trigger point referred pain:

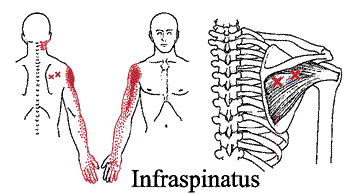
Active trigger points and muscle knots do not only respond to pressure or palpation. They can also be inducing muscle stiffness that spreads its painful ache out and around a central myofascial trigger point. When this happens, these muscle knots can spread and refer/radiate pain towards all corresponding areas. In 1983, two experts in myofascial pain syndrome and its referred pain, Janet G. Travell and David G. Simons, have carried out a thorough research and produced a map of referred pain pattern for various common myofascial trigger points and they called it “Myofascial pain and Dysfunction – The Trigger Point Manual”. Today, specialist clinicians such as chiropractor, osteopath or physiotherapist like us still refer to the textbook in our practice time to time.

Fig 1. Example of infraspinatus’ myofascial trigger point referred pain


Signs and symptoms of trigger points or muscle knots:

  • General sore spots, sensitive to pressure, primarily in muscles.
  • Affected limbs may feel a little heavy, stiff and feeble.
  • Pain mainly elicits at a localised spot that you can almost pinpoint it.
  • Pain can be dull, aching, and nagging.
  • There is usually no clear mechanism of injury, but flare-ups can be exacerbated in response to extremes of position, or exercise.
  • Pain is usually in episodes but episodes can last a long time (for days, weeks, or months).
  • The pain may move around and even to the opposite side of the body. However, it is still a very uncommon symptom, but a distinctive one of trigger points.
  • Any heat modalities such as hot showers, baths and heat packs provide pain relief.
  • The pain is not strongly linked to movement as a low back pain or ankle sprain would be.

What can physiotherapy help to treat myofascial trigger points?

Physiotherapist is well-trained to treat the condition with a variety of useful tools and techniques in together with their knowledge to approach the condition most effectively.

  • Trigger point massage involves applying sustained pressure directly over the irritable trigger point to create a hypoxic environment for the knot, which reduces blood and oxygen supply. The main goal is to relax and free up the contracted/knotted muscle fibers at the trigger point to produce a gradual relaxation.
  • Dry needling therapy is a treatment modality where your trained physiotherapist inserts a few fine needles aiming at the trigger points of the concerned muscle. This causes a cascade of chemicals to be released from the muscles, which can cause a local twitch response, which is a contraction and RELAXATION of the muscle fibres in the contracted tissue. 
  • Massage, especially deep tissue massage.
  • Passive stretching exercises.
  • Postural advice/education that can be contributing to the eliciting of trigger points.
  • Education regarding self-release methods you may apply at home to help relieving pain, muscle knots and myofascial trigger points, such as foam-rolling, massage balls, etc.

EASY STRETCHES DESK STRETCHES

Sitting at a desk working, studying or surfing the net for long hours at a time makes it extremely difficult to maintain proper posture. That’s because our bodies are not designed for hours of idle sitting. So as the clock gets ticking many of us have the tendency lean forward, slouch our shoulders and hunch our backs.

Unfortunately, this increases pressure on multiple areas in your body. This explains why most of us experience pain and stiffness in our neck, shoulders, back and in some cases your tailbone!

So what do I need to do you ask?

The answer is simple, STAND, MOVE AND STRETCH!

It sure does sound easier said than done, especially if you are pressed with time to complete set work tasks. BUT the good news is that stretching or moving is a buildable habit that can be easily implement as you work. It doesn’t take long!

For starters set an alarm to take micro 2–3-minute break for every 20-30 minutes. Use this time to stand up, walk over to a colleague, go for a toilet break, drink water or make yourself tea or a coffee.

Or try out these simple easy stretches while you sit or stand at your desk

So let’s get started!

SPINAL TWIST:

  • Sit up tall, relax your shoulders
  • Cross one leg over the other, then place your opposite elbow on your top thigh.
  • Take a deep breath and as you exhale slowly twist your body (not your neck) and look over your shoulder.
  • Hold for 10 seconds.
  • Slowly return to resting position and repeat on the other side.

BACK ARCHES

  •  Sit tall, set your feet flat on the ground hip-width apart.
  • Rest your hands behind your hips, then slowly arch your back as you gently tilt your head back.
  • If you experience pain or discomfort in your neck or tingling in your arms – do this stretch without head tilt.
  • Hold for 10 seconds, return to start and repeat

ARM REACHES 

  • Sit up tall with your feet flat on the ground.
  • Interlace your fingers and stretch your arms straight as you turn your palms up to the ceiling.
  • Hold this position for 10 seconds and repeat

SHOULDER CIRCLES

  • Sit or stand up tall, feet hip width apart
  • Relax your arms and shoulder, begin by rolling your shoulder backward in a circular motion.
  • Do this 5 times, repeat forward circles

NECK CIRCLES

  • Sit or stand up tall, with feet planted flat on floor
  • Slowly begin to roll your head in a clockwise position
  • Do this 20 seconds, then repeat in a counterclockwise direction

CHEST STRETCH


  • Stand close to wall or a door frame
  • Place your forearm in a 90-degree angle at shoulder height.
  • Take one step forward on the leg closest to the wall and slowly rotate your chest away until you feel a stretch across your chest.
  • Do not hunch or round your shoulders.
  • Hold the stretch for 20 seconds, repeat
  • Do this both for both sides

BACK EXTENSIONS

  • Stand with your legs at hip width apart and straight.
  • Place your hands on your hips.
  • Lean your body backwards, trying to arch in the lower back as much as you can, lifting your chest up towards the ceiling.
  • Try to avoid allowing your hips to swing forwards too far.
  • Hold this position for 10 seconds, return to start position & repeat 5 times.

 FLOOR REACHES

  • Sit on a chair with upright posture
  • Slowly bend forward to plant your hands on the floor.
  • Hold for 10 seconds, return to start

SHOULDER BLADE SQUEEZE

  • Start in an upright position.
  • Practice bringing your shoulder blades back and down.
  • Picture gently drawing your shoulder blades towards the centre of your lower back.
  • This is a subtle movement, ensure you do not over strain your shoulder blades when performing this action.
  • Hold for 10 seconds, repeat 3-5 times

SHOULDER BLADE STRETCH

  • Clasp your hands together and hold them in front of your body.
  • Push your arms as far forward as you can whilst rounding your shoulder blades.
  • Gently drop your chin down to your chest.
  • Hold this position while you feel a stretch between your shoulder blades.

 WRIST STRETCHES

  • Stretch out your arm straight in front of you with your palm facing away
  • Use your opposite hand to gently pull your palm back
  • Hold for 5 seconds, repeat with your palm facing your body

Stay safe, Stay fit

Our daily routine has been forced to change during the lockdown and it has never been more important to focus on your physical and mental health. The current situation we’re facing is strange, stressful, emotionally exhausting and there is no surprise that the motivation to keep fit has been a bit of a struggle. It is in these disquieting times that exercise can provide much-needed solace.

Research shows that being physically active helps lower cholesterol and blood pressure and can significantly reduce the risk of heart disease, stroke, and diabetes. Physical activity also maintains mass and bone density, reducing the risk of developing osteoporosis (loss of bone density), Sarcopenia (loss of muscle mass), and helps boost one’s immune system, as it flushes bacteria from the lungs and airways, increases white blood cell circulation and raises body temperature, all of which help the body fight infection.

How much Activity is Recommended?

Be active every day, in as many ways as possible. Aim for at least 2 ½ hours of moderate (or 1 ¼ hours of vigorous physical activity) spread throughout the week. The Ministry of Health outlines how much physical activity New Zealanders need to stay healthy https://www.health.govt.nz/your-health/healthy-living/food-activity-and-sleep/physical-activity/how-much-activity-recommended.

Create a Routine

Whether you are looking to maintain an exercise regime or just stay motivated from one day to the next, as your own four walls start to make you feel a bit stir crazy, many people find that it helps to have a set routine. It portions the day into bite-size chunks and allows you to feel a sense of accomplishment as you tick off the day’s tasks.

Few of us are lucky enough to have an exercise bike/treadmill at home. Fortunately, there are plenty of simple exercises that you can do around the house or with household objects that will work instead. If you do not have your own weights at home there are some surprising substitutes you can utilize instead i.e bags of rice or flour, a tin of beans and bottled water can be used, if you need something heavier you can always fill a carrier bag with a few items inside.

1. Squats

Directions:

Lie on the floor and rest on your back. Ensure that your knees are bent, and your feet are touching the floor.

Put your hands behind your head and then lift both your chest and your legs slightly but leave a gap between them.

Go back to the starting position and repeat.

2. Crunches

Crunches are another important exercise for your abs to strengthen your body core.

Directions:

Widen your feet parallel to your shoulder and extend your arms in front of you.

Bend your knees and your hips slightly and then do the traditional squat position.

Push up using your heels and repeat.

3. Stationary Lunge

Directions:

Stand up straight and put your right leg forwards and your left leg backward. It should look like you’re preparing to run.

Place your hands on your hips. Bend your right leg, leaving a little gap between the floor and the knee.

Then, switch your legs and do the same.

These bodyweight exercises are a great way to start your day and get the blood pumping in your body.


Safety during exercise outside

If you’re working from home, getting outside for physical activity will do wonders for your physical and mental health. Regular walking, running or cycling is a great way to stay active and healthy during lockdown, but it is important to keep your distance and stay more than two metres away from others. Plan your route when you’re thinking of heading out for a cycle/jog. If possible try to think of roads, neighborhoods, and parks that will be quieter and less congested. Follow the latest advice about whether you will also need to wear a mask.

Take a Bit of You Time

Fill your own cup first…Being healthy is not just about maintaining an exercise regime and eating right, it is also about staying mentally healthy too. If you are in isolation with your family, it is easy to spend the day making sure they are happy and entertained, but don’t forget to take a bit of time for you. Do a quick meditation or yoga routine while the kids are watching TV or maybe just go into the garden and take a few deep breaths to relieve some stress!

During this time of uncertainty, something we can take control of is our health and well-being. So, whatever your situation, try to keep active, eat healthily, and stay hydrated.

Ngā mihi and stay safe

5 COMMON MISCONCEPTIONS ABOUT PHYSIOTHERAPISTS- PART 1

Myth 1: ‘’Physiotherapy is just massage’’

This is a common phrase people use to describe a physiotherapists role. It is true that as a profession we like to work ‘hands on’. This is because our profession is directly affiliated with the anatomy of our clients and by using touch we can more accurately assess, locate and treat any dysfunctional motions within your body. Our physiotherapists like to use massage as it is a great way reduce pain and improve bodily function but their skill set is much more extensive than this.

Did you know?

There are well over 20 different treatment approaches commonly used by physiotherapists.  These may include, but are not limited to:

  • Exercise prescription.
  • Joint mobilization.
  • Joint manipulation.
  • Instrument mobilization.
  • Muscle energy techniques (improves muscle and joint function).
  • Neurodynamics (mobilization of the nervous system).
  • Taping.
  • Dry needling.
  • Acupuncture.

Myth 2: Always sit up straight! Slouching is bad.

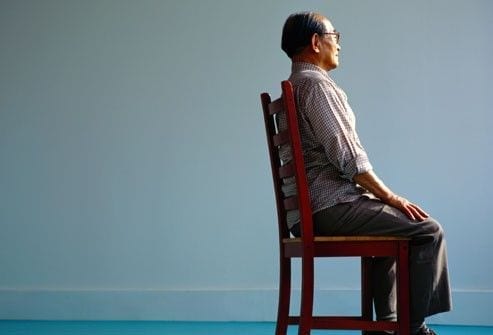
In fact, forcing yourself to adhere to the traditional ‘good posture’ (back straight and shoulders back) may be putting unnecessary tension on your body. That isn’t to say being upright is bad either, but in life we must always find a balance. To reduce stress on your body whilst seated, ensure your back is supported and your feet firmly on the ground. To prevent and reduce the likelihood of back pain we must look to vary our posture frequently throughout the day and ensure we take short breaks to stretch, stand and walk.


Myth 3: Physiotherapy sessions are painful

Physiotherapists aim to help you reduce pain and get you back to doing what you love! Whether your injury is acute or chronic our physios always ensure they work within your pain threshold to help you regain lost movement and function.

Myth 4: I need a referral to see a Physiotherapist’

We have got you covered!

Remember, physios are registered health care professionals. Physio Fusion is a registered ACC provider. This means that if you have had a recent injury (within one year), you can see us directly and we can help you lodge an injury claim directly with ACC. You do not need a referral for your doctor.


Myth 5: Lower back pain …. surgery is my only option

Around 70-90% of the total world population will experience lower back pain during the course of a life time. Symptoms can range from mild to severe and can either last for short or long periods or remain constant. Back pain can be very debilitating and when the pain does not resolve as soon as anticipated many fear that surgery may be the only option. In few cases surgery may be necessary, but for the majority there’s often nothing to fear, and with time and a gradual loading or exercise program, you can make a full recovery.

Did you know ?

Back pain is not always a sign of injury or damage. Each individuals back pain story will be different, and for many non-physical factors play a huge part in their story. These factors can be:

Psychological –

  • Stress.
  • Fear of movement.
  • Depression.

Health related –

  • Sleep deprivation.
  • Physical inactivity.
  • Smoking (nicotine decreases blood flow to your back).
  • Overweight.

Physio Fusions top recommendations for keeping back pain away:

  • Keep active – regular exercise nourishes joints, strengthens muscles, increases blood flow and improves your mood.
  • Sleep well.
  • Maintain a healthy weight by ensuring you maintain proper nutrition and diet.
  • Sit in a chair with good lower back support.
  • Quit smoking.
  • Ensure that when you lift or pick up objects you do so in a safe manner. This is something one of our physiotherapists can guide you with.

See a doctor urgently if you have the following symptoms:

  • Numbness in the groin or buttocks.
  • Loss of bladder or bowel control.
  • Redness or swelling on your back.
  • Difficulty walking.
  • Constant pain, especially at night.
  • Pain that is getting much worse, or spreading up your spine.
  • Numbness or pins and needles in both legs.
  • Feeling unwell with your back pain, such as a fever or significant sweating that wakes you from sleep.